harvst Harvster Manuale utente

Harvst user manual

Introduction
Harvst is not just a product, it’s everything needed to build a productive growing space at
home, on an allotment or in a school yard.
It’s a combination of greenhouse, automation technology, advice and community to help
small areas of cultivation become more productive. Whether that’s an existing raised bed in
a large allotment, or a small corner of an urban backyard.
Your Harvst setup could just be irrigation hardware in a polytunnel or greenhouse, or one of
our fully automated “Harvsters” - smart greenhouses or cold frames designed for
automation, with built-in rainwater collection, irrigation, cooling, heating and lighting.
Giving your plants the environment they need
Plants grow best when they are given a protected environment with the right temperature,
and the right amount of water. The Harvst mini-greenhouses provide shelter from the cold
and wind, as well as a built in irrigation system to do the watering for you. If your Harvster
is near a mains electricity connection, it can provide extra heating and grow lights to extend
your growing season, and even grow greens all year round.
The control box connects to your home or garden WiFi network so that you can monitor
conditions in your Harvster, greenhouse or polytunnel, and change settings from anywhere.
The Harvst control system can run off grid, powered by a small solar panel. Off grid power
is sufficient to run all sensors and irrigation. If you choose to add heaters or grow lights,
then you will need a mains electricity connection.
An internet connection is required, which means that the Harvst system is not suitable
for a remote allotment location, unless you can provide a local wifi hotspot using an
off-the-shelf 3G/4G system. The Harvst WiFi antenna works well up to 50m
line-of-sight. If you are in any doubt that your WiFi signal is strong enough, please
request a WiFi signal test device which we can loan to you before you purchase a full
system.

Step 1 : Choose where to put your Harvster
The Harvster needs to be as level as possible, so that the rainwater collection system
works. A slope of 5% (1 in 20) is just about OK.
Sunshine
Put your Harvster somewhere that gets as much sun as possible; grow lights will help
germinate seeds and provide a bit of top-up light, but they are not a complete substitute for
the sun. The solar panel (if you’re running off grid) can be placed up to 3m away from the
main unit.
Power
Mains power is not needed unless you add heaters and/or grow lights. If you do add mains
power, you will need to work with a registered electrician to install an outside power
socket, or position your Harvster within 5m of an indoor power socket. The mains powered
Harvst control units come with 5m of cable.
Water
If you have a garden hose, you can run a tee’d connection to your Harvster. It can be as far
as you like from the tap.
If you don’t have a hose, you’ll need a pump, and a water tank of some sort. You can use
the Harvster tank, or a water butt if there’s one within 2m of your Harvster. If you live in an
area that doesn’t get much rain, you might want to consider running a gutter offshoot from
another roof onto your Harvster to collect more rainwater.
Base
Harvsters can be placed directly on the ground, on an existing raised bed, or on one of our
Harvster raised beds. Consider how much soil depth you want to have for your plants. At
least 25cm (10”) is wise for many vegetables that are suitable for growing in a Harvster.
A 40cm raised bed under the largest Harvster (1.2m * 2m / 4’ * 7’) will take about 500kg of
soil / compost. That’s about 10 wheelbarrows full - this will vary based on the type of soil
you get and how moist it is.
Containers are great for growing in; the Harvster is designed to take standard 600mm euro
stacking crates.

Step 2 : Build your Harvster
Your Harvster will arrive flat-packed, with a list of components. The lids and end panels
come as a complete assembly.
Log in to the Harvst app to run the interactive build and setup guide. You will have
received an email from us when you bought your Harvster with a link to the app.
You’ll need:
- 8mm ring spanner (or open spanner, but a ring spanner is the easiest)
- 4mm allen key
- Pozidrive (Phillips) screwdriver size PZ2
- A pair of pliers
Allow a half day to build your Harvster, fit the irrigation, wire up the control unit and load it
with your growing medium.

Irrigation
Your Harvster comes with a built in irrigation system.
Sprinkler system
Along the bottom of the front shelf bar is a sprinkler hose. This delivers a good spray of
water for most uses.
Mister system
The mister bar is under the main ridge of your Harvster, and is intended to keep seedlings
damp. It works well in conjunction with moisture wicking capillary mat to keep the bottom
of the soil damp too. Each yellow mister can be turned off individually.
Pump and water tank
If you have a water pump, it will need to sit inside the tank you are using. You can have up
to 2 metres of hose between the pump and the solenoids. Any more and you will lose
pressure and spraying performance.
Put the water tank on the right hand side of the Harvster, drop the pump into the tank and
run the pipe through the hole in the right hand panel, to the water filter which is connected
to the inlet of the solenoids. If you need to extend the hose to your own water butt, you can
use any 13mm hose, with suitable elbow fittings to go around corners. Don’t let the pipe
kink.
Water hose
If you’re using a hose for your Harvster, simply plug it in to the right hand side of the unit.
Make sure all the hose clamps are well secured before turning on the water.
A tip ...
Don’t plant anything yet. You’ll be playing around with the watering system a fair bit while
you get the hang of things, and you don’t want to drown your seeds or plants.

The control system
Control box
The plastic box with the big sticker on the front is the control unit that is the brains of your
Harvster. It fixes on the right hand side, just under the lid. Screw it to the back panel with
any short self tapping screws.
Power (mains)
If you have a mains powered Harvster, it will come with a power supply already wired into
the control unit. Run the mains cable through the notch in the base of the right hand panel,
and across your yard to a suitable power point.
Power (solar)
You’ll have a solar panel which needs to be positioned somewhere that will get as much
sun as possible throughout the day. It can be up to 3 metres away from your Harvster.
Mount it securely, and run the cable into your Harvster appropriately based on where
you’ve mounted the solar panel.
Soil sensors
Your Harvster comes with two black dual-purpose sensors, which will measure soil
moisture as well as soil temperature. These are best placed in an area where the
temperature and moisture doesn’t change too fast; such as a large container of soil, or the
ground. It’s best placed horizontally, just under the surface.
The first soil sensor is what drives the irrigation (and optional heating) for zone 1. The
second sensor (with the red band around it), is used to monitor zone 2. We recommend that
the top shelf is one zone (watered by the mister bar) and the bottom of your Harvster is the
second zone (watered by the sprayer bar).
The soil sensors plug into the 4-pin connector on the control unit, via a Y-splitter. Do not
plug or unplug while the control unit is turned on.
Air temperature sensor
A silver temperature-only sensor comes pre-wired into your control box. You can use this
to monitor any temperature; typically it’s used for outside air temperature, and will show as
“air temp” on the app.

Water pump
If you have a water pump, it plugs into the middle-sized 2-pin connector on the control unit
(the large 2-pin connector is for power, and the smaller one is for the tank level sensor).
Water solenoids
The water solenoids are electronic taps, which determine which zone will be watered when
the pump turns on (or your hose is connected). The manifold wire is plugged into the three
pin connector on the control unit.
Tank level sensor
If you have chosen to use water from a tank, you’ll be supplied with a water tank level
sensor; which triggers an email and/or SMS message when your water tank runs low. The
sensor can be fitted to the built-in tank in a Harvster, or your polytunnel / greenhouse water
butt.
If you’re using your own tank or a water butt, drill a 3.5mm hole and push the sensor in.
The sensor is supplied with 1m of cable. Extension cables are available. The tank level
sensor plugs into the smallest of the 2-pin connectors on the control unit.
Heaters
If you have a mains powered unit, there will be three connectors on the left hand side. The
top two connectors are for heaters; zone 1 at the top and zone 2 below it. Into these
connectors you can plug either Harvst heated seed trays, or heater pads to put into a grow
tub. You can use up to four heaters per zone (unless you are also using grow lights, in
which case use the maximum power tables at the end of this guide).
You might want to set seedling trays at 20 °C to germinate peppers, and salad grow tubs at
15 °C, perhaps. The bigger the tub you try to heat, the slower it will heat up, and the more
heat will be lost at the same time as heat is being put in, so you have a lower achievable
maximum temperature. A single heater pad should be able to keep a large grow tub at
least 10 °C above ambient temperature (even when the outside temperature is freezing).
The pads can reach a maximum theoretical temperature of 40 °C, so it’s possible to get a
small amount of soil very warm.
Place your temperature sensors somewhere sensible so that they report the temperature of
the soil you’re heating, rather than the temperature of the heater pad. Keeping one or two
large tubs in the base of your Harvster warm will also keep the air temperature in the
Harvster to a reasonable level. Put any heated tubs on an insulating layer of wood, if
possible, to keep them off the cold ground.

Grow lights
Grow lights plug into the bottom connector on the left hand side of the control unit. You
can fit up to four grow lights, using a y-splitter cable. Grow lights clip onto the side of seed
trays or grow tubs. We recommend grow lights for germinating seedlings, so fit them on
the top shelf of a tall Harvster, or the right hand side of the shelf of a wide Harvster.

Getting connected
Now that you’ve built your Harvster, plugged it into water and power (or set up the solar
panel and filled the water tank), it’s time to turn it on and put it to work.
Log in to your Harvst account
When we shipped your Harvster, you will have received an email with details of your online
account. Log in now, so that when your Harvster comes online you can see the data and
control the watering. Your account is at https://app.harvst.co.uk
Configure wifi details
1. Plug in the power and turn on. Your Harvst control box will spend 5 seconds trying
to connect to the previous wifi network it was on, if any.
2. If, after 5 seconds, it fails, connect manually:
3. Find the “Harvst-wifi” network on your phone or laptop and connect to it. You’ll be
asked to log in … and will be taken to the wifi setup screen at http://192.168.4.1
4. Click to “configure wifi”.
5. Click the name of your wifi network and enter the password. Click “connect”.
6. If the connection was successful, the beeper will go quiet.
7. After 60 seconds, if no wifi connection has been set up, the unit will exit setup
mode. No irrigation will happen and you won’t be able to access the control panel.
Turn the control unit off and on again to restart the WiFi connection process.
When your Harvster connects for the first time, you’ll get a text message with a link to your
dashboard.
Testing
Mains powered units will be on all the time, so you can connect directly to the device and
turn the water on without any delay. Solar powered units will be asleep most of the time,
and only turn on every 15 minutes when they need to send an update. To wake a solar
powered unit, press the yellow button on the left hand side until you hear a beep. It will
stay awake for 5 minutes.
When your control unit is awake, you can click “access device” to view live data. Here’s
where you can also press the green buttons to water immediately. Run a test pump for
each zone to check that the water is coming out as you wish. Watering manually like this
does not affect your timing or moisture driven watering cycles.
Adjust the pumping time for each zone based on how you choose to automate (see our
website for tips on irrigation settings).
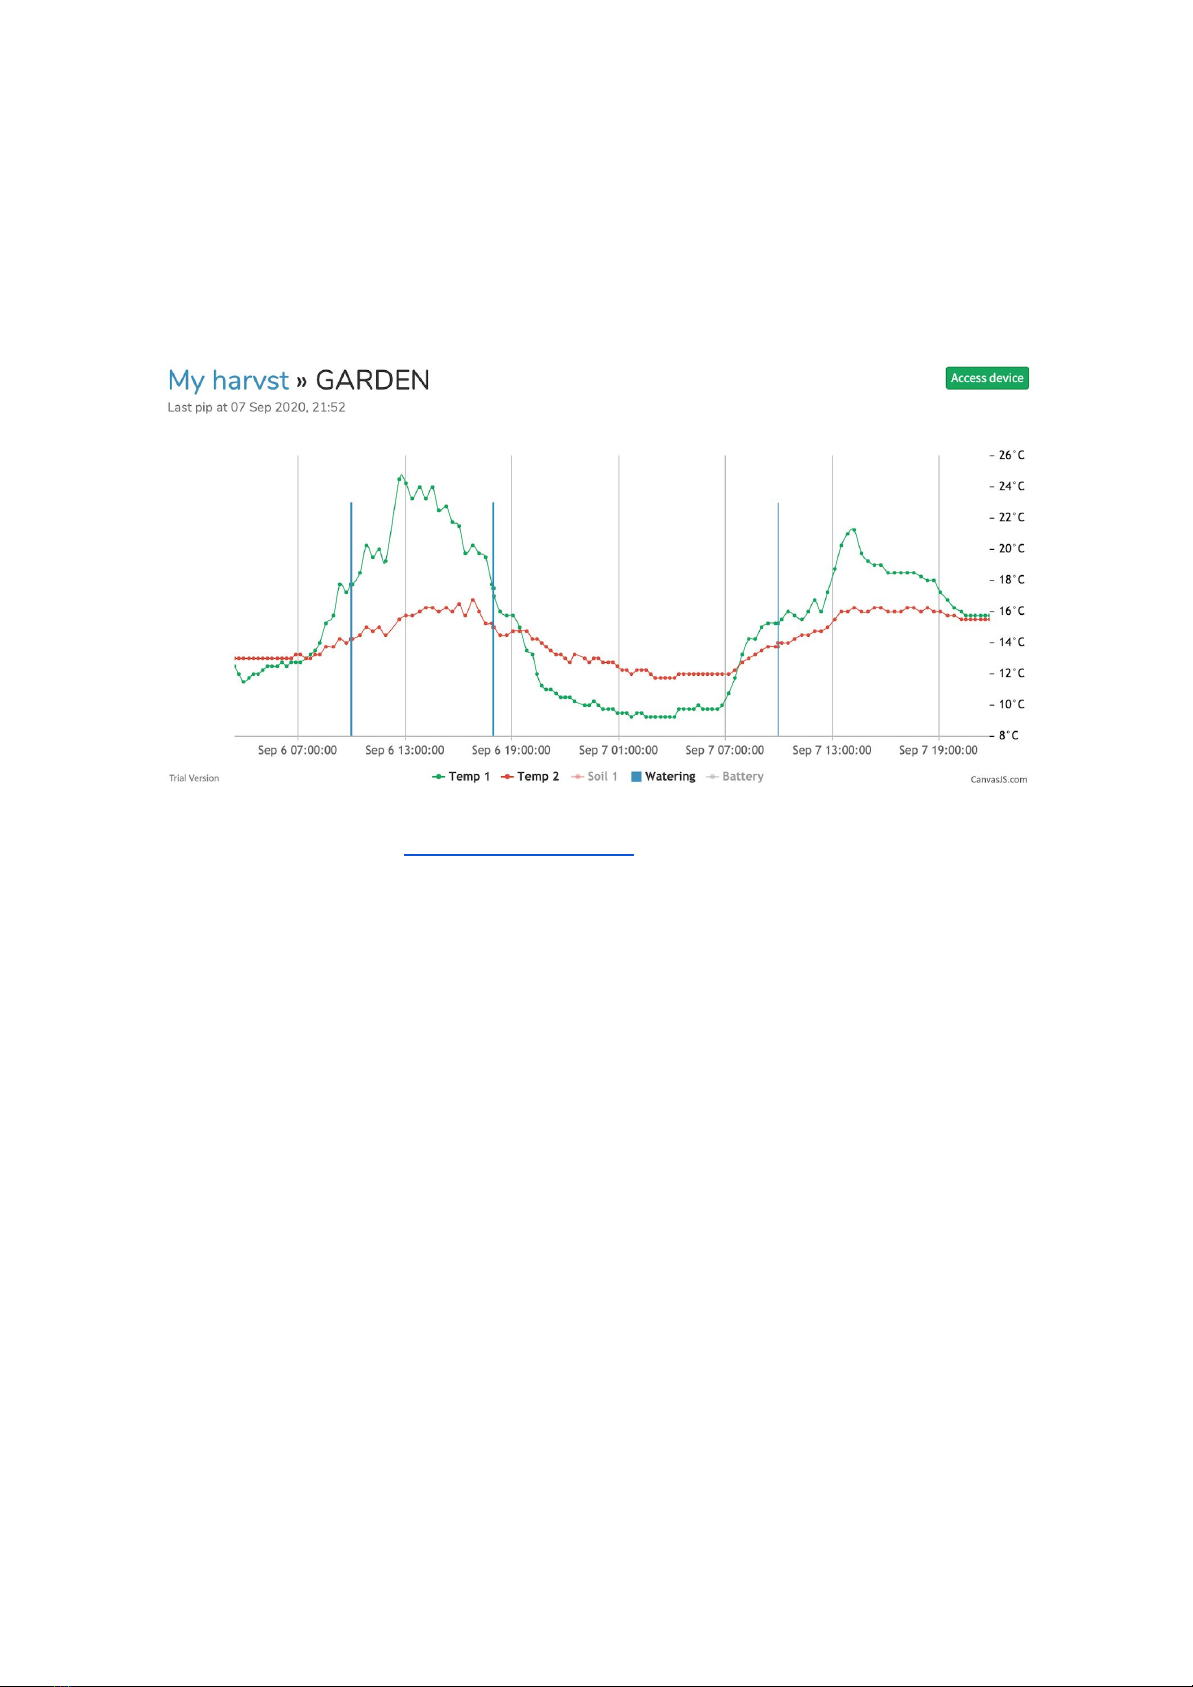
Understanding your online account
Your Harvst control unit will send data to your online Harvst account every 30 minutes so
you can see what’s going on throughout the day and night. Here’s a typical day with two
temperature lines, and blue spikes when it’s watering.
Access your dashboard at https://app.harvst.co.uk
Your dashboard is also where you manage your Harvster settings. The settings are first
saved to the Harvst servers, and are only collected by the control unit when it next sends
an update, which can be up to 30 minutes after you save the settings. Your dashboard will
tell you if your Harvster has not yet updated with the latest settings.
If you are on your home network (the same network that your Harvst control box is on) then
you can click “Live data” from the dashboard to visit the control unit itself and click “get
settings”, to update settings faster. There are also buttons here to boost the watering
without any delay.
The control unit needs to be awake to access it directly; to wake it up, press the button on
the side. You’ll see the light on top flash and hear a beep when it wakes up. It will stay
awake for 5 minutes.
Irrigation controls
Harvst can water your plants based on a timer schedule, using soil moisture, temperature,
or a combination. You can choose to water two zones using different methods.
Indice
Altri manuali harvst Kit serra

harvst
harvst S14 Manuale utente

harvst
harvst S14 Manuale utente

harvst
harvst Sprout S10 Mini Manuale utente

harvst
harvst Sprout S10 Mini Manuale utente

harvst
harvst Sprout S6 Mini Manuale utente

harvst
harvst WaterMate Manuale utente

harvst
harvst Yard Manuale utente

harvst
harvst WaterMate Manuale utente

harvst
harvst S24 Manuale utente

harvst
harvst Terrace Manuale utente


