Seafloor HyDrone ASV Manuale utente

Seaoor Systems, Inc. | Info@seaoorsystems.com | 1 (530) 677 - 1019
HyDrone
SeaoorTM TM
Model # ASV/RCV
Unmanned Survey Vessel

Congratulations on your recent purchase of the Seaoor HyDrone Unmanned Surface Vessel or “USV”.
It was designed specically to allow the hydrographic surveyor to reliably and effectively tackle hydro-
graphic surveys in shallow waters or difcult to reach areas when conventional survey boats are not an
option. The HyDrone features all non-corrosive materials and dual thruster motors for ease of control and
operation.
The HyDrone’s multi-payload remotely controlled surveying function combined with its portability makes
owning and operating this remote control survey vessel affordable to all in the Hydrographic Community.
If you are adding the optional AutoNav™ Auto-Pilot Module:
The survey vessel can be monitored while underway, in both Auto and Manual modes. The mission plan-
ner application runs on board the Hydrone controlled with remote desktop connection and displays the
vessel’s positioning and progress against a background map of the survey area. Battery voltage remain-
ing may be monitored via the remote control unit.
Switching from autonomous operation to manual control is as easy as ipping a switch on the long range
remote control unit. Featuring an optional 2km range upgrade, combined with a survey endurance of
over eight hours, the HyDrone is a viable survey vessel.
Parts List
25/32 allen tool 1
1Deck plate cover removal tool 1
33/16 allen tool 1
HyDrone
SeaoorTM TM
Model # ASV/RCV
Unmanned Survey Vessel
1
4
26
5
Tools List
Number Description QTY
6Venom volt meter 1
5EV-Peak battery charger 1
4Skeg 2
3Starboard HyDrone pontoon 1
2Port HyDrone pontoon 1
1HyDrone frame + Hardware 1
3
v1 - 10/02/19 Page 1 of 15
Seaoor Systems, Inc. | info@seaoorsystems.com | +1 (530) 677 - 1019

HyDrone Safety and Cautions
Always practice caution when working with electricity in water and with the spinning blades of the
propeller. The propellers can rotate up to 3,800 RPM and draw 350W producing a max thrust of
11.2 lbs. each. Keep body parts away from the thruster inlet and outlet to avoid injury.
Do not operate the thrusters for an extended period outside of the water. The motors are
lubricated by the water, therefore vibration and noise will be greater when dry. A slight clicking
noise is normal, especially when operated dry. This is caused by slight movement of the shaft in
the motors.
The thrusters can handle saltwater and sandy environments however, to avoid damage, refrain
from sucking debris into the thruster.
NEVER leave batteries connected while the HyDrone is unattended. Always disconnect all
batteries immediately after use.
• Even with an on/off switch, power will still be bleed off the batteries and they may
become over-discharged and even catch re.
When powering up the HyDrone, always turn on the remote control unit before powering the
boat. If, when powered up, the receiver on the boat does not detect a controller signal, the
remote control unit may unexpectedly enter the fail-safe mode. This could be extremely
dangerous.
Conversely, when shutting down, always power down the boat using the thruster switches
on the boat before shutting down the remote control. Again, if the remote control unit is shut off
before the boat, unexpected and possibly very dangerous maneuvers may occur.
Improperly installed instruments can cause the boat to ll with water. Never try to operate the
HyDrone without properly installed instruments.
• Unloaded weight 20lbs
• Case weight 80-100lbs (Depending on model)
• Cruise speed 1m/s (2knots)
• 8 hours of battery life at cruise speed
• Max speed 4m/s (8knots)
• 22lbs of thrust
• 40lbs of cargo capacity
• impact resistant HDPE construction
• Pontoon width 8 3/8 in (21.28cm) length 45 1/2 (115.57cm)
• Assembled width 29 1/4 (74.3cm) length 45 1/2 (115.57cm)
HyDrone Specications
v1 - 10/02/19 Page 2 of 15
Seaoor Systems, Inc. | info@seaoorsystems.com | +1 (530) 677 - 1019

HyDrone Warranty
Seaoor Systems, Inc. makes every effort to assure its products meet the highest quality, reli-
ability and durability standards and warrants to the original purchaser or purchasing agency
that each HyDrone be free from defects in materials or workmanship for a period of one year
from date of shipment.
Warranty does not apply to defects due directly or indirectly to misuse, negligence or accidents,
repairs or alterations outside of our facilities, use of the HyDrone for purposes other than water
measurements, or use with instruments weighing more than 75 lbs.
Seaoor is not responsible for loss of boat, instruments, and damage to property, injury or death
associated with the use of any of its products or products that may be included or used with
Seaoor products. Seaoor does not warranty third-party products sold by Seaoor. These may
include GPS, depth sounders and other ancillary equipment.
All warranty services are FOB Seaoor’s facility in Shingle Springs, California, U.S.A.
Optional Equipment
AutoNav system
HyFi system
AutoNav w/ integrated HyFi
900MHz Long range kit Servo Steering
HydroLite TM
HydroLite DFX
v1 - 10/02/19 Page 3 of 15
Seaoor Systems, Inc. | info@seaoorsystems.com | +1 (530) 677 - 1019

Open the HyDrone case. The top section of
foam including the frame, ns and other
components can be removed and set aside.
Prepare a raised surface to set the HyDrone
pontoons on top of so all the pontoons sit level
and the thrusters do not hit the ground. Raised
surface should allow the HyDrone pontoons to
sit off of the ground roughly 4 inches (150mm)
and allow the two pontoons to be roughly one
foot (475mm) apart. Remove the Port and
Starboard pontoons from the case and set on
top of prepared surface.
Place the HyDrone frame across the top of both pontoons. Loosely attach the pontoons
to the frame with the 1/4 - 20x1 stainless steel hardware. Once the four bolts are installed
tighten them with the provided 5/32 allen key.
Assembling your HyDrone
Step 1
Step 2
Step 3
v1 - 10/02/19 Page 4 of 15
Seaoor Systems, Inc. | info@seaoorsystems.com | +1 (530) 677 - 1019
Step 4
Turn the HyDrone upside down or leaned onto one side gain access to the bottom of the
HyDrone. Then slide the ns into the n mount channel that are in front of the thrusters.
Make sure to slide the n locking pin into the side of the n mount to secure the ns in
place.
Your HyDrone is now assembled and ready for optional equipment to be installed.
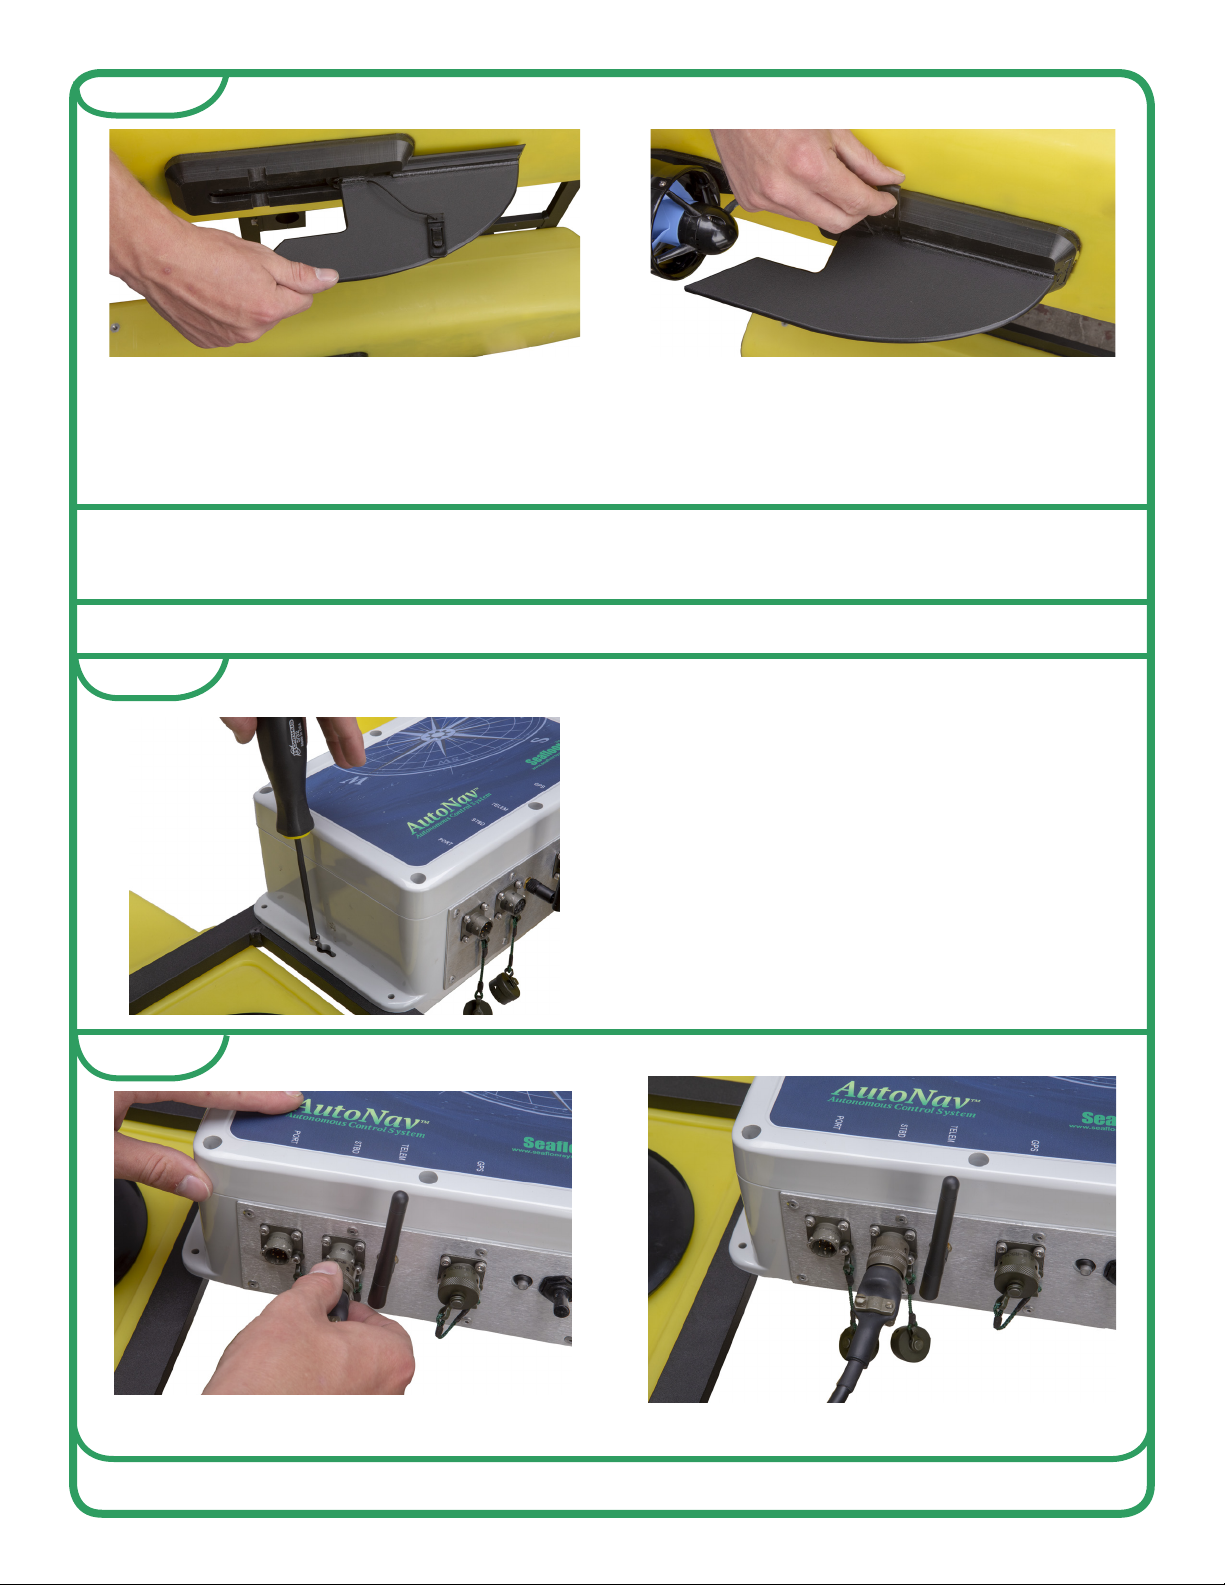
INSTALLING AUTONAV
The HyDrone frame is pre-drilled and
tapped for the AutoNav. Use the 10/32 x 11/4
stainless steel hardware and the provided
5/32 allen key to secure the
AutoNav to HyDrone frame.
Step 1
Step 2
Plug the PORT and STBD power cords into the AutoNav.
v1 - 10/02/19 Page 5 of 15
Seaoor Systems, Inc. | info@seaoorsystems.com | +1 (530) 677 - 1019

The AutoNav is now wired into
the HyDrone and ready for op-
tional equipment.
Plug the GPS into the GPS port on the
AutoNav.
Step 4
Step 3
Plug the corresponding PORT and STBD
cords from the AutoNav into each of the
pontoons.
Step 5
v1 - 10/02/19 Page 6 of 15
Seaoor Systems, Inc. | info@seaoorsystems.com | +1 (530) 677 - 1019
CHARGING 14.8 (4S) BATTERIES
Maintaining proper charging practices is important to prolong your battery life. The
HyDrone includes an EV-Peak charger with necessary cords to charge the 14.8 (4S)
batteries.
It is important to ensure each battery is fully charged before deployment. Operating
endurance of the thruster batteries between charges is up to 8 hours, depending on
operating speed and payload.
BATTERIES SHOULD BE SUPERVISED WHILE CHARGING AND SHOULD NOT BE
LEFT UNATTENDED. ENSURE THAT THE BATTERIES ARE DISCONNECTED AS
SOON AS CHARGING IS COMPLETE.
The 14.8V 4S batteries powers the HyDrone thrusters and the AutoNav, if installed.
**IMPORTANT**
• Do NOT overcharge the batteries! It is up to the end user to monitor the batteries to
prevent explosion or re.
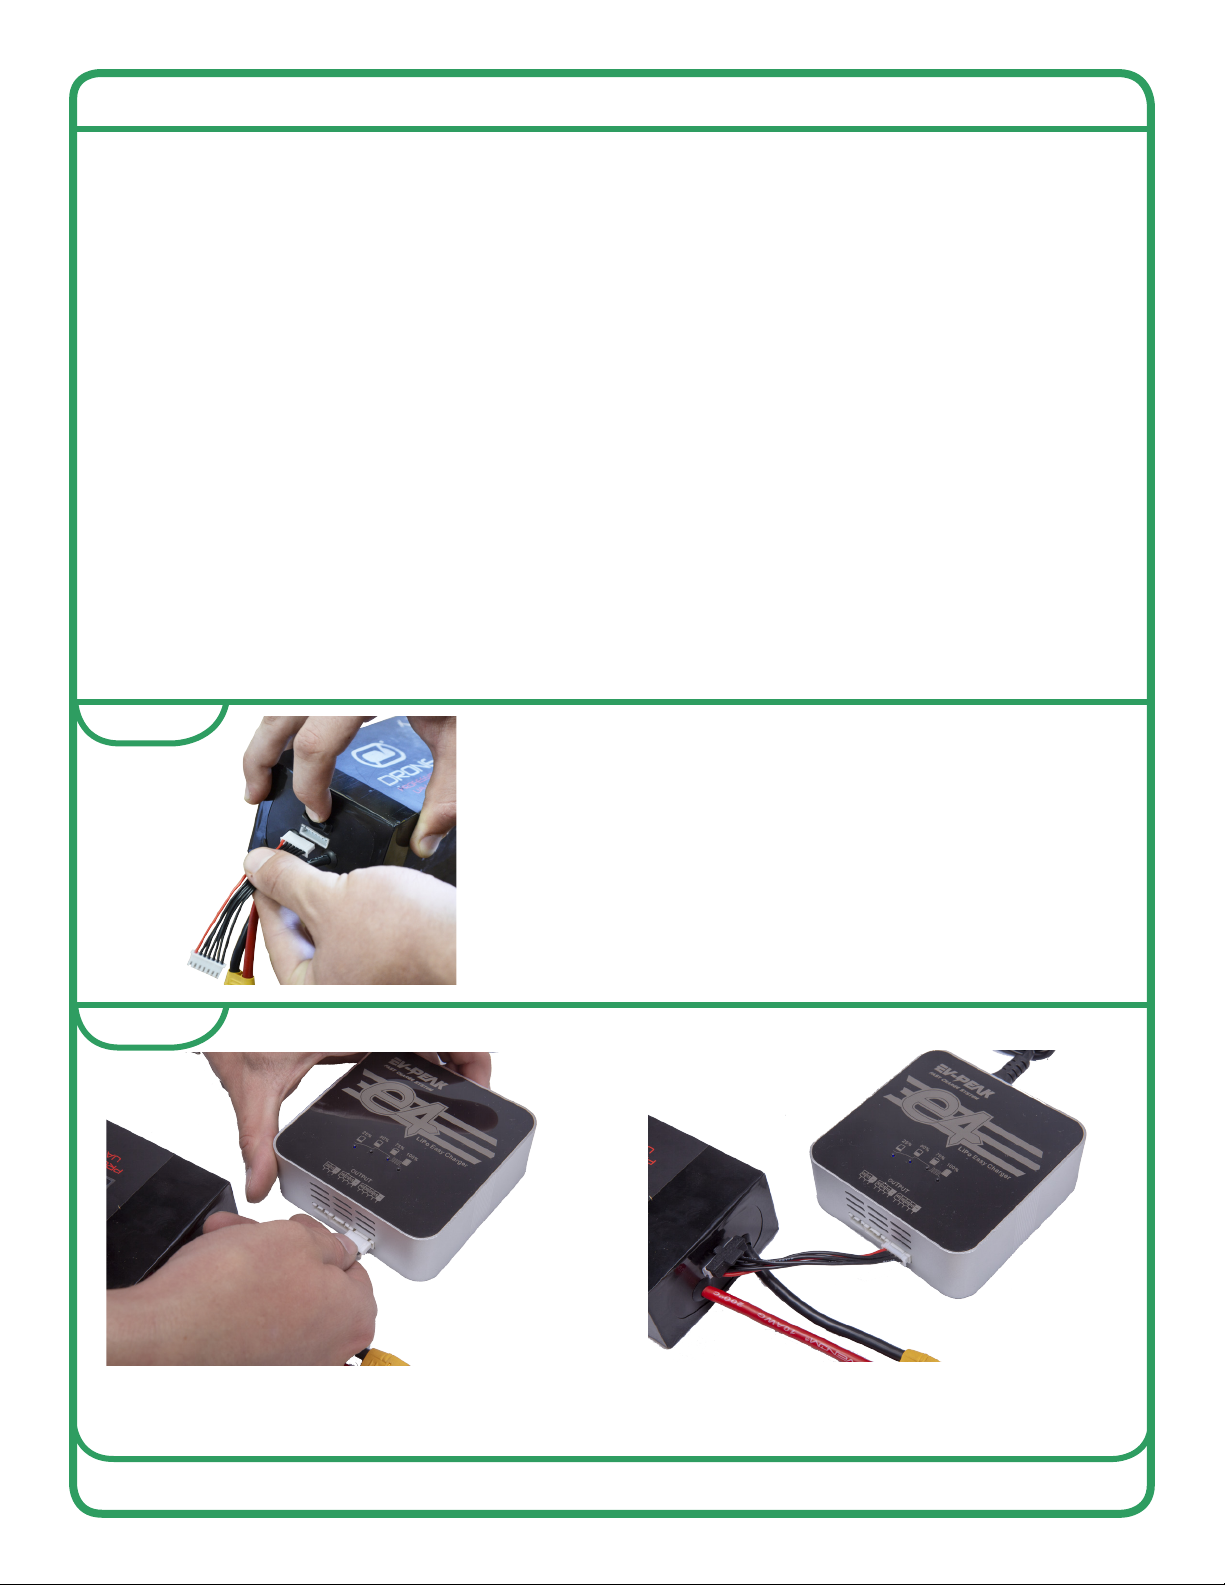
Install balance cords on the batteries that will
be charged.
Plug balance cord into the right most port on the EV-Peak charge labeled, OUTPUT
[4S|3S|2S|1S|-]
Step 1
Step 2
v1 - 10/02/19 Page 7 of 15
Seaoor Systems, Inc. | info@seaoorsystems.com | +1 (530) 677 - 1019
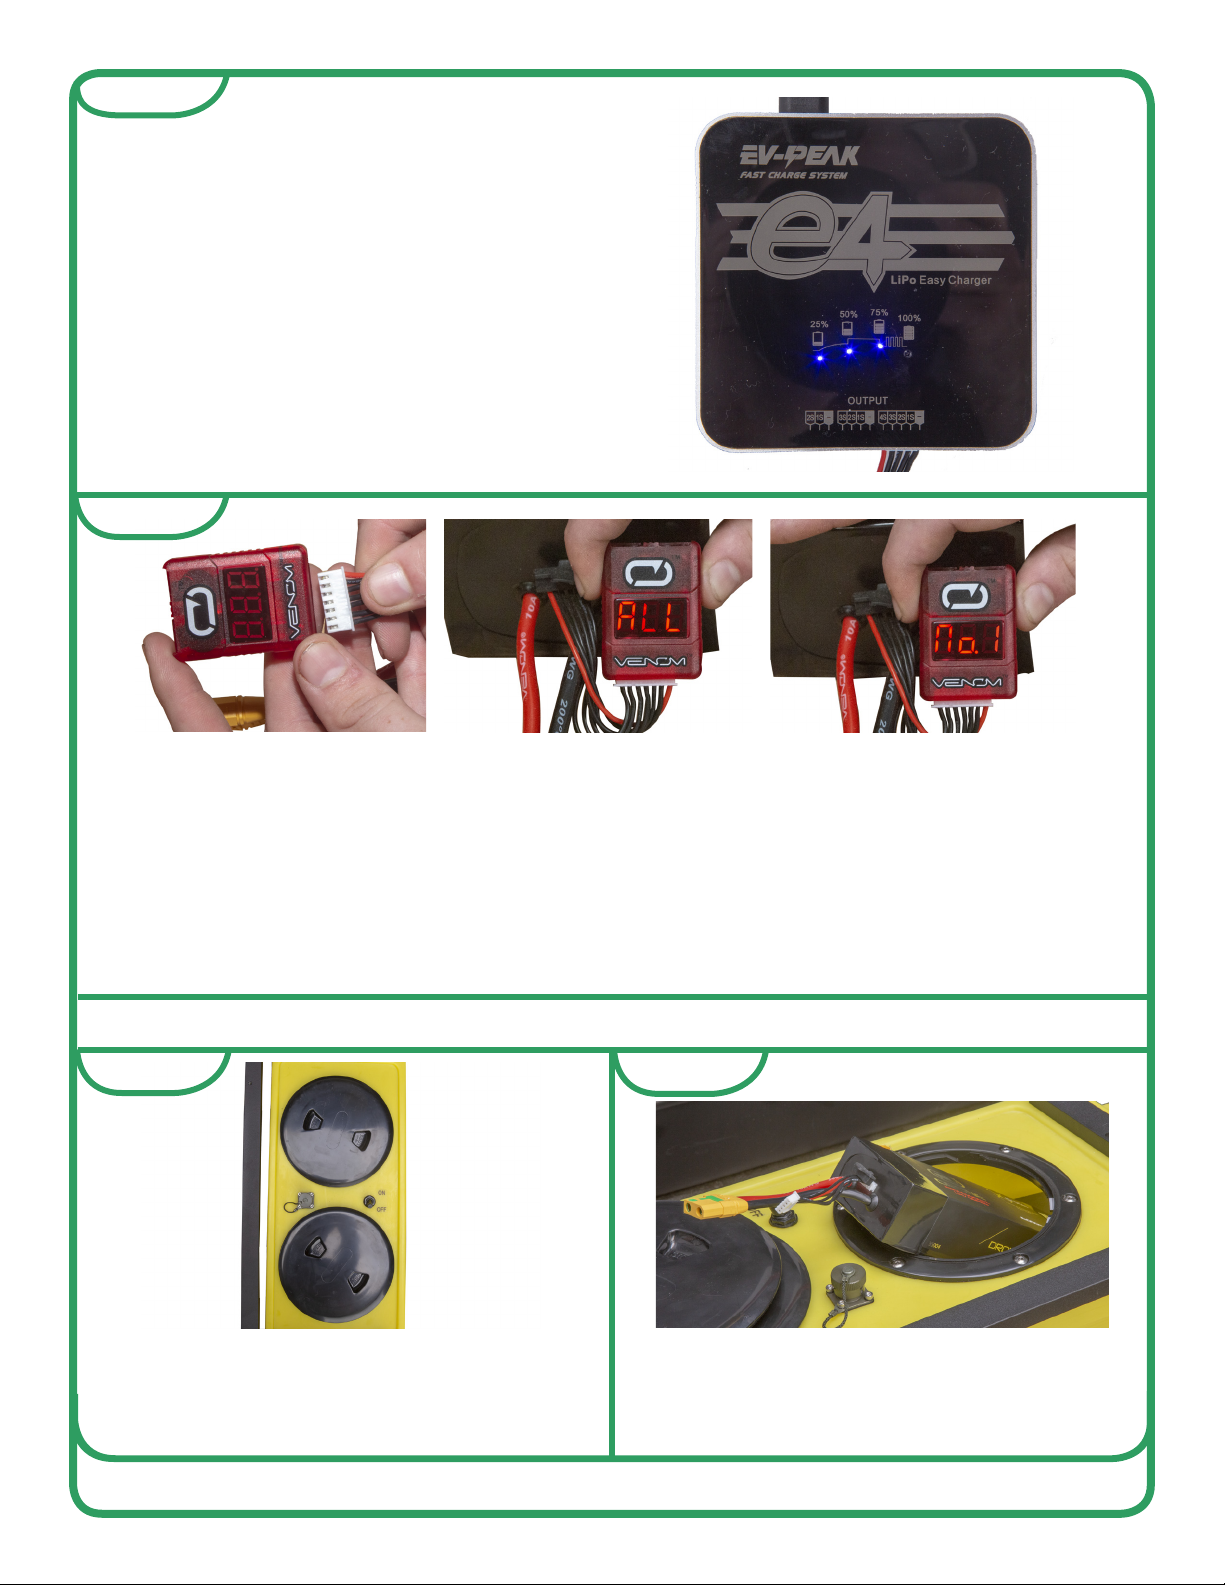
After the battery is fully charged use the supplied voltage meter to check that each cell in the
battery is within 0.1 volts of each other. At full charge each cell will be around 4.2 volts. If the
cells have a difference in voltage greater than 0.1 volts, that battery should be taken out of
service. The voltage meter display will cycle through the cell number, then cell voltage. After
cycling through each cell it will display ALL then the total voltage.
• NOTE - Never allow batteries to drop below 3.3 volts per cell this will permanently damage
the battery. It is a good practice to check the batteries after each use to become familiar
with the batteries and their power consumption.
Step 3
Step 4
Plug the EV-Peak charger into 110v outlet
and the charging lights will illuminate.
Remove battery when 100% light is illumi-
nated.
INSTALLING THE BATTERIES
Step 1
Remove the forward hull deck plate cover.
If it is too tight to remove by hand Seaoor
includes a deck plate cover removal tool to
loosen it.
Step 2
Slide the 14.8 (4S) battery into the hull of
the HyDrone with the cords toward stern.
Make sure the battery is fully seated into
the battery slot.
v1 - 10/02/19 Page 8 of 15
Seaoor Systems, Inc. | info@seaoorsystems.com | +1 (530) 677 - 1019

POWERING UP HYDRONE
Step 3
Plug the 14.8 (4S) battery in to the Hy-
Drone with the XT90 plug.
Repeat for both Port and Starboard
pontoons.
B Ensure the remote-control battery is fully charged. See the remote control manual for
instructions.
C Review the remote control manual if you are not familiar with it.
D Power on remote-control.
E Power on thruster motors with the two on/off switches in the middle of each pontoon.
If AutoNav is installed and the AutoNav power switch is in the ON position, this will turn
AutoNav on.
F Wait approximately 15 seconds for speed controllers to pair. They will go through a
series of tones and LED ashes.
G If using AutoNav - Arm AutoNav from remote control. AutoNav will chime when
armed.
5
6
1
2
3
4
v1 - 10/02/19 Page 9 of 15
Seaoor Systems, Inc. | info@seaoorsystems.com | +1 (530) 677 - 1019
Altri manuali per HyDrone ASV
1
Questo manuale è adatto per i seguenti modelli
1
Indice
Altri manuali Seafloor Strumento di misura


