Shining 3D Transcan-C Manuale utente

Shining 3D Transcan-C_User Manual_V1.4.2
1
Transcan-C
User Manual
V1.4.2

Overview
General
The Manual introduces the information concerning the installation and the use of Transcan-C (hereinafter
referred to as the “Scanner”).
Safety Instructions
Signal
Meaning
Additional information for particular situation.
Improper actions or conditions that may damage the product or injury, and
consequently void your warranty or service contract or lose the customer data or
system data.
The safety instructions that you must precisely follow to avoid injury. Failure to observe
can cause damages to your product, or result in personal injuries.
About the Manual
The User Manual is related to your safety, lawful rights and responsibilities. Read it carefully before installing
and using the product.
SHINING 3D Tech Co., Ltd. (hereinafter referred to as “the Company”) owns complete intellectual property
rights for the contents of this User Manual and, without the written consent of the Company, it is not allowed
to copy, transmit, publish, reedit, compile or translate any contents of this Manual for any purpose or in any
form.
The Manual is a guidance for installing, operating, and maintaining the product, including the Device, software,
or other products provided by the Company, to which the Manual is applicable. The Manual does not serve as
the quality guaranty for the product. While the Company makes all efforts to ensure the applicability of the
content of the Manual, it reserves the right to interpret and modify the content of the Manual and possible
errors and omissions therein. The contents of the Manual are subject to changes without further notice.
Images and diagrams in the Manual are presented to provide convenience to readers. In the event that any
images or diagrams are inconsistent with the physical product, the latter shall prevail.
It is recommended that professionals or technicians shall operate and/or use relevant Products. The Company
shall not be held responsible for any damages and/or losses caused by negligence, environmental factors, or
improper maintenance and use, or any other factors other than due to the quality of the Product.
Disputes arising from the Manual and related Products thereof shall be governed by the laws of the People’s
Republic of China.
In the event of any ambiguity and/or any advice on the contents of the Manual, contact us by the contact
information provided herein.

Shining 3D Transcan-C_User Manual_V1.4.2
2
Contents
Overview............................................................................................................................................I
1. Specification and System Requirements...................................................................................3
1.1. System Requirements ..............................................................................................................................3
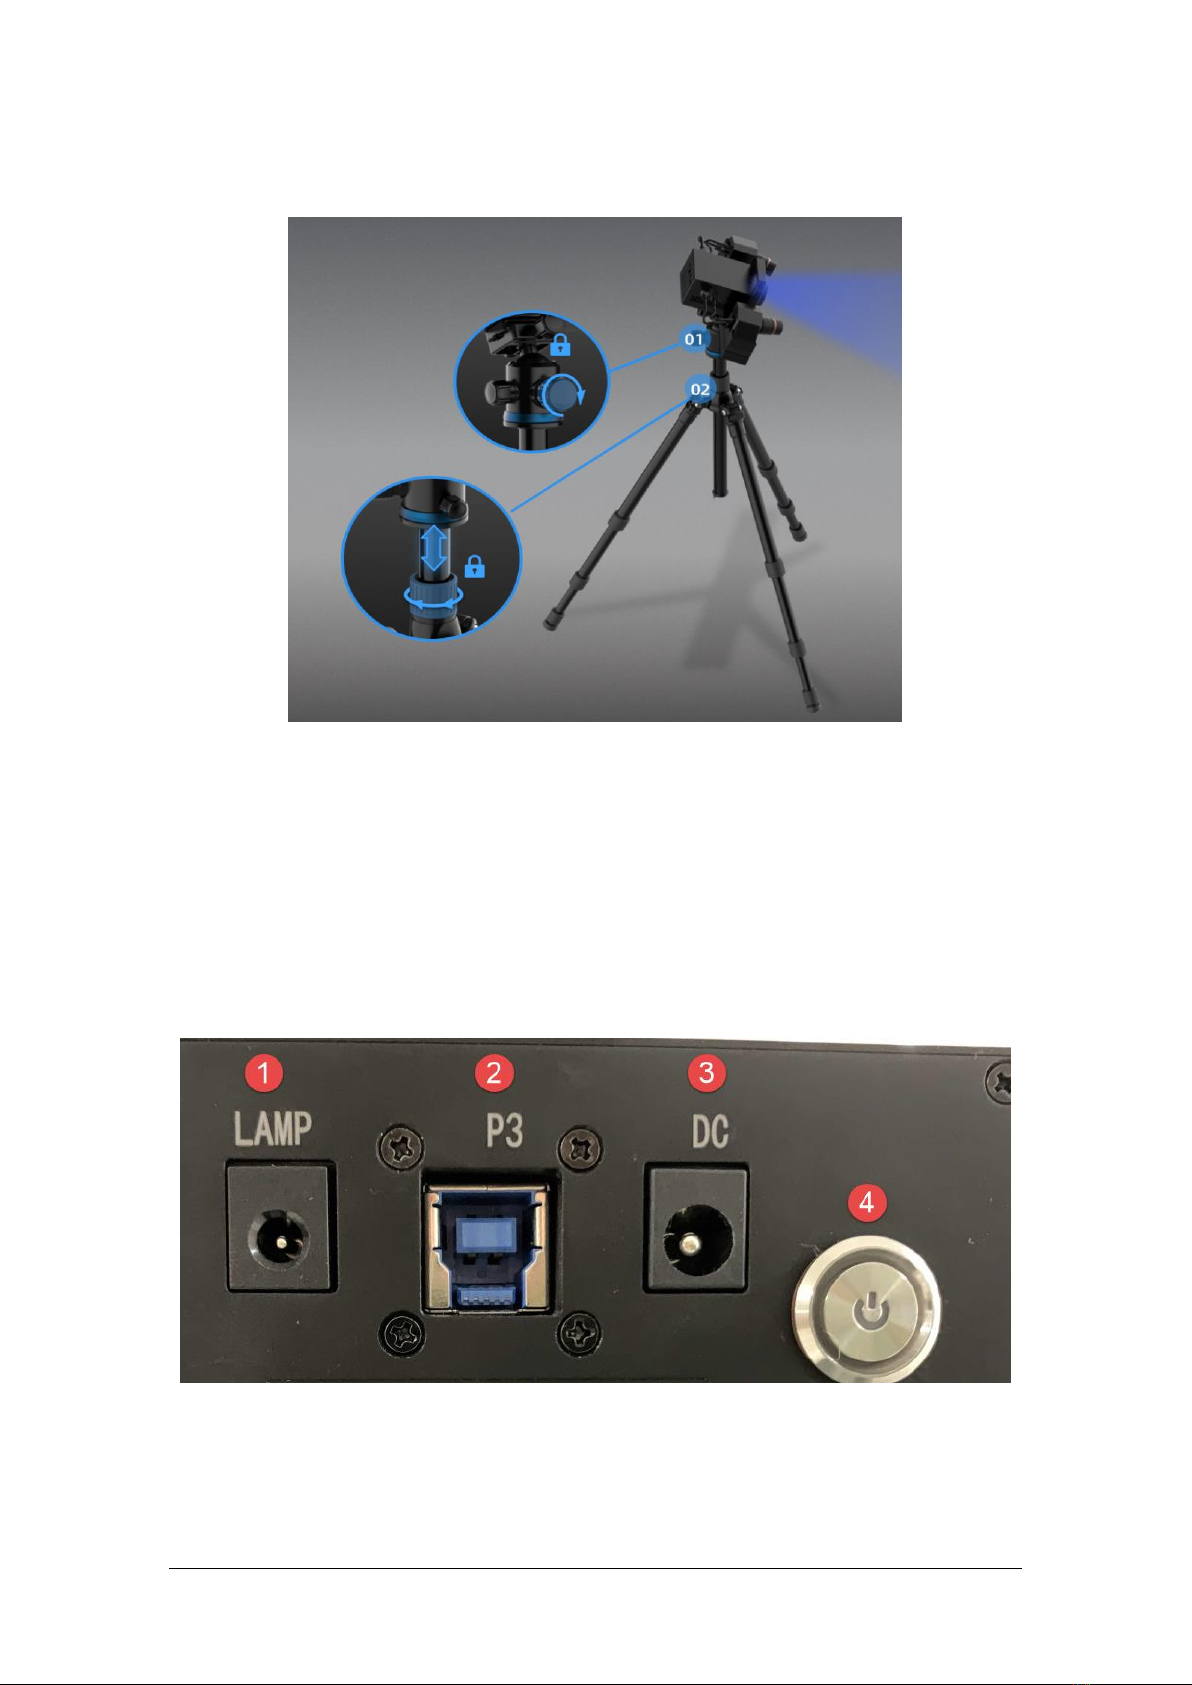
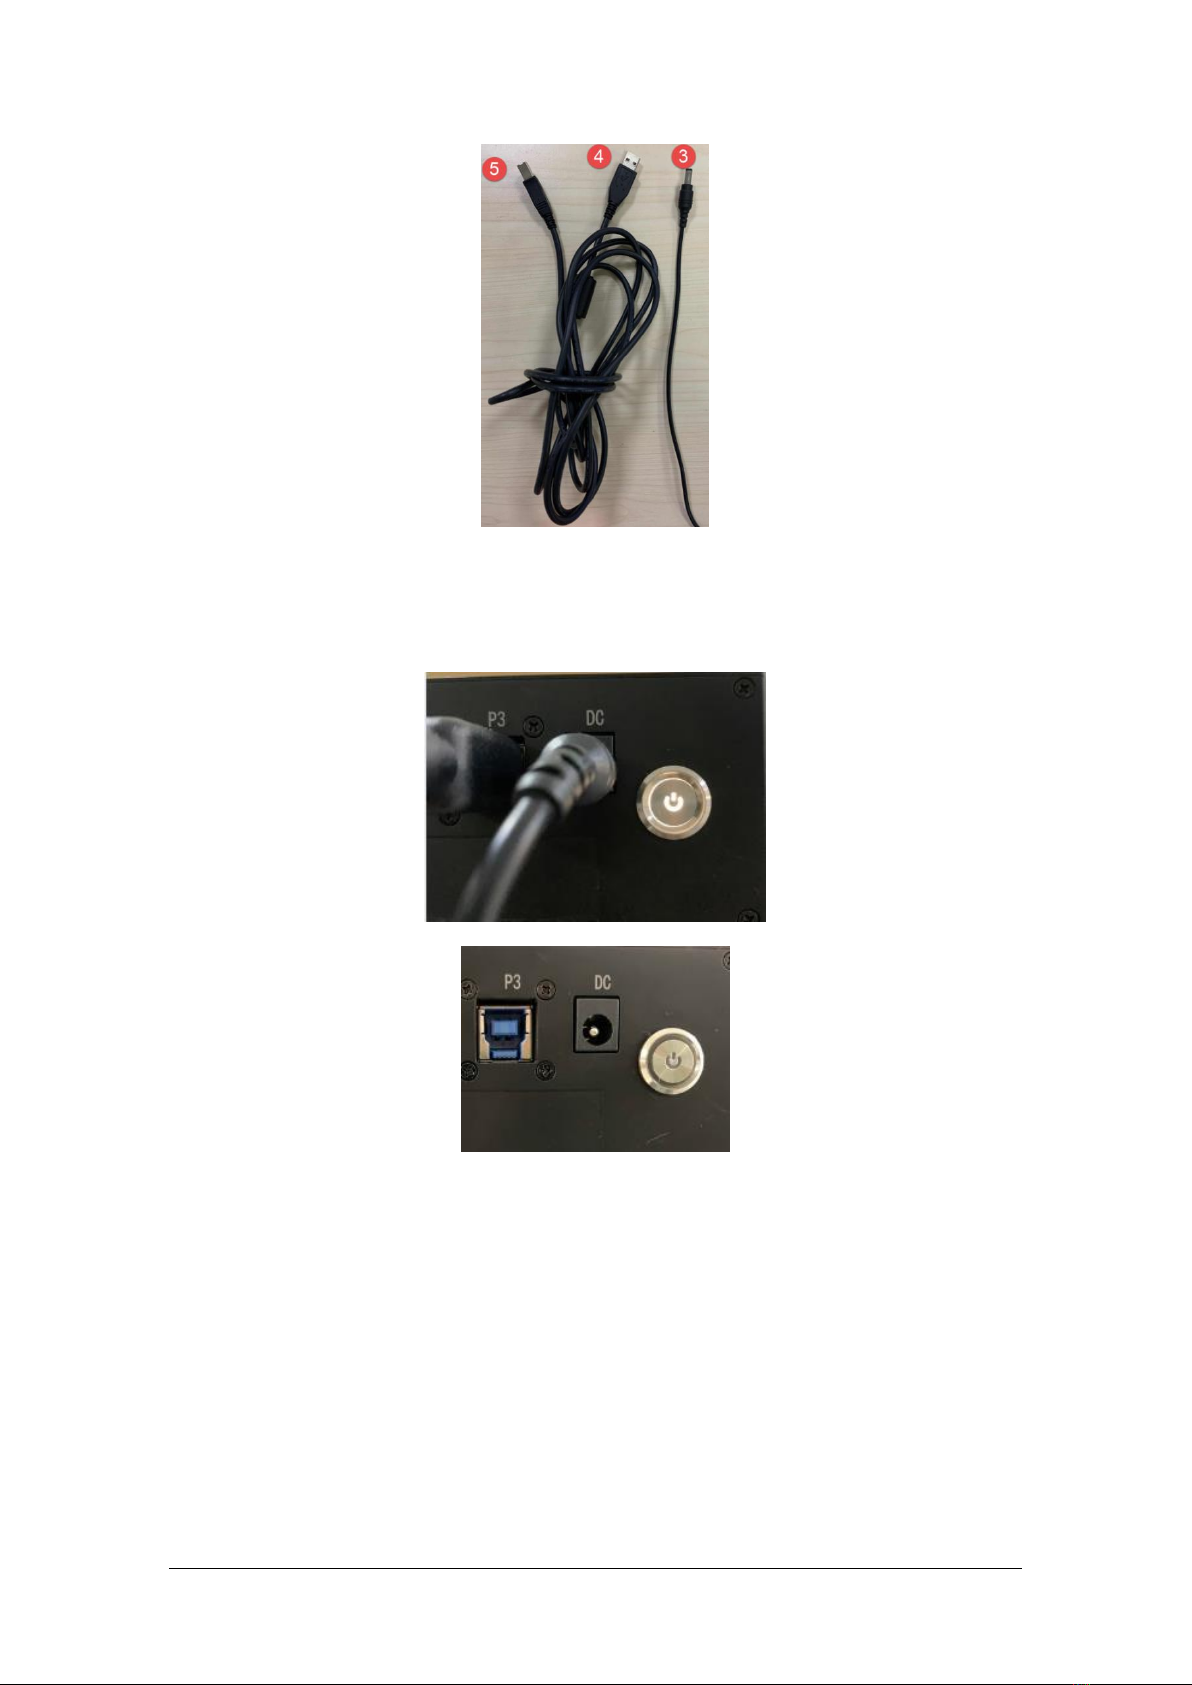
1.2. Hardware Installation...............................................................................................................................3
2. Set Software ..............................................................................................................................8
2.1. Download the Software............................................................................................................................8
2.2. Install the Software ..................................................................................................................................8
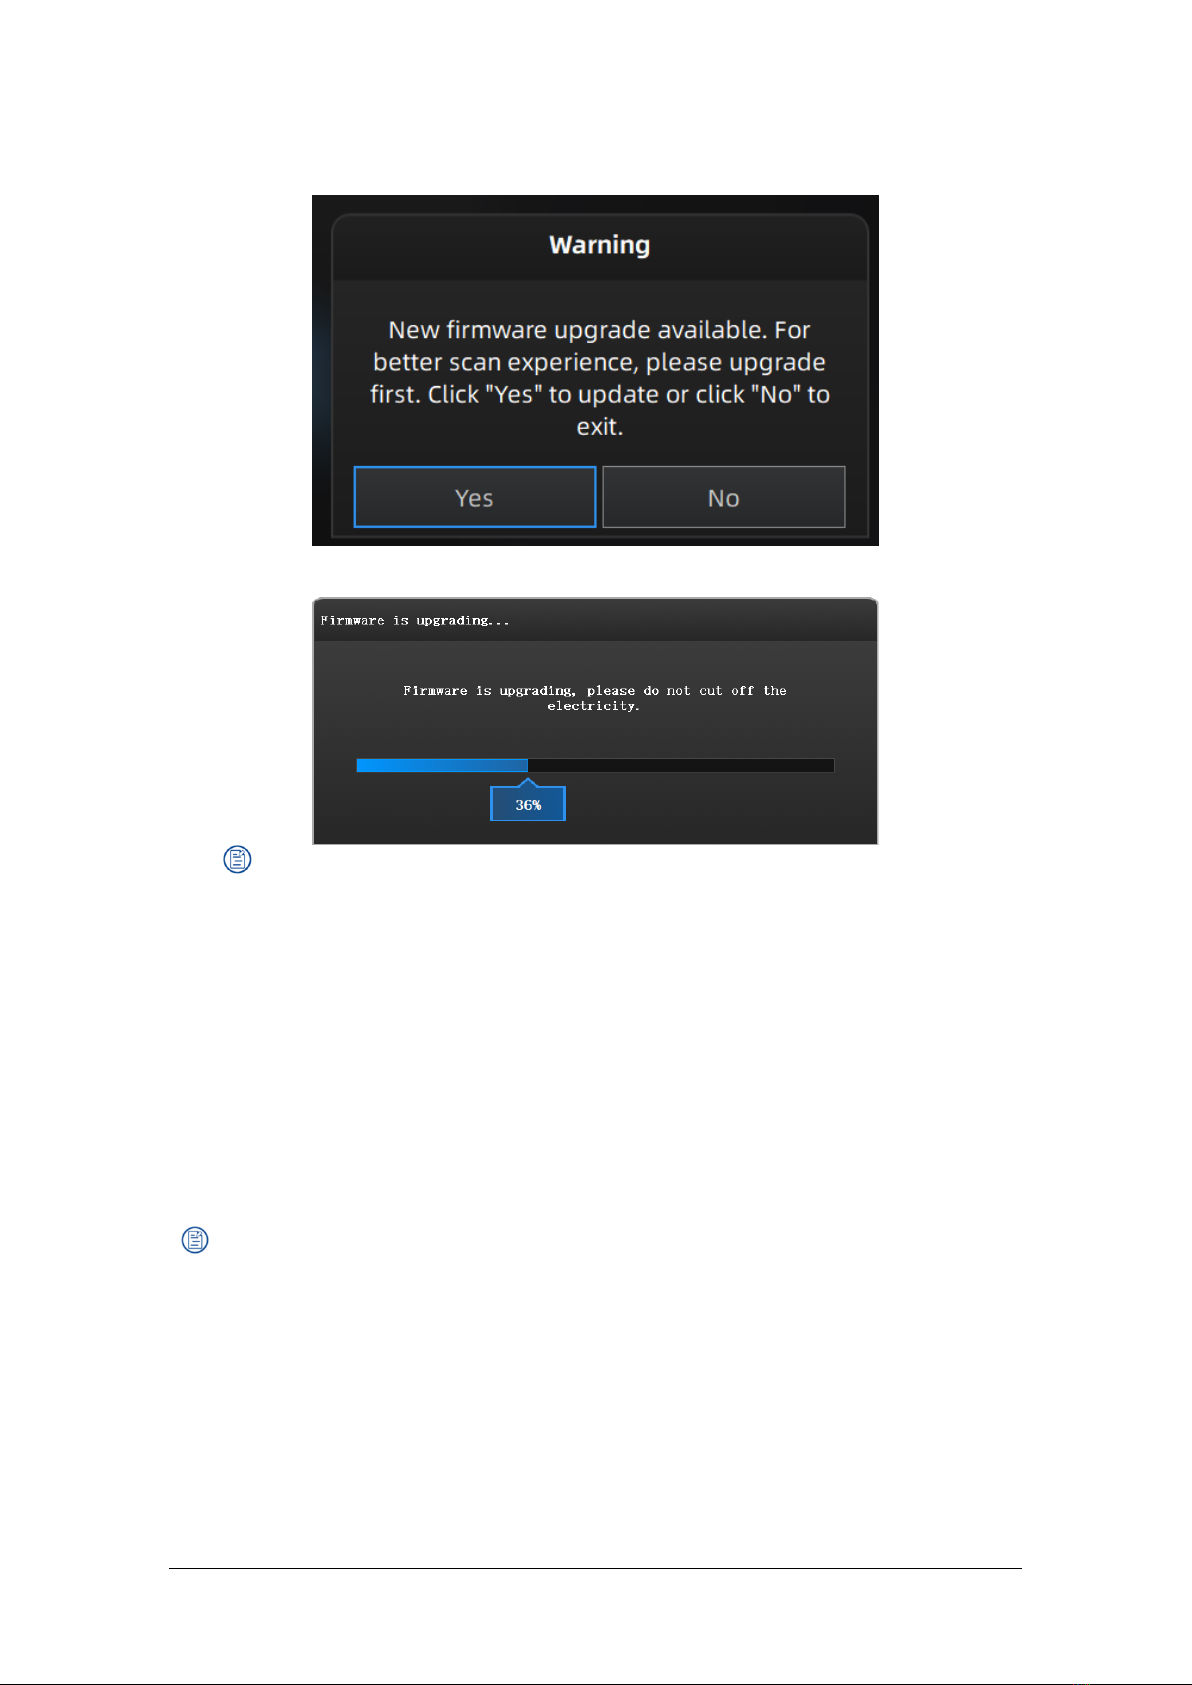
2.3. Firmware Update .....................................................................................................................................8
2.4. Update the Software................................................................................................................................9
2.5. User Account..........................................................................................................................................10
2.6. Interface and Parameters.......................................................................................................................13
3. Equipment Regulation.............................................................................................................14
4. Calibrate the Scanner..............................................................................................................18
4.1. Precautions and Use...............................................................................................................................18
4.2. Operation ...............................................................................................................................................18
5. Scanning ..................................................................................................................................23
5.1. Preparation.............................................................................................................................................23
5.2. Before Scanning......................................................................................................................................24
5.3. Scan........................................................................................................................................................28
6. Project Group ..........................................................................................................................32
6.1. Create/Import Projects...........................................................................................................................32
6.2. Rename a Project ...................................................................................................................................32
6.3. Delete.....................................................................................................................................................32
6.4. Create/Split A Group ..............................................................................................................................33
6.5. Edit Data.................................................................................................................................................34
6.6. Global Optimization ...............................................................................................................................34
6.7. Alignment...............................................................................................................................................34
7. Post Process.............................................................................................................................36
7.1. Mesh (Watertight/Unwater tight)..........................................................................................................36
7.2. Data Post Process...................................................................................................................................38
Auto Hole Filling ..................................................................................................................................................42
Manual Hole Filling..............................................................................................................................................43
7.3. Measurement.........................................................................................................................................45
7.4. Export Data.............................................................................................................................................52
8. Other Operations.....................................................................................................................56
9. FAQ..........................................................................................................................................57
10. Safety Precautions...............................................................................................................58
Contact Us.......................................................................................................................................59

Shining 3D Transcan-C_User Manual_V1.4.2
3
1. Specification and System Requirements
1.1. System Requirements
Preparing a suitable computer will improve your scanning experience.
One important notice for PC configuration is the graphic card. It must be Nvidia card since certain
function from Nvidia is needed for scanning. GTX series card is the best for scanning while Quadro
series CAD card also works but you need a more expensive model comparing to the GTX series to get
a good scan experience.
Attention:
When running the software, do not turn on the power saving mode of the computer.
1.2. Hardware Installation
Unpack and set up your scanner before getting started with scanning.
1.2.1. Assemble Scanner
1) Open the tripod and place it on the ground. The three tripods can be extended and retracted. After
adjusting the height, lock and fix the tripod.
2) If the height is still too high or too low, loosen the lock [2] to adjust and fasten vertical slide rod to
an appropriate height.
3) Unscrew the quick shoe from the top of the tripod and fix it on the bottom of the scan head.
Item
Recommended
Graphics card
NVIDIA GTX serial cards higher than GTX1080
USB port
At least one USB 3.0 port
OS
Win10 64bits
Video memory
≥ 8G
RAM
≥ 32 GB
CPU
i7-8700 or higher
Screen resolution
1920*1080 DPI: 100%; 125%
3840*2106 DPI: 100%; 125%; 150%

Shining 3D Transcan-C_User Manual_V1.4.2
4
4) Insert the scanning head assembly into the groove on the top of the tripod. After adjusting the
direction, tighten the bolts to fix it, as shown in Figure [1].
5) Adjust the height of the device as required, and tighten the lock after the adjustment is complete.
1.2.2. Connect the Scanner
1) Connect the power cord and cables.
Confirm that power switch ④ is not pressed.
Connect the power cord port ⑦ and the adapter port ⑥ first.
Inserted adapter socket ⑤ into the device ③ port.
Insert the power cord triangular plug into the plug or socket.
Connect the computer USB 3.0 port and device socket ② with the device connection
cable.
If using a light box, plug the light box connection cable into port ①.

Shining 3D Transcan-C_User Manual_V1.4.2
5
USB interface next to the labeled SS is the USB3.0 interface
2) Turntable connection
Insert the turntable connection cable ⑤ into the turntable port ①.
Insert turntable connection cable ④ into computer USB port.
Insert the turntable power cable ③ into the turntable port ②.

Shining 3D Transcan-C_User Manual_V1.4.2
6
1.2.3. Turn on/off the Scanner
1) Press power button to turn on the device, and the switch light will be on.
2) Press power button again to turn off the device, and the switch light turns off.
After installing the software, connect the device to the computer and start it up, the following devices
are displayed in the Device Manager.

Shining 3D Transcan-C_User Manual_V1.4.2
7
Scanner in Device Manager
If the scanner driver is not installed properly, or the device is connected and keeps prompting "Device
offline":
Check power connection status.
Check if USB 3.0 is connected.
Install the camera driver manually if a device with a question mark or exclamation point is found
in the Device Manager.
After the device is powered off, unplug the USB cable; then re-power and plug in the USB cable.

Shining 3D Transcan-C_User Manual_V1.4.2
8
2. Set Software
2.1. Download the Software
Step 1: Go to https://www.einscan.com/support/download/.
Step 2: Select your scanner model.
Step 3: Download the software to your operating computer.
Note:
You are required to register before downloading.
2.2. Install the Software
1. Double click installation package, accept the modification on your computer.
2. Follow the instructions to complete the software installation.
3. After the software is installed, a shortcut will be created on your desktop. Double-click to
open the software.
2.3. Firmware Update
When the scanner firmware is incompatible, a message will appear when software is open.
Click Upgrade and follow the instruction to update the device firmware.
Firmware updating will take around 3 mins.
Power off the device after upgrading successfully.
Reconnect the device, and open the software again, the device is running under the
latest firmware.
Note before installation: Administrator rights are required for the installation of the software.

Shining 3D Transcan-C_User Manual_V1.4.2
9
Firmware doesn’t match
Firmware upgrading
Note:
Do not disconnect the scanner, or unplug the power during the upgrade.
Recovery will start from a failed upgrade. You can restart the firmware update after
successful recovery.
If recovery fails, turn off the power of the scanner and reconnect the scanner to restart
the software for upgrading.
2.4. Update the Software
When a new version is available, a pop-up will show when you start the software to remind you
update your software to the latest version.
Note:
After clicking Download Now, the software will be downloaded (do not close the software).
Click Yes to update.
Indice
Altri manuali Shining 3D Stampante 3D

Shining 3D
Shining 3D AccuFab L4D Manuale utente

Shining 3D
Shining 3D einstart-c Manuale utente

Shining 3D
Shining 3D AccuFab-D1s Manuale utente

Shining 3D
Shining 3D einstart-c Manuale utente

Shining 3D
Shining 3D EinScan-SE Manuale utente

Shining 3D
Shining 3D einstart-c Manuale utente

Shining 3D
Shining 3D Einstart Manuale utente

Shining 3D
Shining 3D AccuFab-L4D Manuale utente

Shining 3D
Shining 3D AccuFab-D1s Manuale utente

Shining 3D
Shining 3D AccuFab-L4D Manuale utente


