5
English
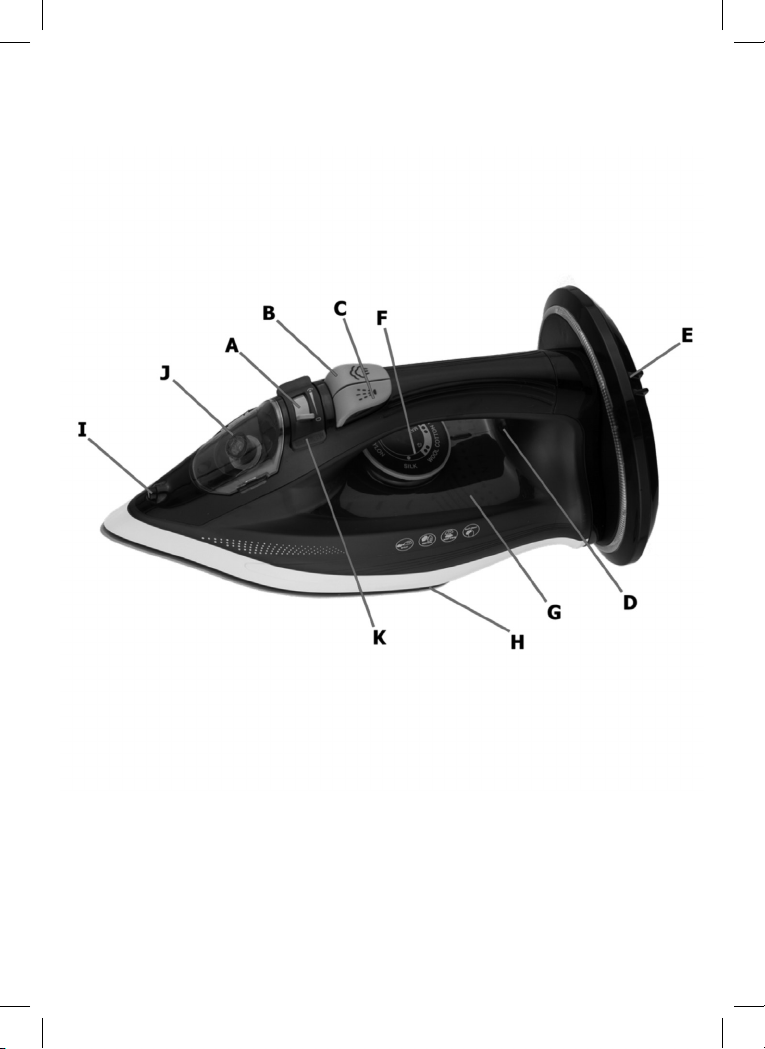
I: Spray nozzle
J: Water tank cover
K: Steam needle for self-cleaning
3. INSTRUCTIONS FOR USE:
Filling the steam iron with water:
Make sure the iron is switched off and
the cable is unplugged from the mains.
1. Turn the steam control knob (A) to the
“0” position.
2. Open the water tank cover (J) and ll
the tank to the “MAX” mark on the water
tank (G).
3. You can check the water level through
the transparent part of the tank (G) when
the iron is in the vertical position. When
the water is getting low, rell the tank by
following the steps in points 1 to 3.
4. Pour the water out of the tank after
each use. Wait until the iron cools down,
open the water tank cover (J) and pour
the water out.
Note:
Most tap water can be used in this iron.
Do not use water additives or substitute
water such as linen or scented water in
the steam iron because they may stain
fabrics and damage the iron. Do not ll
the tank above the “MAX” mark.
Using as a dry iron:
1. Place the iron in the vertical position.
2. Plug it into the mains.
3. Turn the temperature control dial (F)
to the desired temperature.
4. Preheat the iron until the indicator light
goes out (D).
You are now ready to dry iron.
Note:
- Optimal dry ironing will last for appro-
ximately two minutes before the iron has
to be recharged.
- Ensure that the steam control knob
(A) is clearly set at “O” for best results.
Using the spray function:
Before using the spray function (I), check
the garment label because some fabrics
can be spotted or stained by moisture.
The spray function is particularly use-
ful for removing stubborn wrinkles and
when you need extra moisture. It can be
used for both dry ironing and steam iro-
ning. Simply press the button (C) when
you want to spray.
Steam ironing:
Fill the iron as indicated in the section
“Filling the steam iron with water”.
1) Place the iron in the vertical position.
2). Plug the cable into the mains.
3) Turn the temperature control dial (F)
to the “Steam” position. You can steam
iron only after selecting a high tempera-
ture, such as the ones marked “MAX”.
Otherwise, the soleplate (H) will drip.
4) Preheat the iron until the indicator light
goes out (D). The light will go out when
the iron reaches the right temperature.
5) Turn the steam control knob (A) to the
most suitable position for each kind of
fabric.
You are now ready to steam iron.
Note:
Optimal steam ironing will last for 30 to
45 seconds before the iron has to be re-
charged.
Using the burst of steam button:
The burst of steam button provides extra
steam to help remove stubborn wrinkles.
It can be used for both dry ironing and
steam ironing.
Press the burst of steam button (B) for ex-
tra steam. It may be necessary to press
the button several times to prime the
burst function. Wait a few seconds until
the steam penetrates the fabric before
pressing the burst of steam button again.
Note:
For optimal steam quality, do not press
the burst of steam button more than
three successive times when the indica-
tor light is out.
4. CLEANING AND MAINTENANCE
After each use:
1) Turn off the iron and unplug it from the
mains.
2) Pour out any water left in the tank af-
ter each use. Do not store the iron when
there is water in the tank.
3) Wait until the iron has cooled down
before storing it, and always store it in
the vertical position on the base to pre-
vent the soleplate from becoming scrat-
ched, corroded or stained.
4) When it has completely cooled down,