
Toro TouchNet NO-90-06 Manuale utente
TouchNet™
Central Control System
for OSMAC®
User’s Guide
◆Installation
◆Programming
◆Operation
◆Service
RELEASED Version ©Toro 2006-2006

ii
Table of Contents
Section 1: Introduction and System Overview . . . . . . . . . .1-2
Section 2: Installation Procedure . . . . . . . . . . . . . . . . . . . . .3-4
Section 3: Configuring the Controller . . . . . . . . . . . . . . . .5-11
❚The Home Screen . . . . . . . . . . . . . . . . . . . . . . . .5
❚The Menu Screen . . . . . . . . . . . . . . . . . . . . . . . .6
❚System Setup . . . . . . . . . . . . . . . . . . . . . . . . . . . .6
❙Set Current Time . . . . . . . . . . . . . . . . . . . . . . .7
❙Set Current Date . . . . . . . . . . . . . . . . . . . . . . .10
❙Set Day Change Time . . . . . . . . . . . . . . . . . . .10
❙Set Update Time . . . . . . . . . . . . . . . . . . . . . . .11
❙Set Flow Units . . . . . . . . . . . . . . . . . . . . . . . .11
❙Show Days As . . . . . . . . . . . . . . . . . . . . . . . .11
Section 4: Programming the Controller . . . . . . . . . . . . . .13-29
❚Golf Course Layout Example . . . . . . . . . . . . . .14
❚Worksheet Example . . . . . . . . . . . . . . . . . . . . .15
❚System Hydraulics Setup . . . . . . . . . . . . . . . . . .16
❚Defining Programs . . . . . . . . . . . . . . . . . . . . . .17
❙Naming Programs . . . . . . . . . . . . . . . . . . . . .17
❙Set Program Run Time and Flow . . . . . . . . . .21
❚Satellite Setup . . . . . . . . . . . . . . . . . . . . . . . . . .22
❙Address Number . . . . . . . . . . . . . . . . . . . . . .22
❙Name/Area . . . . . . . . . . . . . . . . . . . . . . . . . . .22
❙Number of Stations . . . . . . . . . . . . . . . . . . . .23
❙Maximum Simultaneous Programs . . . . . . . .23
❙Flow Zone Assignment . . . . . . . . . . . . . . . . .23
❚Satellite Station Setup . . . . . . . . . . . . . . . . . . . .24
❚Set Watering Sequence Starts . . . . . . . . . . . . . .26
❙Sequence Start Number . . . . . . . . . . . . . . . . .26
❙Set Start Time . . . . . . . . . . . . . . . . . . . . . . . . .26
❙Set Active Watering Days . . . . . . . . . . . . . . . .27
❙Set Program Priority . . . . . . . . . . . . . . . . . . . .27
❙Program Sort . . . . . . . . . . . . . . . . . . . . . . . . .28
❙Set Syringe Time . . . . . . . . . . . . . . . . . . . . . .29
❙Total Run Time Calculation . . . . . . . . . . . . . .29
Section 5: Manual Operation . . . . . . . . . . . . . . . . . . . . . . . .31
Section 6: Special TouchNet Features . . . . . . . . . . . . . . .33-42
❚Rain Delay and Permanent Rain Hold . . . . . . .33
❚Cancel All Watering . . . . . . . . . . . . . . . . . . . . . .34
❙Removing The Cancel Command . . . . . . . . .35
❚Run Time Adjust . . . . . . . . . . . . . . . . . . . . . . . .36
❚Station Review Screen . . . . . . . . . . . . . . . . . . . .37
❚The Water Window Screen . . . . . . . . . . . . . . . .37
❚System Alarms . . . . . . . . . . . . . . . . . . . . . . . . .40
❚Auxiliary Service Features . . . . . . . . . . . . . . . .42
Appendix A: Troubleshooting . . . . . . . . . . . . . . . . . . . . . . . . . .43
Appendix B: Specifications . . . . . . . . . . . . . . . . . . . . . . . . . . . .45
RELEASED Version ©Toro 2006-2006
Welcome to TouchNet, the easy-to-use central irrigation control
system from The Toro Company.
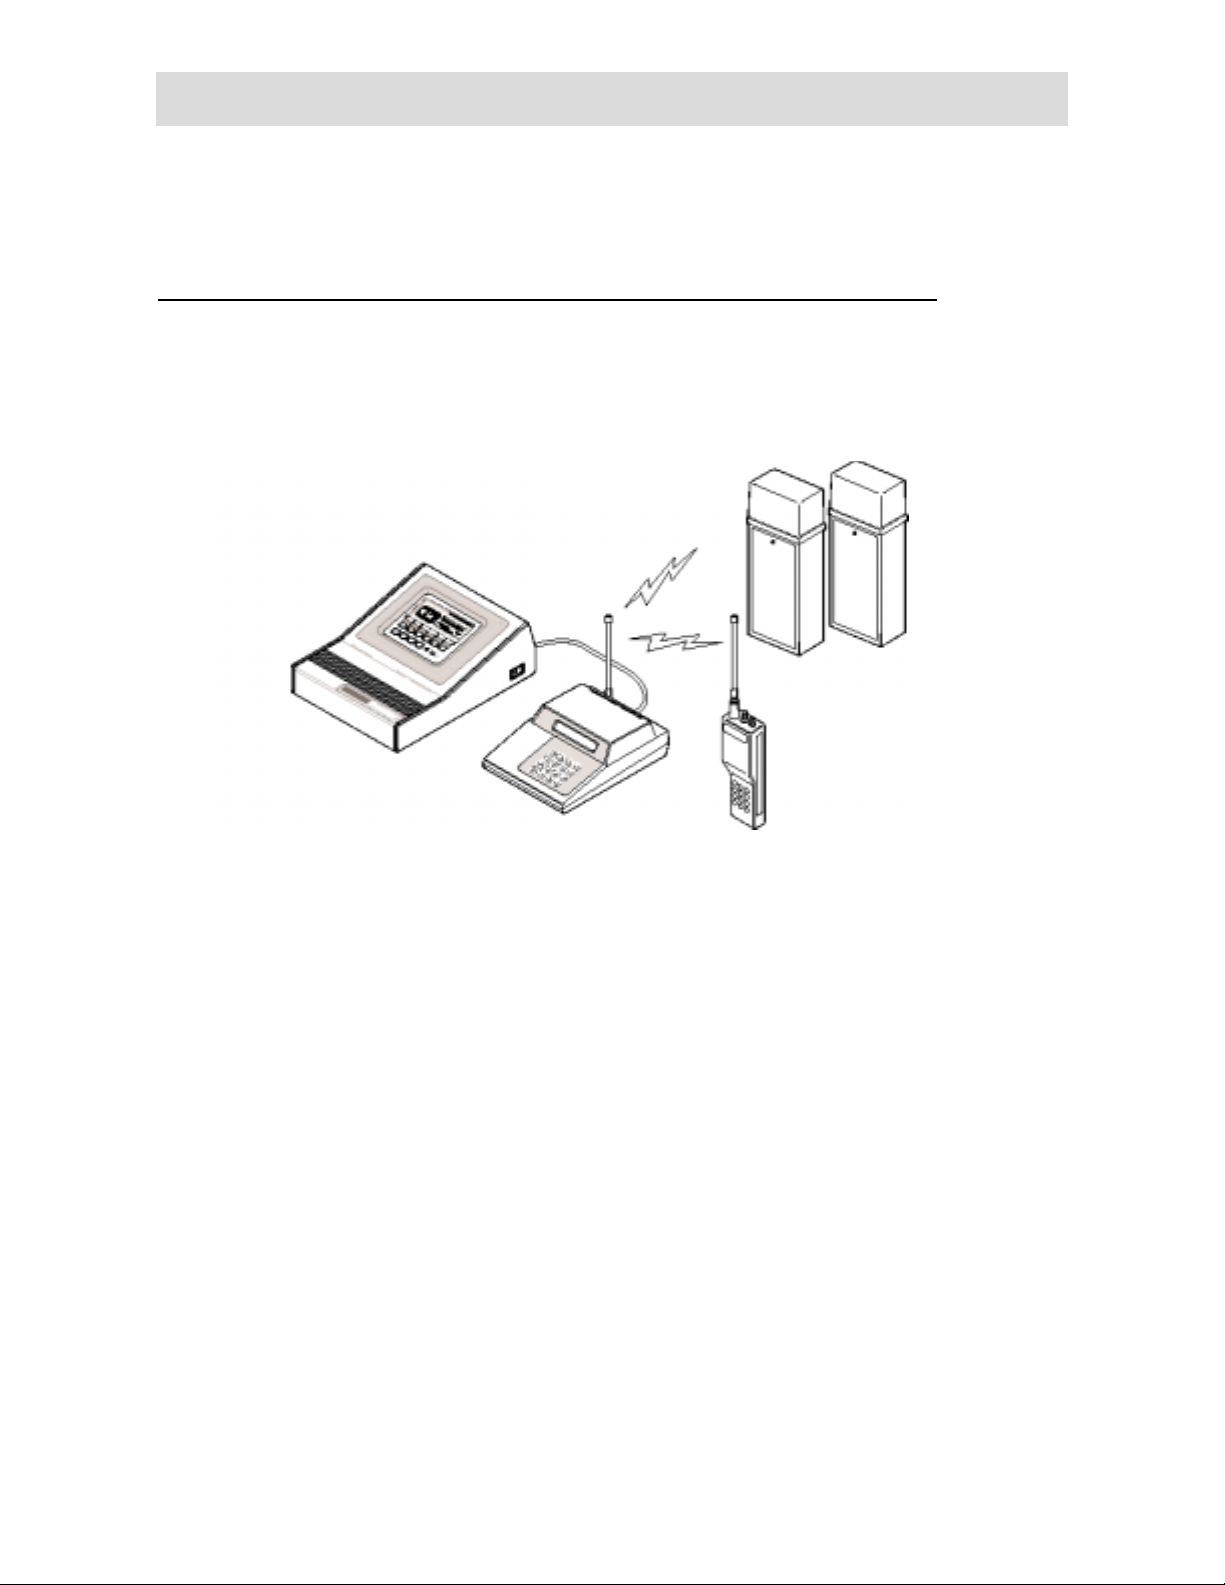
TouchNet for OSMAC is a radio-based central control system
that utilizes Motorola’s digital radio paging technology. It
communicates to RDR satellites through the Motorola “People
Finder”paging terminal. The TouchNet controls up to 35
OSMAC RDR satellites (a total of 1,680 stations) and manages
up to 12 irrigation programs and 20 discrete flow zones.
You will find the TouchNet amazingly simple to use with its
unique AcuTouchTM programming feature. All system
programming and operation commands are easily made on
intuitive, self-prompting screen displays.
The automated hydraulic management feature, HydroGuard™,
protects your system from excessive flow demands and
optimizes your system irrigation cycles for peak efficiency.
1
Introduction To TouchNet
1
TouchNet Central
Motorola “People Finder”
Paging Terminal
Hand-Held Radio
with DTMF Keypad
OSMAC Satellites
(35 maximum)
System Overview
RELEASED Version ©Toro 2006-2006
Irrigation scheduling will be simplified with up to 12 watering
sequence starts allowing you to easily select active days and to
prioritize or re-prioritize all programs within a start sequence in
either Normal or Syringe mode.
In addition to its powerful automated features, the TouchNet
also enables you to manually start, syringe or cancel any
program at any time.
Its programmable Rain Delay feature enables you to suspend
watering operation up to seven days, or indefinitely if you
choose, by simply entering one number. The Touchnet will
automatically resume operation at the end of the delay period.
Continue now to the installation procedures on the following
pages. Please read through the installation steps before starting
to ensure that you have the necessary tools and/or additional
materials on hand.
About this manual…
Throughout the manual, two symbols are used to bring
attention to helpful or very important points of information.
The Note symbol is used to highlight special information
which is helpful to know about the installation, programming
or use of the TouchNet control system.
The Alert symbol is used to highlight special points of
information or procedures which are critical for the proper
function, operation or safety of the TouchNet control system.
Introduction to TouchNet –1
2
RELEASED Version ©Toro 2006-2006
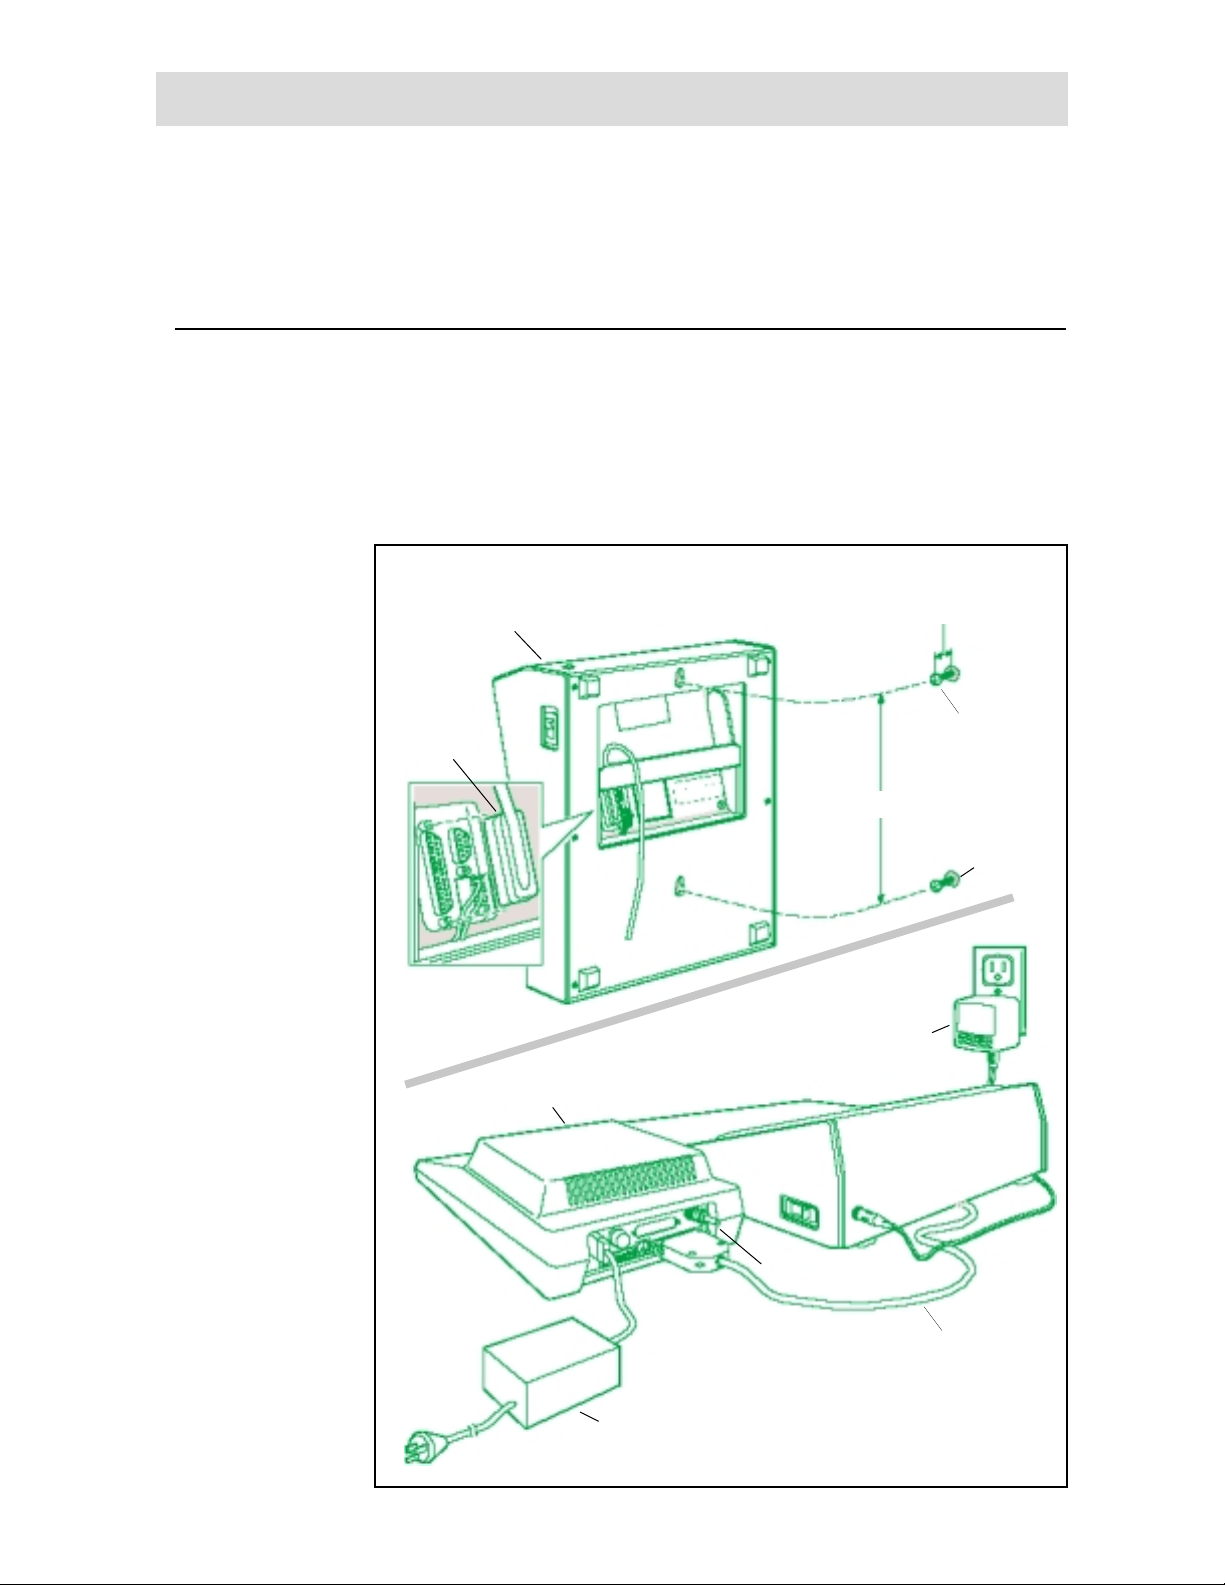
The TouchNet controller can be wall mounted or positioned on
a stationary work surface or desk top. Select a location for the
TouchNet which enables the connection cable (provided) to
easily reach the paging terminal (People Finder).
3
Installation Procedure
7⁄16" (22mm)
9" (228mm)
#10
Wood
Screw
Screw
Anchor
Connection Cable Assembly
Antenna Cable
TouchNet
Transformer
TouchNet
Controller
Motorola Paging
Terminal
90°Angle
Connector
Paging Terminal
Power Supply
Wall Mount
Desk Mount
Figure 1
2
RELEASED Version ©Toro 2006-2006
The TouchNet controller is not weather resistant and must be
installed indoors only. The temperature range of the
installation site must within 0°–40°C (32°–104°F). Non-
compliance can void product warranty
❑First, plug the 90°angle connector of the connection cable
assembly into the receptacle located on the bottom of the
TouchNet enclosure. See Figure 1.
❑Plug the remaining cable connector into the Motorola paging
terminal receptacle labeled EIA RS-232C.
The power supply and attaching cable, when installed in close
proximity to the antenna of the Motorola paging terminal
(People Finder) are susceptible to interference and may
cause the power supply and People Finder to reset during
signal transmission.
To prevent this occurrence, the following installation
configuration should be used:
•Position the power supply unit as far away from the People
Finder as possible
•Route the power supply power and output cords as far
away from the antenna as possible
•Alternately, mount the antenna remotely and connect it to
the People Finder using low-loss coax cable.
❑If installing the TouchNet on the wall, install a #10 x 1.5"
(38mm) wood screw into wall (stud) at eye level. Install a
second wood screw 9" (228mm) directly below the top screw.
Leave the screw heads extending from wall 7/16" (11mm).
If installing the controller on dry wall or masonry and a wall
stud cannot be located, install screw anchors to prevent screws
from loosening.
❑Hang the controller enclosure on the screws using the
keyhole slots. Ensure the screw shafts engage the slotted
portion of the keyholes.
❑Attach the paging terminal power supply cable and plug the
power supply into a wall outlet.
❑Ensure the TouchNet On/Off switch is in the Off position.
Insert the TouchNet transformer cable plug into the
receptacle provided and plug the transformer into a wall
outlet.
Switch on the paging terminal first, then the TouchNet controller.
The units must be switched on in this order.
When using a hand-held radio for remote system operation,
the TouchNet must not be communicating with the paging
terminal at the same time. If a radio signal is received,
communication with the TouchNet may be interrupted, in
which case the system alarm “Missing Connection To Paging
Terminal”will be generated. See SystemAlarms, pages 40–42
for more information.
4
Installation Procedure –2
RELEASED Version ©Toro 2006-2006
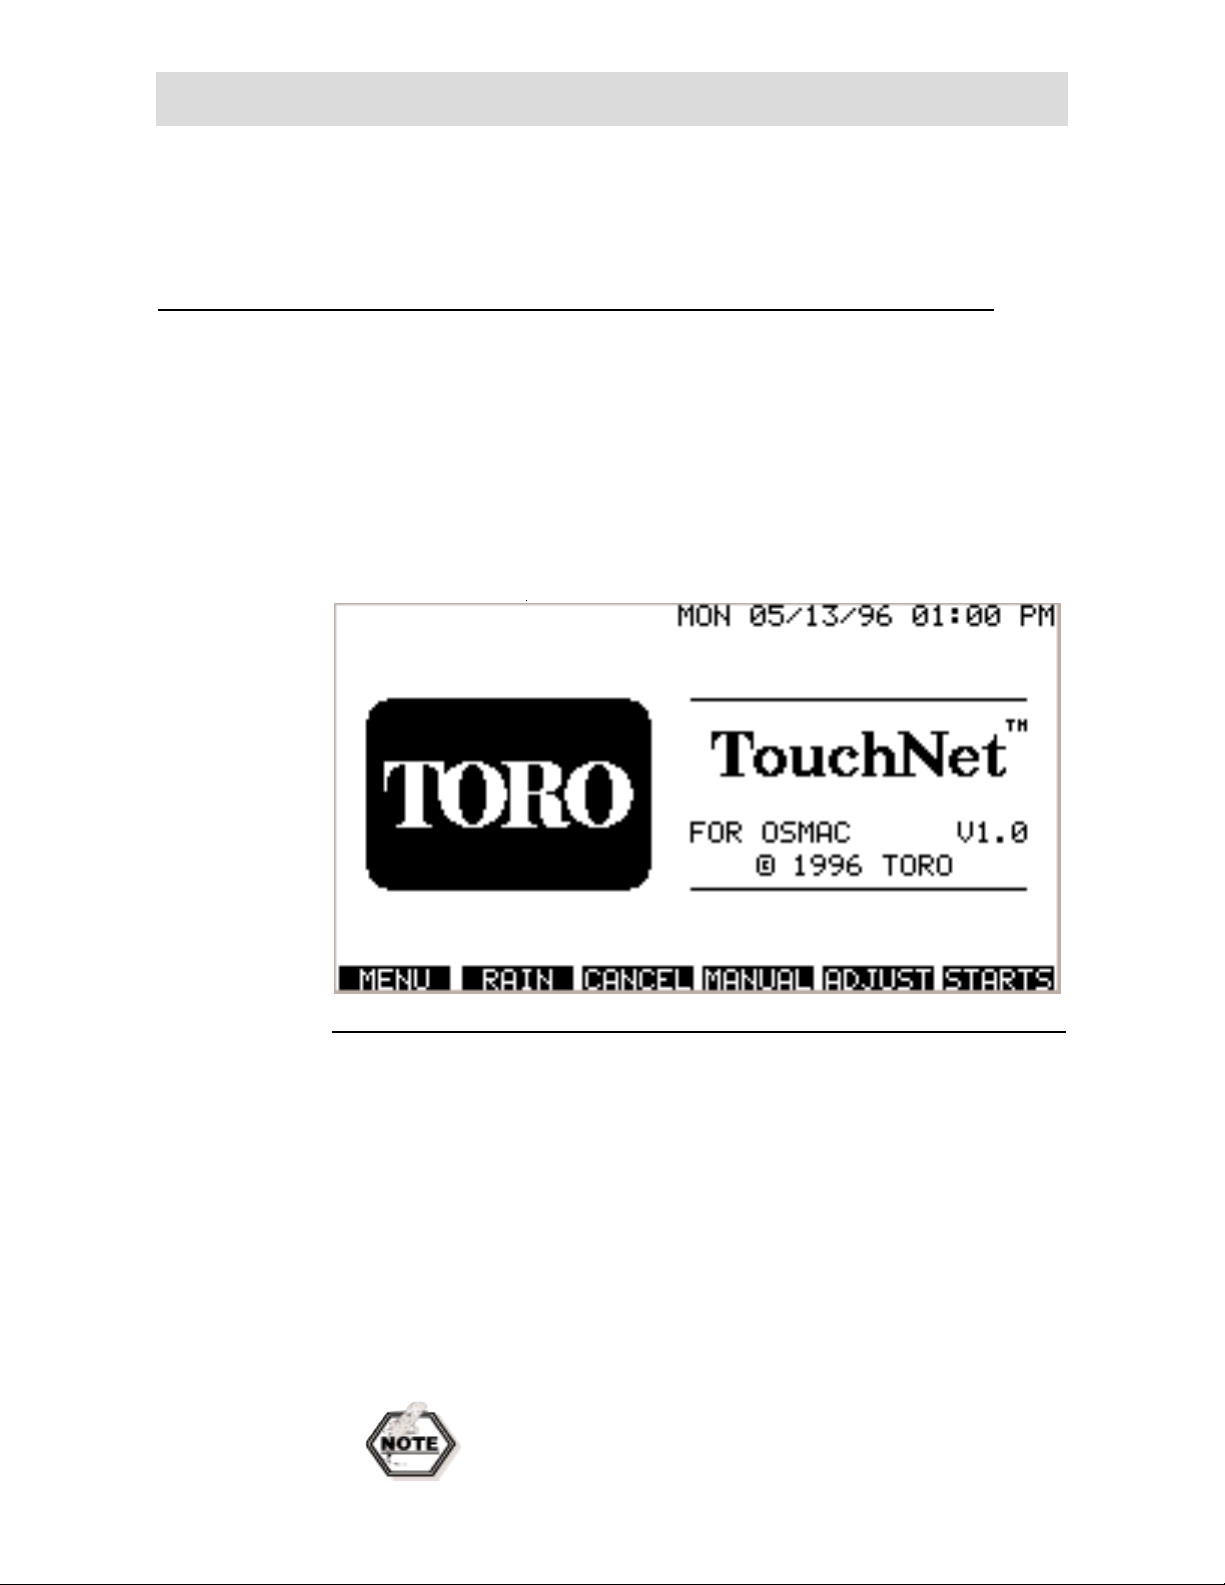
The Home Screen
When the TouchNet controller is first powered-up, you will be
greeted with the Home screen as shown below. The Home
screen is used to identify the controller, the type of Toro
satellite it controls, and the version of the TouchNet software.
As you navigate through the various TouchNet screen displays,
you can return to the Home screen by touching the TORO key
displayed in the lower left corner of the Menu screen.
The Home screen has no active programming controls but
does provide six standard function keys - MENU, RAIN,
CANCEL, MANUAL, ADJUST and STARTS. The function keys
are found on most TouchNet screen displays. In some cases
they will change depending on individual screen needs. The
RAIN and CANCEL keys implement their labeled functions.
The remaining function keys enable you to select other screen
displays.
The TouchNet for OSMAC can be fully programmed and
operated using only the touch control areas on the screen
display.
3
Configuring The Controller
5
Figure 2 - Home screen.
RELEASED Version ©Toro 2006-2006
6
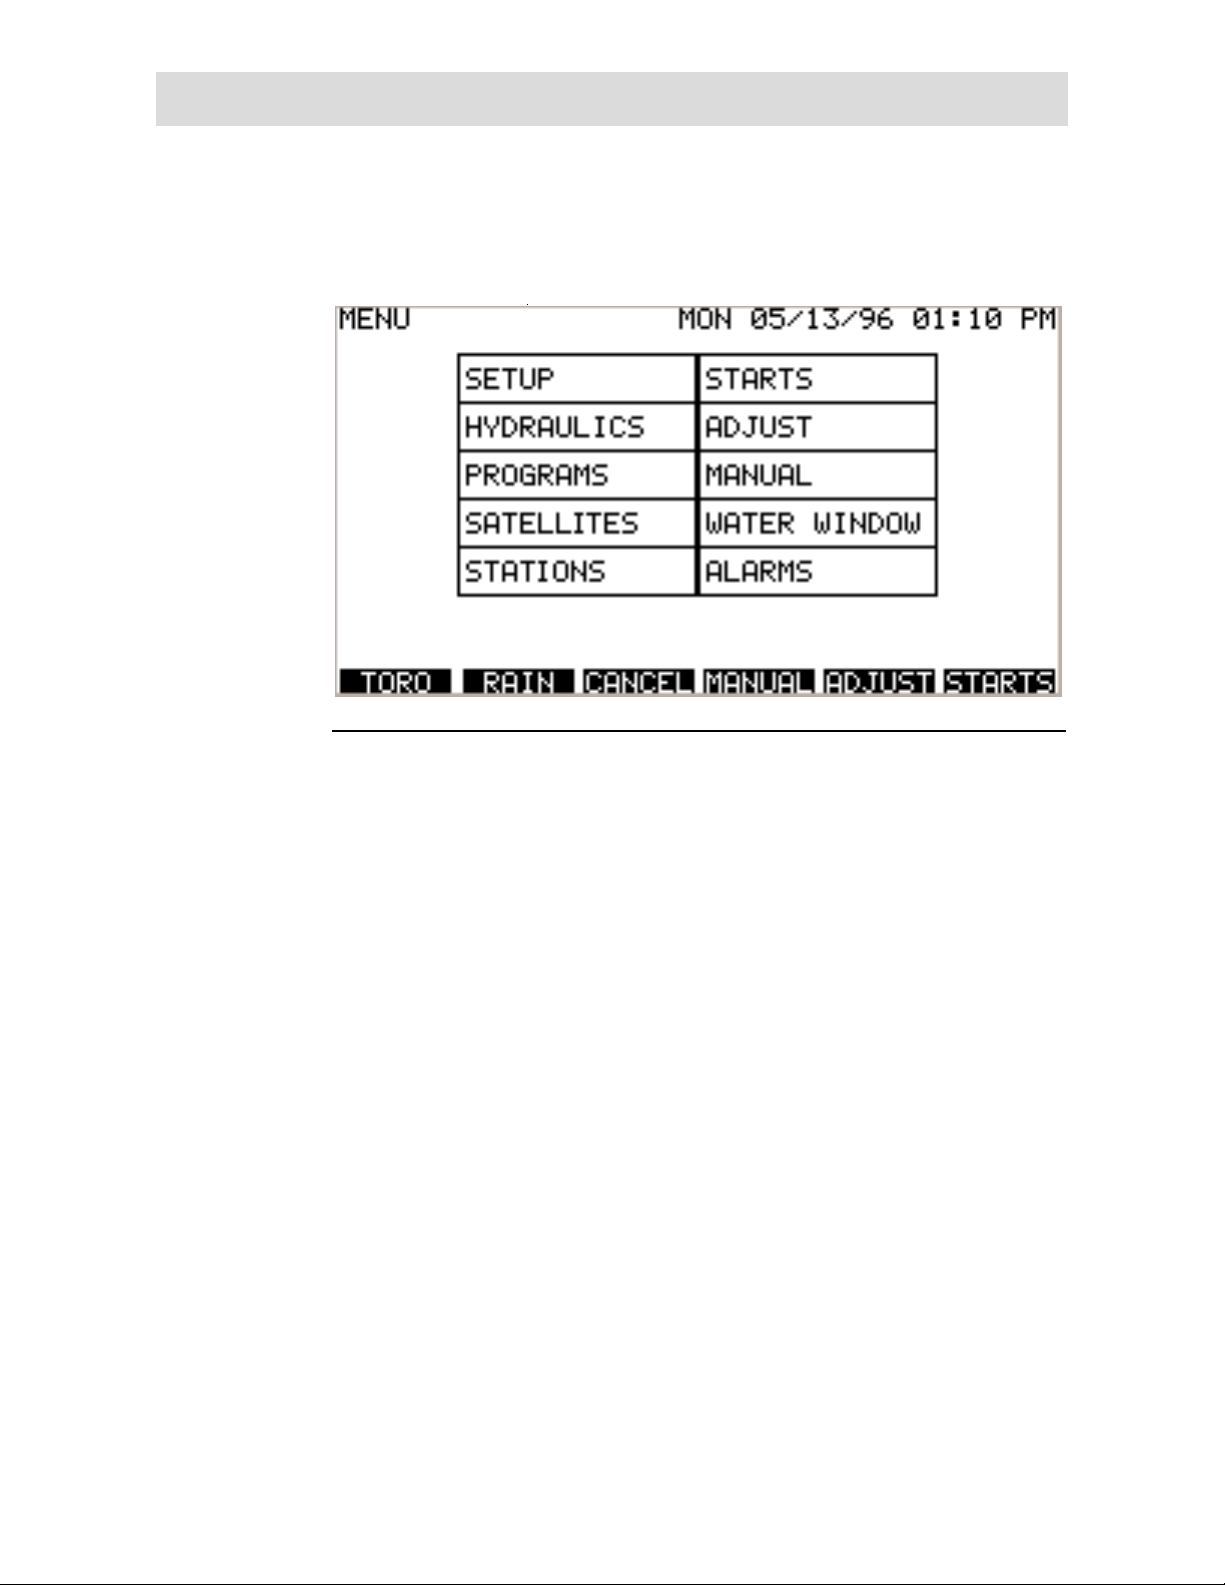
The Menu Screen
To access the system Menu screen, touch the MENU function
key located on the bottom left corner of the Home screen.
From the Menu screen you can access virtually all
configuration, programming, operation and system information
screens available for your TouchNet controller.
To configure the TouchNet for operation, you will need to
enter some basic information about your irrigation system
which will enable the TouchNet to accurately calculate and
optimize water flow throughout the system.
System Setup
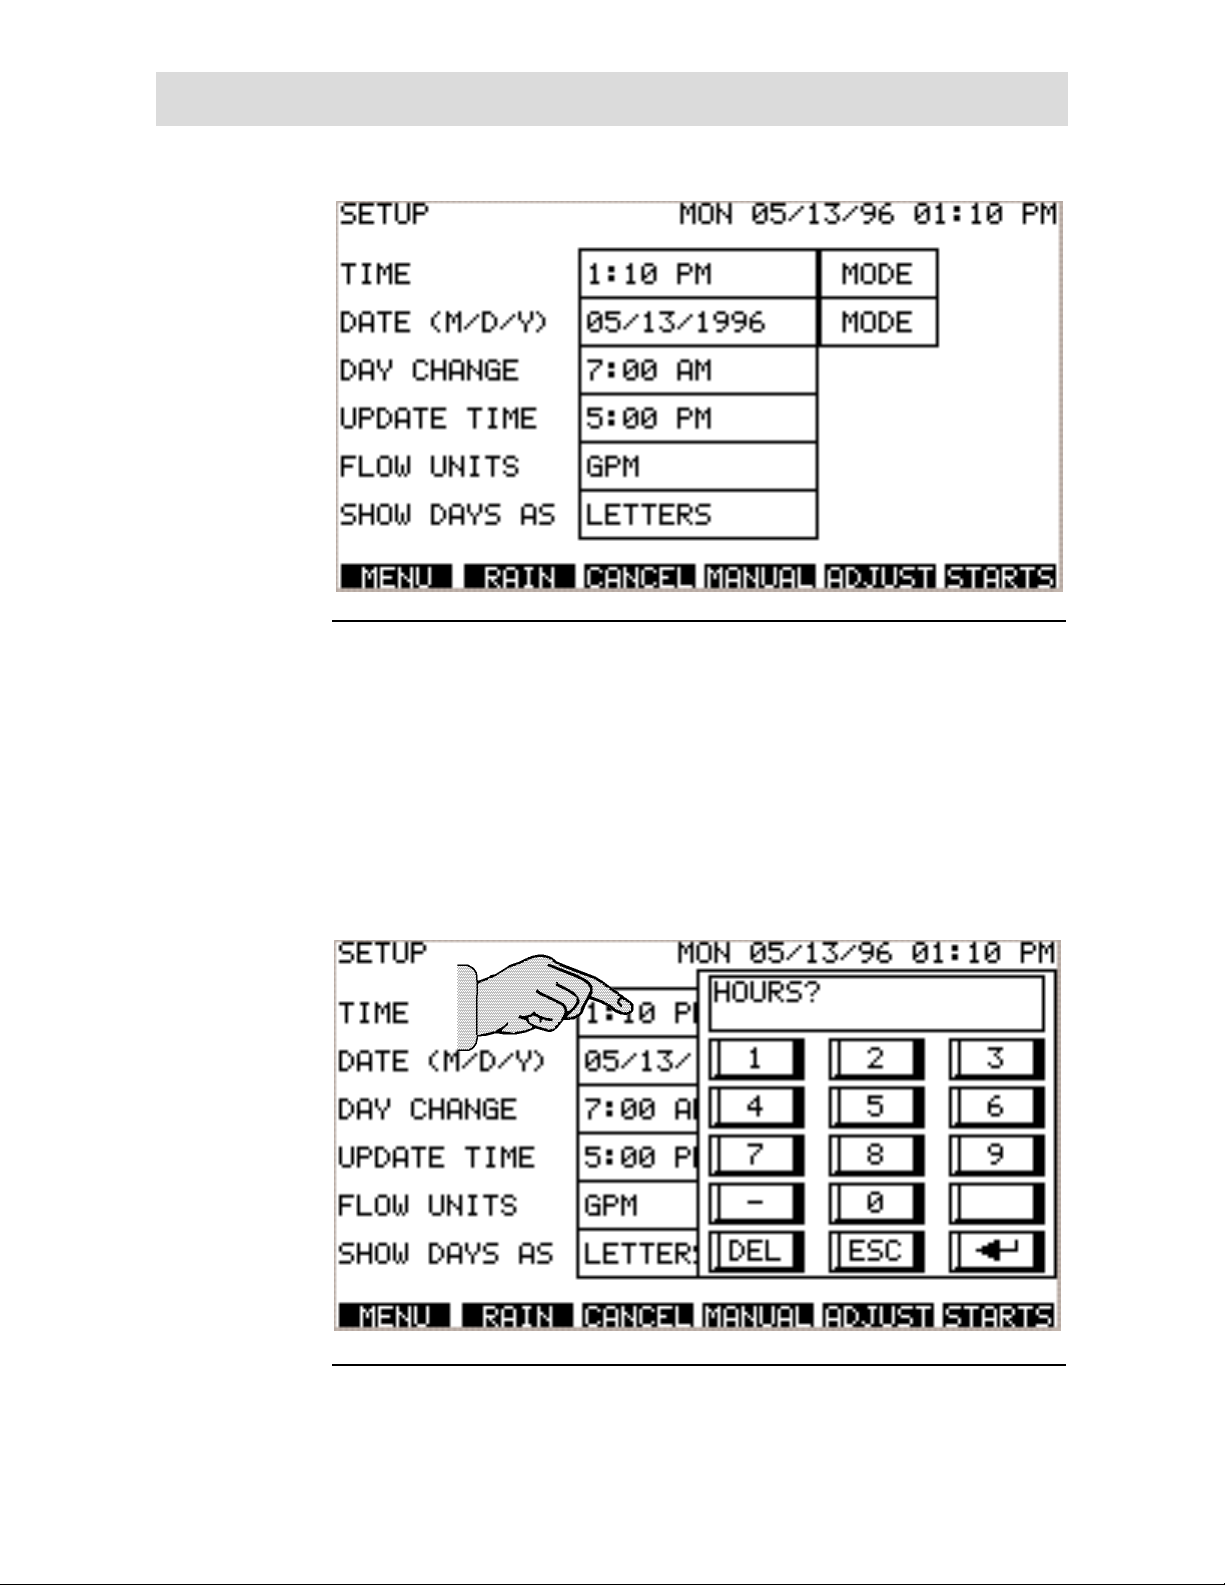
To start, select the Setup screen from the Menu screen by
touching SETUP. The Setup screen will appear as shown in
Figure 4.
Configuring The Controller –3
Figure 3 - Menu screen.
RELEASED Version ©Toro 2006-2006
7
On this screen you will set up your general system information
and the overall operating parameters of your system.
Set Current Time
The first item to set is the current time. The current time and
date will be displayed in the upper right corner of all screens.
To enter the current time, touch the box displaying the time.
A pop-up keypad, as shown in Figure 5, will be displayed with
the “Hours?”prompt.
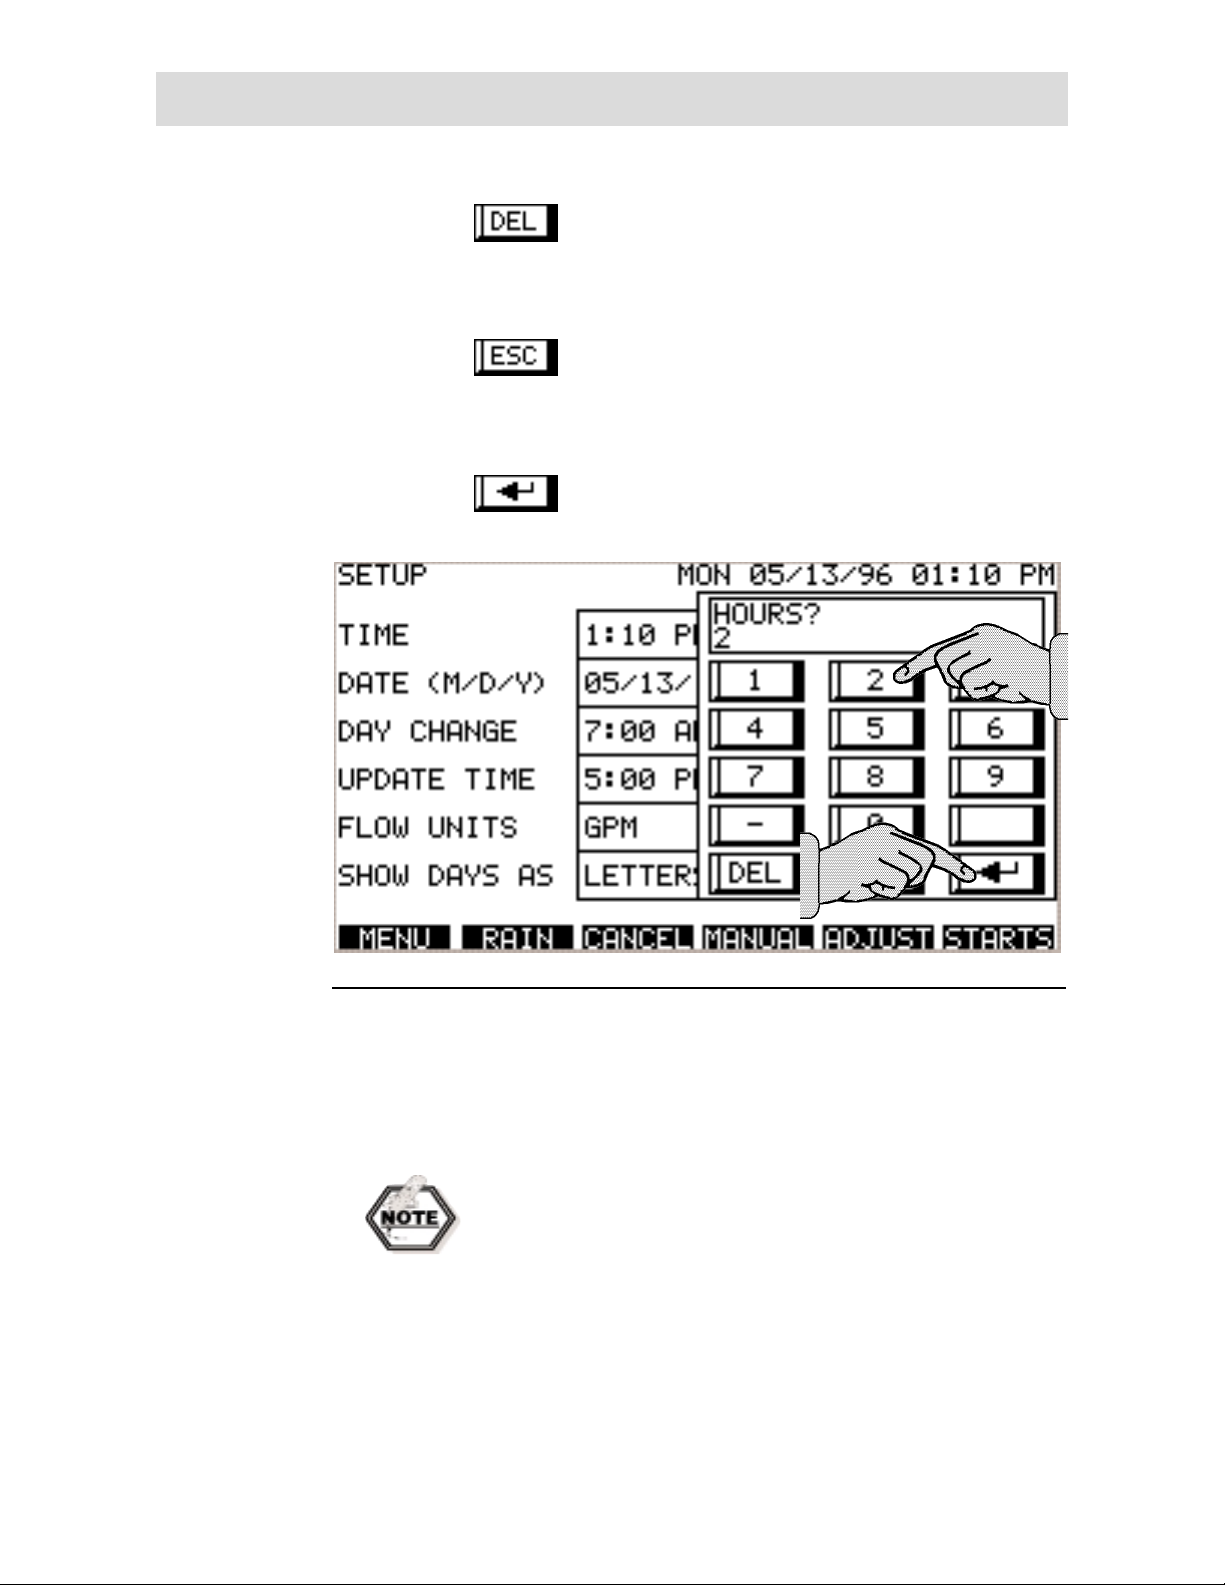
To use the keypad, note the following special keys and their
uses as described on the following page.
Configuring The Controller –3
Figure 4 - Setup screen.
Figure 5 - The pop-up keypad.
RELEASED Version ©Toro 2006-2006
8
The Delete key is used to remove information being
selected on the keypad. For example, if you touched
key 4 but meant to touch the 7 key, touching DEL would
remove number 4 so the correct number could be selected.
Touching the Escape key either selects the next
keypad prompt or exits the keypad returning you to
the underlying screen. You can discontinue using the keypad
at any time by touching the ESC key.
Touching the Enter key places the keypad selection
into the TouchNet memory.
In the example shown above, we will adjust the current time of
1:10 PM to Daylight Savings Time. We have selected 2 from the
keypad when prompted “Hours?”. We then touch the Enter
key.
If you attempt to enter information into the TouchNet which
cannot be accepted, you will be prompted by the message
“Bad Input”. For example, if “0”was entered in the above
example, the prompt “Bad Input”would appear. A valid
number could then be selected.
Configuring The Controller –3
1
2
Figure 6 - Entering the current hour.
RELEASED Version ©Toro 2006-2006
Questo manuale è adatto per i seguenti modelli
1
Indice
Altri manuali Toro Sistema di controllo


