BOQU PHS-1701 Manuale utente

Portable pH Meter
User Manual

Content
1 Introduction....................................................................................- 1 -
1.1 Safety precautions..................................................................................- 1 -
1.2 Display and button.................................................................................- 2 -
2 Operation........................................................................................- 4 -
2.1 Calibration............................................................................................- 4 -
2.1.1 Standard buffer solution groups........................................... - 4 -
2.1.2 One point calibration............................................................ - 4 -
2.1.3 Two point calibration........................................................... - 5 -
2.1.4 Three point calibration......................................................... - 5 -
2.2 Sample measurement...........................................................................- 6 -
2.3 Temperature measurement................................................................ - 6 -
2.4 Parameter setting.................................................................................- 6 -
2.4.1 Standard buffer solution groups setting................................- 6 -
2.4.2 Mannual temp-compensation setting....................................- 7 -
2.4.3 Temperature unit setting.......................................................- 7 -
2.4.4 Prompt sound setting............................................................- 7 -
2.4.5 Remove storage data............................................................ - 7 -
2.4.6 Automatic turn off setting.................................................... - 7 -
2.5 Restore factory setting.........................................................................- 8 -
2.6 Data storage..........................................................................................- 8 -
2.6.1 Storage data reading............................................................. - 8 -

2.6.2 Storage data checking...........................................................- 9 -
2.7 Error message.................................................................................... - 11 -
3 Maintenance................................................................................. - 12 -
3.1 Meter maintenance........................................................................ - 12 -
3.2 Electrode maintenance.................................................................. - 12 -
4 Technical indexes......................................................................... - 14 -
5 Standard buffer solution groups................................................ - 15 -

-1-
1 Introduction
Thank you very much for purchase of our company's high-quality pH meter, good
ease of use, is our product's consistent pursuit.
1.1 Safety precautions
Operator protective measures
Do not work in an explosive environment! Because the instrument
case is not airtight
(May cause an explosion hazard due to corrosion caused by spark
formation or immersion in gas)。
When using chemicals and solvents, follow the operator's operating
instructions and laboratory safety procedures!
Operators operate safety precautions
It is forbidden to separate the shell of the instrument, only allow
the company to appoint a professional service personnel to repair
the instrument!
Please avoid the following environmental factors:
1. Violent shaking
2. Under sunshine for long time
3. Atmospheric humidity more than 85%
4. The presence of corrosive gases
5. Ambient temperature below 5 ° C or higher than 40 ° C
6. Strong electric field or magnetic field
- 2 -
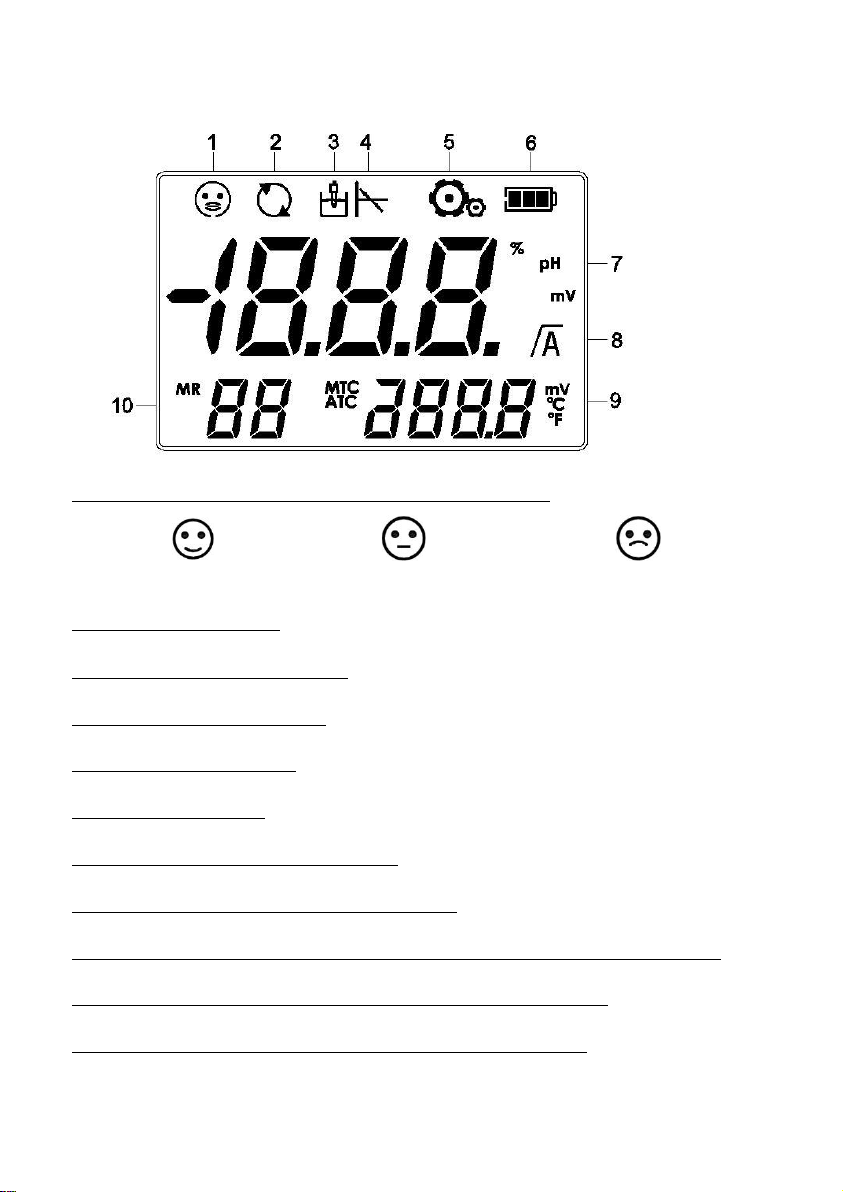
1.2 Display and button
1. Electrode status(electrode maintenance pls see 5.2)
Good Normal Bad
2. Continued boot icon
3. Electrode measurement icon
4. Electrode calibration icon
5. Parameter setting icon
6. Battery status icon
7. Electrode slope or pH/mV reading
8. Reading stable / automatic end point icon
9. The temperature in the measurement process / the reference temperature
during calibration / the zero calibration of the sensor calibration
10. Error index / calibration point / standard buffer solution
-3-
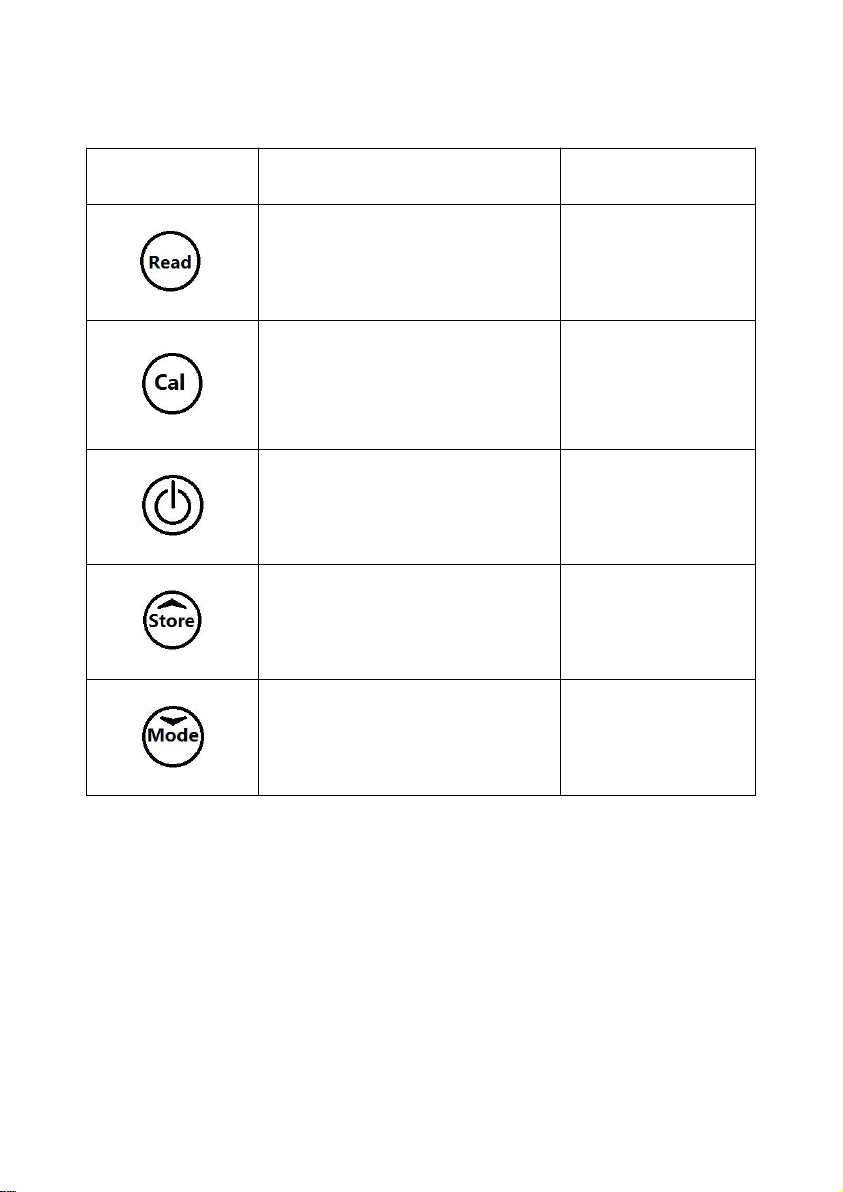
Button description:
Button
Short Press
Long Press
(3 seconds)
(Reading)
—Reading
—Confirm setting
—Set the end
point
(Calibration)
—Calibration
—Calibration
data is echoed
(ESC)
—ESC
—Turn on
—Turn off
(Store)
—Measuring data storage
—Up key to select a value
—View storage
data
(Mode)
—Mode
—Down key to select a value
—Setting

- 4 -
2. Operation
2.1 Calibration
2.1.1 Standard buffer solution groups
The instrument can be calibrated for 1 point, 2 point or 3 points. During
calibration, the meter automatically recognizes the pH of the standard buffer
solution. The automatic temperature compensation procedure is solidified in the
meter (see appendix).
The instrument has 8 sets of buffer solution (see appendix). The settings for the
buffer solution group refer to 2.4.1.
2.1.2 One point calibration
2.1.2.1 Calibration
Place the sensor in the buffer and press the "Cal" button to start the calibration.
The calibration icon will be displayed. After the signal is stabilized, the instrument
will automatically end according to the pre-selected end point or press the "Read"
button.
2.1.2.2 Store calibration result
After measuring value stable, press “Read” button, meter will display zero point
and slope, and automatically return to measurement interface.
Note:
When doing one point calibration, only zero point was adjusted. If sensor made
multi points calibration before, it’s slope will be reserved, otherwise the theory

-5-
slope (-59.16mV/pH) will be adopted. Press “Cal” for a long while, meter will
display slope and zero point, and then return to measurement interface.
2.1.3 Two point calibration
First step Press one point calibration according to 2.1.2.1。
(After the instrument's automatic end point or manual end point, do not press the
"Read" key, otherwise it will return to the measurement state)
Second step Wash electrode with distilled water。
Third step Put electrode in the second buffer solution, and pree “Cal” start the
second point calibration.
After the signal is stabilized, the instrument will automatically end according to
the preselected end point or press the "reading" key.。
Fourth step Pls see 2.1.2.2
2.1.4 Three point calibration
Process three point calibration according to 2.1.3.
Note:
It is recommended to use a temperature probe or an sensor with a built-in
temperature sensor. If the MTC (manual temperature compensation) mode is used,
all buffers and sample solutions should be kept at the same set temperature.
In order to ensure accurate pH readings, calibration should be performed
periodically.。

- 6 -
2.2 Sample measurement
Place the electrode in the sample solution and press the "Read" button to start the
measurement, and the decimal point on the screen flashes. The automatic
measurement end point (with the A icon display) is the default setting for the
meter. When the result is stable, the decimal point is no longer flashing, and there
is a display on the screen.
Press and hold the "Read" button to switch between automatic and manual
measurement end mode. To manually measure an end point, press the "Read" key
to display the value.
To view the mV value during the pH measurement, simply press the "Mode"
button to execute the mV (ORP) measurement, according to the same steps as the
pH measurement.
2.3 Temperature measurement
To improve accuracy, we recommend using a temperature probe or an electrode
with a built-in temperature sensor. When using the temperature electrode, the
screen displays the ATC symbol and the sample temperature.
Note:This meter only match with NTC30k temperature sensor。
2.4 Parameter setting
Press the "Mode" button to enter the parameter setting mode.
Press "Store" / "Mode" to select the parameters to be set;
Press "ESC" to exit the current setting mode and return to the previous mode;
-7-
Press "Read" to enter the corresponding parameter settings page, press "Store" /
"Mode" to adjust the parameters.
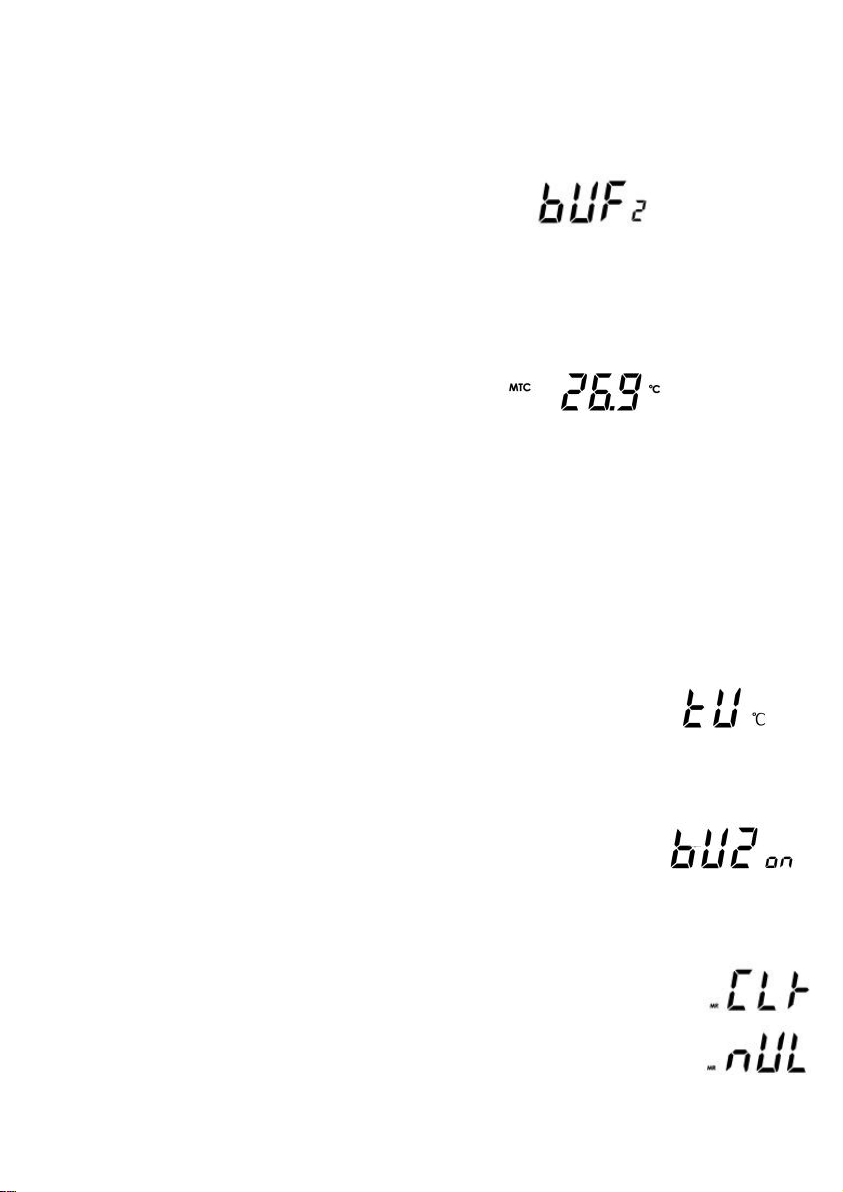
2.4.1 Standard buffer solution groups setting
Display “BUF”, press “Read” enter into standard buffer solution setting mode.
Note:Please refer to Appendix 5.1 for a total of 8 groups of buffer sets.
Default:1(NIST)
2.4.2 Manual temp-compensation setting
Display “MTC”,press “Read” enter into manual temp-compensation setting mode.
Note:When the meter does not detect the temperature sensor, it will
automatically switch to manual temperature compensation mode, and display
MTC.
Default:25 ℃。
2.4.3 Temperature unit setting
Display “TU”,press “Read” enter into temperature unit setting mode.
Default:℃。
2.4.4 Prompt sound setting
Display ”BUZ”,press “Read” enter into prompt sound setting mode
Default:ON (with sound prompt).
2.4.5 Remove stored data
Display“MR CLr”,press “Read” enter into remove the stored data mode.
Display “Read” to confirm,display “MR nUL”,indicates clear success,
Automatically exit this setting; press "ESC" to exit this setting.
Indice
Altri manuali BOQU Strumento di misura


