CLA-VAL XP2F Manuale di istruzioni

Model XP2F
Metering Package
Installation / Operation / Maintenance
Written for Version 1.0

Model XP2F
Installation, Operation, and Maintenance Manual
N-XP2F IOM V1.0-4.5 Page 2 of 35
Table of Contents
1 Introduction ............................................................................................................................................................................ 3
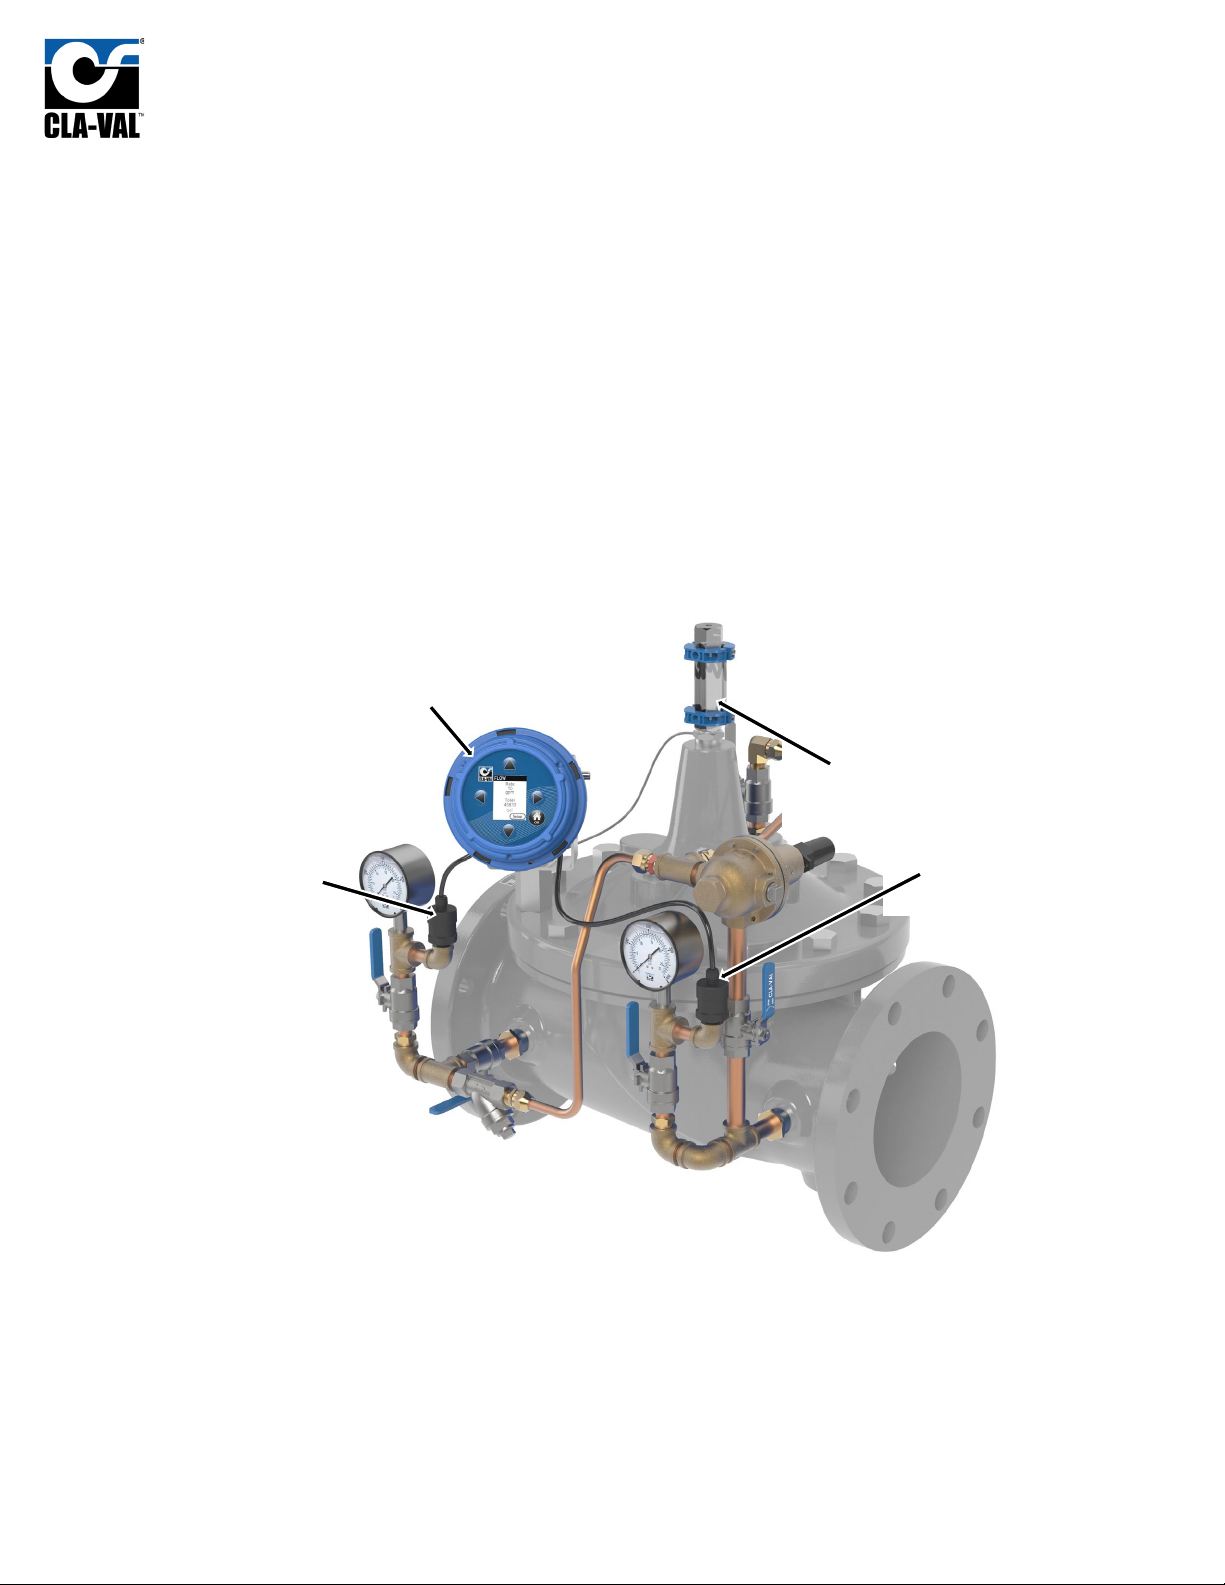
2 X117H Valve Position Transmitter........................................................................................................................................... 4
3 X141-PT Pressure Transmitters ............................................................................................................................................... 5
4 X35 Flow Calculation Module.................................................................................................................................................. 6
4.1 Installation..................................................................................................................................................................... 7
4.1.1 Valve Mounted .................................................................................................................................................... 7
4.1.2 Flat Surface Mount .............................................................................................................................................. 8
4.1.3 Installing Wire Cable Glands ................................................................................................................................ 9
4.2 Electrical Wiring........................................................................................................................................................... 10
4.2.1 Overview............................................................................................................................................................ 10
4.2.2 X35 Power Supply .............................................................................................................................................. 10
4.2.3 Analog Inputs ..................................................................................................................................................... 10
4.2.4 Analog Outputs .................................................................................................................................................. 12
4.2.5 Standard Wiring Diagram................................................................................................................................... 13
4.3 Screen Navigation........................................................................................................................................................ 14
4.4 Setup ........................................................................................................................................................................... 15
4.4.1 Initial Configuration ........................................................................................................................................... 15
4.4.2 DPM Setup ......................................................................................................................................................... 17
4.4.3 I/O Setup............................................................................................................................................................ 20
4.4.4 Calibration ......................................................................................................................................................... 22
4.4.5 Display Options .................................................................................................................................................. 23
4.4.6 Logging............................................................................................................................................................... 24
4.4.7 Date/Time .......................................................................................................................................................... 25
4.4.8 Language............................................................................................................................................................ 25
4.4.9 Factory Reset ..................................................................................................................................................... 26
4.5 SD Card Features ......................................................................................................................................................... 27
4.5.1 SD Card Removal................................................................................................................................................ 27
4.5.2 Access Logged Data............................................................................................................................................ 28
4.5.3 Firmware Update ............................................................................................................................................... 29
Appendix A: Wiring Diagram Examples........................................................................................................................................... 30
A.1 2x X141-PTs and X117H ....................................................................................................................................................... 30
A.2 DP Transmitter and X117H .................................................................................................................................................. 31
A.3 2x X141-PTs and X117D ....................................................................................................................................................... 32
A.4 DP Transmitter and X117D .................................................................................................................................................. 33
Appendix B: Full Data Acquisition Setup......................................................................................................................................... 34
B.1 Full Retransmission Wiring, 2x X141-PTs and X117H........................................................................................................... 34
B.2 Full Retransmission Device Settings..................................................................................................................................... 35

Model XP2F
Installation, Operation, and Maintenance Manual
N-XP2F IOM V1.0-4.5 Page 3 of 35
1Introduction
The XP2F is a low cost, robust, state of the art package that can accurately meter the flow through a Cla-
Val valve. To meter the flow, the XP2F assimilates data from valve mounted pressure transmitters and a
position transmitter. Using a proprietary algorithm, the flow rate through the valve is calculated and
shown on a local display. The XP2F provides 4-20mA analog outputs to retransmit the calculated flow,
measured pressures, and measured position transmitter to a nearby PLC/SCADA system. The XP2F also
logs all data to a local SD card which can be exported in CSV file format for analysis later.
The XP2F package is an ideal solution for users that need to monitor flow for control or reporting
purposes. The XP2F offers several advantages over traditional flow meter options. Because it mounts to
an existing Cla-Val valve, it’s much easier to retrofit into a system than most other flow meters (e.g. mag
meter which requires the pipeline to be cut for installation). Additionally, there is minimal straight pipe
upstream or downstream requirements for the XP2F to accurately meter flow.
In the standard setup, the XP2F package consists of an upstream and downstream pressure transmitter,
a valve position transmitter, and a calculation module as depicted in FIGURE 1.1 below:
Figure 1.1
The XP2F package can be customized with different components. The upstream and downstream
pressure transmitters can be substituted with a differential pressure transmitter. Additionally, the XP2F
comes standard with a Cla-Val X117H position transmitter (as shown in FIGURE 1.1) but can be used with
a Cla-Val X117D position transmitter as well.
X35
Flow Calculation
Module
X141-PT
Upstream Pressure
Transmitter
X141-PT
Downstream
Pressure
X117H
Valve Position
Transmitter

Model XP2F
Installation, Operation, and Maintenance Manual
N-XP2F IOM V1.0-4.5 Page 4 of 35
2X117H Valve Position Transmitter
The Cla-Val Model X117H Valve Position Transmitter is an accurate monitor of the valve position.
Through an industry standard 4-20mA, the X117H delivers accuracy within 100 micrometers. This
position transmitter easily provides the accuracy required for computer-guided control valve systems
(SCADA). The sensor requires a supply voltage of 15-30 VDC. Power can be supplied by either the X35 or
an external power source.
The X117H consists of two main parts: the
X101D Position Indicator and the X117H
Sensor Assembly. The X117H can be retrofit to
almost any Cla-Val valve. The X117H also
includes a newly designed indicator body
which allows for easier bleeding in any
situation. The new body includes a weep hole
above the sight glass (see Figure 2.1) that can
be opened via a set screw mounted in the top
of the position indicator. This greatly reduces
the likelihood of misplacing or breaking the
bleed screw while allowing easy removal of air
from the indicator housing.
The position sensor used in this assembly utilizes 3
LED’s to allow the user to monitor device status
visually (Figure 2.2).
For further installation or troubleshooting
information please refer to the corresponding
X117H N-sheet.
Figure 2.1
Green
Figure 2.2
Red
Yellow

Model XP2F
Installation, Operation, and Maintenance Manual
N-XP2F IOM V1.0-4.5 Page 5 of 35
3X141-PT Pressure Transmitters
The Cla-Val Model X141-PT consists of a pressure transmitter installed with isolation valves mounted on
the main valve inlet and/or outlet. The rugged design provides resistance to vibration, shock, wide
temperature variations, RFI and other extreme environmental conditions.Performance and reliability
are enhanced by the all-stainless steel welded measuring cell that eliminates the need for soft sealing
materials that may deteriorate over time.
The X141-PT pressure transmitter can be installed on
new or existing valves on the valve inlet and/or
outlet. The 141-PT transmitters can be paired with
Cla-Val Model X141 Pressure Gauges for both local
and remote valve pressure information. Default
configuration for the XP2F package includes 2
pressure transmitters, one for upstream pressure
and one for downstream pressure. The transmitter
requires a supply voltage of 8-30 VDC. This
transmitter will output an industry standard 4-20 mA
signal when using the default 2-wire setup. The
X141-PT will provide an accuracy of ±0.5% of the
span.
There is no field calibration or internal setup
required for the X141-PT. If needed, zero-point
calibration can be done on whatever controller is being used. For wiring examples, refer to Wiring
Diagram Examples.
Figure 3.1

Model XP2F
Installation, Operation, and Maintenance Manual
N-XP2F IOM V1.0-4.5 Page 6 of 35
4X35 Flow Calculation Module
The Cla-Val X35 Flow Calculation Module is the
centerpiece of the XP2F metering package. The X35
Module is responsible for handling all the input and
output signals in the XP2F package. The X35 has four 4-
20mA inputs and four 4-20mA outputs. The standard
inputs include Valve Position, Upstream and
Downstream Pressure Transmitters or a single DP
Transmitter. The fourth input is reserved as a spare
which can log or retransmit data from any additional 4-
20mA field device.
To calculate the metered flow, the X35 assimilates data
from valve-mounted pressure transmitters and a
position transmitter. Using a proprietary algorithm, the
flow rate through the valve is calculated and shown on
the local X35 display. The X35 provides 4-20mA analog
outputs to retransmit the calculated flow, measured
pressures, and measured position to a nearby PLC/SCADA system. The X35 also logs all data to a local SD
card which can be exported in CSV file format for later analysis. Continue below for installation, wiring,
and configuration. Refer to Wiring Diagram Examples for detailed wiring information. Refer to Screen
Navigation for menu info and advanced configuration.
Figure 4.1

Model XP2F
Installation, Operation, and Maintenance Manual
N-XP2F IOM V1.0-4.5 Page 7 of 35
4.1 Installation
The X35 Flow Calculation module can be mounted directly on a valve, on a nearby flat surface (e.g., an
electrical enclosure door or wall mounted).
4.1.1 Valve Mounted
To mount the X35 flow calculation module directly on a valve, assemble the X35 on the included rotating
support bracket along with the X56 valve cover standoff supports using the fasteners as depicted in the
Figure 4.2.
Figure 4.2

Model XP2F
Installation, Operation, and Maintenance Manual
N-XP2F IOM V1.0-4.5 Page 8 of 35
4.1.2 Flat Surface Mount
To mount the X35 calculation module on a flat surface as shown in Figure 4.3, assemble the calculation
module on the included rotating support bracket using the fasteners depicted in Figure 4.4.
Figure 4.3
Figure 4.4

Model XP2F
Installation, Operation, and Maintenance Manual
N-XP2F IOM V1.0-4.5 Page 9 of 35
4.1.3 Installing Wire Cable Glands
Included with the X35 are multiple 3-hole, 2-hole, and blank glands. These will need to be selected and installed
based on the number of wires coming and going from the X35 housing. To ensure IP68 rating, please match the
number of holes to the number of wires. Examples can be seen in Figure 4.5.
WARNING: DO NOT leave any holes/glands open. Blanks can be used to block an entire port or if a custom sized
hole needs to be drilled.
Figure 4.5 – 4 wire config (1x 2hole, 1x drilled blank), 3 wire config (1x 3hole), 3 wire config (1x 2hole), 6 wire (1x 2hole, 1x 3hole)

Model XP2F
Installation, Operation, and Maintenance Manual
N-XP2F IOM V1.0-4.5 Page 10 of 35
4.2 Electrical Wiring
4.2.1 Overview
The XP2F integrates several components electrically, and this section is designated to explain how those
electrical connections should be made. The X35 flow calculation model is the connection point for all
other components in the package, so the wiring is explained in terms of the X35.
4.2.2 X35 Power Supply
The X35 has the following power draw requirements:
•6-24 VDC
•2.2 watt draw when screen is off
•3.3 watt draw when screen is on
4.2.3 Analog Inputs
The X35 has 4 analog input channels that can accept a standard 4-20mA signal. The X35 can provide loop
power to the sensor or allow the sensor to be field powered. The wiring terminals used on the X35
determine whether the analog input provides power. To have the X35 provide loop power to the sensor,
see the wiring diagram in Figure 4.6.
Figure 4.6
Altri manuali per XP2F
1
Indice
Altri manuali CLA-VAL Strumento di misura

CLA-VAL
CLA-VAL VC12 Manuale di programmazione

CLA-VAL
CLA-VAL X144D e-FlowMeter Manuale utente

CLA-VAL
CLA-VAL XP2F Manuale del proprietario

CLA-VAL
CLA-VAL X144D e-FlowMeter Manuale utente

CLA-VAL
CLA-VAL e-FlowMeter Manuale utente

CLA-VAL
CLA-VAL X144D e-FlowMeter Manuale del proprietario

CLA-VAL
CLA-VAL e-Lift-34 Manuale utente


