
Ginnys 779570 Manuale utente

8-QT. MULTICOOKER
User Guide
Item: 779570
Ginnys.com • 800-544-1590
Facebook.com/GinnysBrand
Pinterest.com/GinnysBrand
BRAND

TABLE OF CONTENTS
Important Safeguards 3
Electrical Safety and Specicaons 4
Get to Know Your Appliance 4–5
How to Operate 6–11
Cleaning & Care 12
Troubleshoong 13–14
Recipes 15–19
Warranty 20
____________________________________________________________
____________________________________________________________
Thank you for purchasing a Ginny’s Brand 8-Qt.
Mulcooker. Pressure cooking puts quicker and
healthier dinners at your ngerps. The family-size
pot, presets galore and several safety features make
using this pressure cooker simple and worry free!
See the recipes in the back of this manual to get
started—through breakfast to dinner and even
dessert. Enjoy!
2Ginnys.com 800-544-1590
____________________________________________________________
____________________________________________________________

IMPORTANT SAFEGUARDS
READ CAREFULLY BEFORE USING AND SAVE THESE INSTRUCTIONS!
• FOR HOUSEHOLD USE ONLY. DO NOT USE THIS APPLIANCE FOR OTHER
THAN ITS INTENDED USE.
• Remove all packaging materials and labels before rst use.
• Wash all removable parts before rst use. See Cleaning & Care.
• A short cord is provided to reduce the hazards resulng from tripping
or entanglement. This detachable cord should always be aached to the
appliance rst, then to the electrical outlet. DO NOT drape the cord over
a counter or tabletop where it can be pulled on or tripped over. DO NOT
wrap the cord ghtly around the appliance for storage.
• CLOSE SUPERVISION IS NECESSARY WHEN USING THIS APPLIANCE NEAR
CHILDREN.
• A re may occur if this appliance is used near ammable materials,
including curtains, towels, walls, etc.
• DO NOT place any paper, plasc or other nonfood items in the appliance.
• DO NOT place the appliance or its cord on or near a heated surface or in
a heated oven.
• Always use this appliance on a stable, dry, heat-resistant surface.
• DO NOT use near water.
• DO NOT use an accessory or aachment not recommended by Ginny’s,
as this may cause injury or damage the appliance.
• Keep hands, hair and clothing away from all hot surfaces.
• The lid for this unit has a safety oat valve that prevents the user from
opening the lid when the cooker is pressurized. DO NOT OPEN THE LID
UNTIL INTERNAL PRESSURE HAS BEEN RELEASED. NEVER FORCE THE
LID OPEN.
• Always use handles and wear oven mis when handling hot food or
appliances. DO NOT aempt to move an appliance when it is hot or has
hot contents.
• DO NOT use outdoors.
• Turn o and unplug this appliance when not in use.
• THERE ARE NO SERVICEABLE PARTS INSIDE THIS APPLIANCE.
• DO NOT USE AN APPLIANCE WITH A DAMAGED CORD OR PLUG, OR
AFTER THE APPLIANCE MALFUNCTIONS OR HAS BEEN DAMAGED IN ANY
MANNER.
• Appliances contain valuable materials that can be recycled. Dispose of
old appliances using appropriate collecon systems in accordance with
federal and local regulaons.
3
Facebook.com/GinnysBrand

ELECTRICAL SAFETY
SPECIFICATIONS
This appliance is equipped with a detachable 3-prong grounding plug. This is
a safety feature to reduce the risk of electrical shock. DO NOT use an exten-
sion cord with this appliance. The plug should be aached to the appliance
before connecng to an electrical outlet. It is recommended that an electri-
cal outlet serving ONLY this appliance be used. This outlet must be properly
installed and grounded. If you have any quesons about the grounding or
electrical instrucons, contact a qualied electrician. DO NOT aempt to
modify the plug in any way. Ginny’s cannot accept any liability for damage or
injury resulng from failure to observe these safety procedures.
POWER RATING 120V, 60Hz, 1200W
CAPACITY 8 quarts
CORD LENGTH 48"
DIMENSIONS 15" W x 14½" H x 13" D
MODEL GT801
4Pinterest.com/GinnysBrand
GET TO KNOW YOUR APPLIANCE
14
(connued on next page)
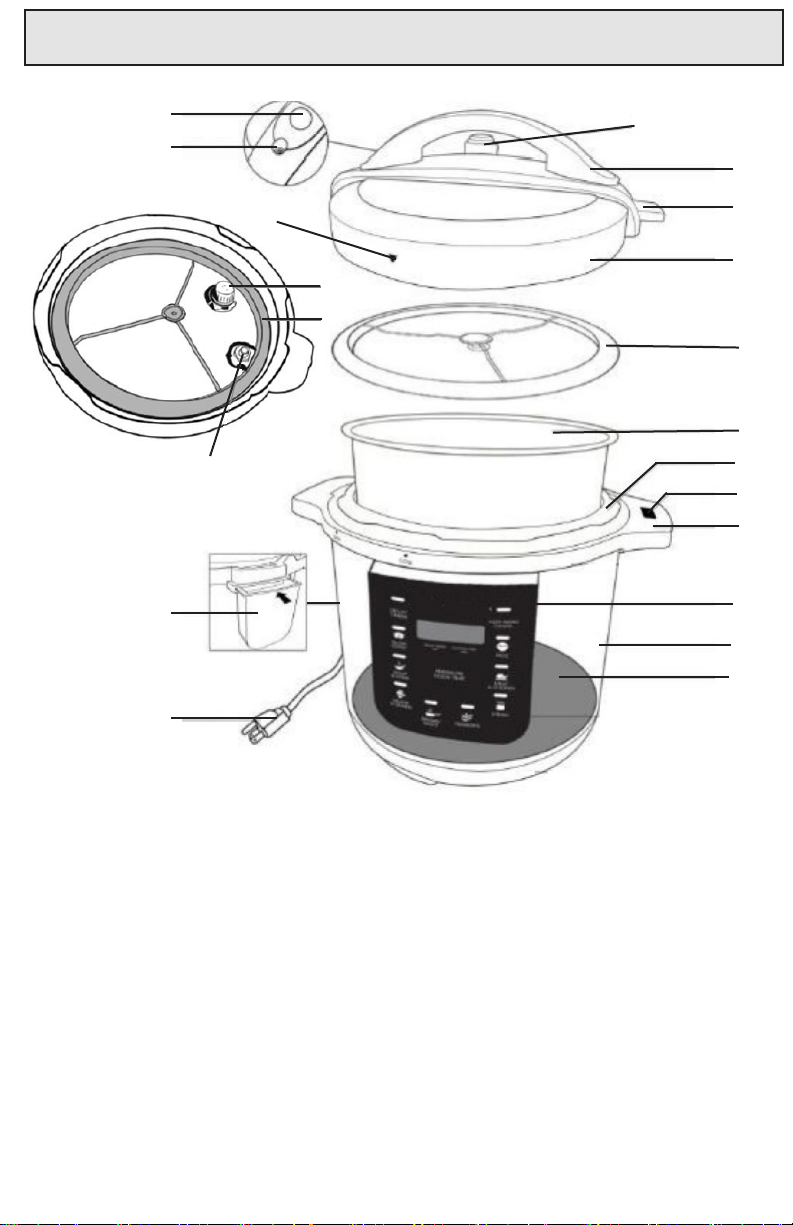
GET TO KNOW YOUR APPLIANCE
5
Ginnys.com 800-544-1590
1. Lid Release Buon 10. Base Interior
2. Safety Float Valve 11. Notch for Rest Tab
3. Pressure Liming Valve 12. Base Handle (2)
4. Lid Handle 13. Condensaon Cup
5. Lid Rest Tab 14. Control Panel
6. Lock Alignment Arrow 15. Base
7. Lid 16. Interior Heang Plate
8. Lid Gasket 17. Detachable Power Cord
9. Removable Pot 18. Plasc Cup and Spoon (not shown)
19. Wire Rack (not shown)
7
3
1
4
5
8
9
10
11
12
14
15
16
17
13
6
2
3
8
2
View
Under Lid

HOW TO OPERATE
6
Ginnys.com 800-544-1590
WARNINGS:
• If the lid is not properly locked on to the base, the unit will not
operate (except for BROWN/SAUTÉ funcon). The display will show
“LID” and the unit will beep unl the lid is properly closed.
• To avoid clogging valves, DO NOT ll the pot past the 10-cup line
when cooking foods that expand or foam such as beans or grains.
• Always check that pressure valves are clear before use.
• DO NOT use this pressure cooker with oil (like for deep frying).
• Always keep the base interior and heang plate clean.
• DO NOT use the pot with other heang sources.
• DO NOT use any vessel, other than the supplied removable pot, in
the pressure cooker.
• Use wooden or plasc utensils in the pot. DO NOT use metal utensils.
• DO NOT operate the pressure cooker under cabinets; steam may
cause damage.
• KEEP HANDS AND FACE AWAY FROM UNIT WHEN RELEASING
PRESSURE!
• Use extreme cauon when removing the lid aer cooking; lt it away
from you so any remaining steam is away from your face.
• DO NOT use quick release with recipes containing lots of liquid.
• DO NOT cover or block the valves.
• DO NOT use the pressure cooker without liquid.
MENU BUTTON DEFAULT COOK TIME
(porons 3 lbs. or less)
ADJUSTABLE COOK
TIME
RICE 12 MINUTES 5–20 MINUTES
SOUP & STEW 25 MINUTES 20–60 MINUTES
MEAT/CHICKEN 12 MINUTES 5–60 MINUTES
SLOW COOK 6 HOURS .5–9.5 HOURS
YOGURT 8 HOURS 6–24 HOURS
BROWN/SAUTÉ 5 MINUTES 3–8 MINUTES
FISH/VEGETABLE 5 MINUTES 3–15 MINUTES
DESSERTS 18 MINUTES 5–33 MINUTES

HOW TO OPERATE
7
Facebook.com/GinnysBrand
PRESSURE COOKING
RICE, SOUP/STEW, DESSERTS, MEAT/CHICKEN and FISH/VEGETABLES are the
preset funcons (default mes are on page 6).
1. Put the food in the pot per your recipe.
2. Lock on the lid:
a. Ensure the gasket is properly installed on the lid and the valves are
clean. Clean any food from the rim of the pot for a proper seal.
b. Align the arrow on the lid with “OPEN” on the base. Turn the lid
counterclockwise unl it clicks and the arrow is at “CLOSE.”
3. Plug the power cord into an electrical outlet. The display will show
“00:00.”
4. Set the pressure liming valve to AIRTIGHT.
5. Press a funcon and the default cook me will display.
6. To adjust the me per your recipe, press PRESSURE COOK TIME. Each press
of this buon increases cook me by 1 minute. Hold for rapid increase of
me (me will start over again when the maximum for that funcon is
reached). At the desired me, stop pressing PRESSURE COOK TIME and the
cooker will start automacally in 5 seconds.
If you wait too long to press PRESSURE COOK TIME, the cooker
will begin operaon and you won’t be able to adjust the me.
Press CANCEL and start over.
7. The indicator light (above each funcon buon) will blink ve mes and
the unit will begin heang.
8. As pressure builds, the safety oat valve will rise, locking on the lid. (It
may take 15–40 minutes for the cooker to reach full pressure, depending
on amount of food.)
Before rst use, ll the pot to the 6-cup line with water, lock on
the lid (see #2 below), turn the pressure release valve to AIRTIGHT
and press SOUP/STEW. When complete, CANCEL and unplug the
unit. Release the pressure naturally (see page 8, #12) for 15
minutes. Next, carefully turn the valve to EXHAUST with an oven
mi to release any remaining pressure. Carefully remove the lid
(see page 8, #13), cool completely and wash the unit.
(connued on next page)

8
Pinterest.com/GinnysBrand
HOW TO OPERATE
9. While the unit is building up pressure, the display will show a scrolling
paern. When the unit is pressurized, the cooking me count down will
show on the display with a “P.”
10. When done cooking, the cooker will automacally switch to KEEP WARM.
The KEEP WARM light will illuminate and the display will show “bb.” DO
NOT use KEEP WARM for more than 4 hours.
11. Press CANCEL and unplug the power cord from the outlet.
12. Per your recipe, release the pressure by:
a. NATURAL RELEASE: Leave the pressure liming valve set to
AIRTIGHT and let the unit cool for 15–30 minutes unl the safety
oat valve drops. With an oven mi, carefully set the pressure
liming valve to EXHAUST to ensure all the pressure is released.
The safety oat valve will be completely dropped and you will be
able to open the lid.
b. QUICK RELEASE: With an oven mi, carefully set the pressure
liming valve to EXHAUST. HOT STEAM WILL BE RELEASED
THROUGH THIS VALVE. KEEP HANDS AND FACE CLEAR! When
all the pressure is released, the safety oat valve will be completely
dropped and you will be able to open the lid.
13. Open the lid:
a. Hold the handle rmly while pushing down on the red lid release
buon; turn the lid clockwise and li up. NEVER FORCE THE LID
OPEN!
b. Insert the rest tab into the notch in the handle to stand the lid.
USING DELAY TIMER
1. Program the pressure cooker to delay cooking by up to 24 hours. DO NOT
use DELAY TIMER to cook foods that may spoil!
2. Put the food in the pot per your recipe. Lock on the lid and plug the power
cord into an electrical outlet.
3. Set the pressure liming valve to AIRTIGHT.
4. Press DELAY TIMER to set the amount of delay me in 30-minute
intervals.
5. Select the desired cooking funcon and adjust cooking me, if needed.
6. The display will count down the delay me. When that me expires, the
cooker will automacally begin to heat. When pressurized, the display will
count down the set cooking me.

9
Ginnys.com 800-544-1590
HOW TO OPERATE
MAKING RICE
1. When cooking rice, the maximum amount is 8 cups.
2. When measuring rice, use the plasc rice cup provided along with the pot
markings to make perfect rice every me. DO NOT use a standard
measuring cup.
For example, when making 4 cups of white rice, use 4 rice cup
measures of rice and ll with water to the 4 cup mark in the pot.
3. When cooking 1–2 cups of uncooked rice, add 1 Tbsp. buer or oil. For
2–4 cups of rice, add 2 Tbsp. buer or oil. This prevents foaming.
4. Lock on the lid and plug the power cord into an electrical outlet.
5. Set the pressure liming valve to AIRTIGHT.
6. Press RICE and press PRESSURE COOK TIME to adjust the cooking me, if
desired.
7. When done cooking, the cooker will automacally switch to KEEP WARM.
8. Use NATURAL RELEASE for 15 minutes.
9. With an oven mi, carefully set the pressure liming valve to EXHAUST.
CANCEL and unplug the unit. Carefully remove the lid.
MAKING YOGURT
1. Add 4–5 cups of whole milk to the pot. Sr in 2 Tbsp. plain yogurt with live
and acve cultures. Lock on the pressure cooker lid.
2. Plug the power cord into an electrical outlet.
3. This funcon does not cook with pressure, so set the pressure liming
valve to EXHAUST.
4. Press YOGURT. The default me will be 8 hours. Press PRESSURE COOK
TIME to adjust the me, if desired. A longer cooking me will yield a more
tangy avor (8–12 hours is recommended).
5. Preheang may take 5–20 minutes. When heated, the unit will beep and
the cooking me will begin counng down.
6. When done, press CANCEL and unplug the unit.
7. Remove the lid and whisk the yogurt vigorously a few mes. Let cool, then
store in a container with a lid and refrigerate at least 8 hours.
8. Strain the yogurt with a cheesecloth if thicker texture is desired.

HOW TO OPERATE
10
Ginnys.com 800-544-1590
USING BROWN/SAUTÉ
1. Press BROWN/SAUTÉ. Press PRESSURE COOK TIME if more than 5 minutes
will be needed. DO NOT use the lid.
2. Add food to the pot per your recipe and sr or turn food as needed. DO
NOT use metal utensils!
3. Press CANCEL when done.
Allow the unit to rest 5 minutes aer using BROWN/SAUTÉ
before selecng another funcon.
SLOW COOKING
1. Put the food in the pot per your slow cooker recipe to cook on low.
2. Lock on the lid and plug the power cord into an electrical outlet.
3. Set the pressure liming valve to EXHAUST. The cooker does not pressurize
for SLOW COOK.
4. Press SLOW COOK once and the display will show the default me of 6:00.
Quickly connue to press SLOW COOK to increase cook me in 30-minute
increments.
5. The SLOW COOK indicator will blink ve mes and then illuminate solid
when heang begins.
6. The unit may take 5–20 minutes to reach the cooking temperature of
approximately 200° F before beginning to count down cooking me.
7. When done cooking, the cooker will automacally switch to KEEP WARM.
DO NOT use KEEP WARM for more than 4 hours.
8. Press CANCEL and carefully remove the lid (there is no pressure to release).
9. Unplug the power cord from the outlet.
KEEP WARM/CANCEL: When a funcon is done, the cooker will set to
KEEP WARM automacally. To cancel a funcon or seng, press CANCEL.
Indice
Altri manuali Ginnys Elettrodomestico da cucina

Ginnys
Ginnys GR 41140 Manuale utente

Ginnys
Ginnys DKM9801 Manuale utente

Ginnys
Ginnys 3K076 Manuale utente

Ginnys
Ginnys 724554 Manuale utente

Ginnys
Ginnys DCC0916 Manuale utente

Ginnys
Ginnys DK-10 Manuale utente

Ginnys
Ginnys 717246 Manuale utente

Ginnys
Ginnys 717250 Manuale utente

Ginnys
Ginnys 773774 Manuale utente

Ginnys
Ginnys GD–15B Manuale utente

Ginnys
Ginnys HOUS-HS-3318 Manuale utente

Ginnys
Ginnys 740533 Manuale utente

Ginnys
Ginnys 735649 Manuale utente

Ginnys
Ginnys 746835 Manuale utente

Ginnys
Ginnys TX-103S Manuale utente

Ginnys
Ginnys 724610 Manuale utente

Ginnys
Ginnys 733060 Manuale utente

Ginnys
Ginnys 771406 Manuale utente

Ginnys
Ginnys 767048 Manuale utente

Ginnys
Ginnys 767529 Manuale utente


