Smartplanet SCM-1 Manuale utente

SCM-1
PLEASE READ THESE INSTRUCTIONS CAREFULLY
AND RETAIN FOR FUTURE REFERENCE.

1 2
CONGRATULATIONS
You are now the proud new owner of a
SMART PLANET Sweet Heart Cupcake Maker
model no. SCM-1
Before using it for the rst time, kindly take time to care-
fully read your instruction manual. Please observe all safety
precautions and follow operating procedures. After reading,
kindly store your instruction manual in a safe place for your
future reference. If you pass this appliance to a third party,
please include the operating instruction manual as well.
PARTS DESCRIPTION
Electrical Specications
VOLTAGE FREQUENCY WATTAGE
120 V 60Hz 1000 W
ELECTRICITY PRECAUTIONS
• To protect against electric shock, do not immerse cord,
plugs, or other electric parts in water or other liquids.
• Do not operate any appliance with a damaged cord or plug.
• Do not use this appliance outdoors.
• After baking, unplug cord from electrical outlet.
• Do not leave the appliance plugged in when it is not
being used.
• Always unplug the appliance from electrical outlet and
allow to cool before cleaning.
• Once this unit is plugged into an electrical outlet it should
not be left unattended.
• A short power cord is provided with this appliance to
reduce the risk of entanglement or tripping. While we do not
recommend it, extension cords may be used if care is
exercised. If an extension cord is used, ensure that the
marked electrical rating of the extension cord is equal to or
greater than the appliance. If the plug is grounded, the
extension cord must be a grounded type-3 wire cord. To
avoid pulling, tripping or entanglement, position the ex-
tension cord so that it does not hang over the edge of the
counter, table or other area where it can be pulled on by
children or tripped over.
A. Power Light (Red)
B. Ready Light (Green)
C. Top Shell
D. Housing
E. Hot Plates
READ ALL INSTRUCTIONS
bEfORE USINg ThE
SwEEThEART CUPCAkE mAkER
APPLIANCE
A
b
D
E
E
D

3 4
ImPORTANT SAfEgUARDS
• Never touch hot surfaces. Always use hot pads or
oven mitts.
• To protect against re, electric shock and injury, do not
immerse the cord, plug or the appliance in water or any
other liquid.
• Close supervision is necessary when this appliance is
used by or near children.
• Before use, unwind the power cord completely and keep
the cord away from the hot parts of the appliance.
• Do not let the power cord hang over the edge of a table,
counter or touch hot surfaces.
• Do not place the appliance on or near hot gas or electric
burner, or in a heated oven.
• Do not operate the appliance if it has a damaged cord
and/or plug, if the appliance has malfunctioned, or has been
damaged in any manner. Contact the Smart Planet Service
Center for examination, repair or replacement.
Do not attempt to repair this appliance yourself.
• The use of accessories and/or attachments is not recom-
mended and may result in re, electric shock or injury.
• Always unplug the appliance from the electrical outlet
when not in use and before cleaning to avoid accidental
electrical shock. Allow it to cool before cleaning.
• While the appliance is hot, even if unplugged, there is a
danger of getting burned. Do not touch the appliance or
place it into storage while hot.
• Do not use this appliance other than for its intended use.
• For use only with 120V. 60HZ power source.
Use an electrical socket with a good ground connection.
• For interior household use only. Do not use this appliance
outdoors.
PRECAUTIONS
fOR USE AROUND ChILDREN
• Close supervision is necessary when this appliance
is used near children.
• Do not allow cord to hang over any edge where a
child can reach it. Arrange cord to avoid pulling,
tripping or entanglement.
CAUTION
To prevent burns or other personal injuries
to children, read and follow all
instructions and warnings.
bEfORE INITIAL USE
1. When using for the rst time, remove all packaging
materials and unwind the power cord from the appliance.
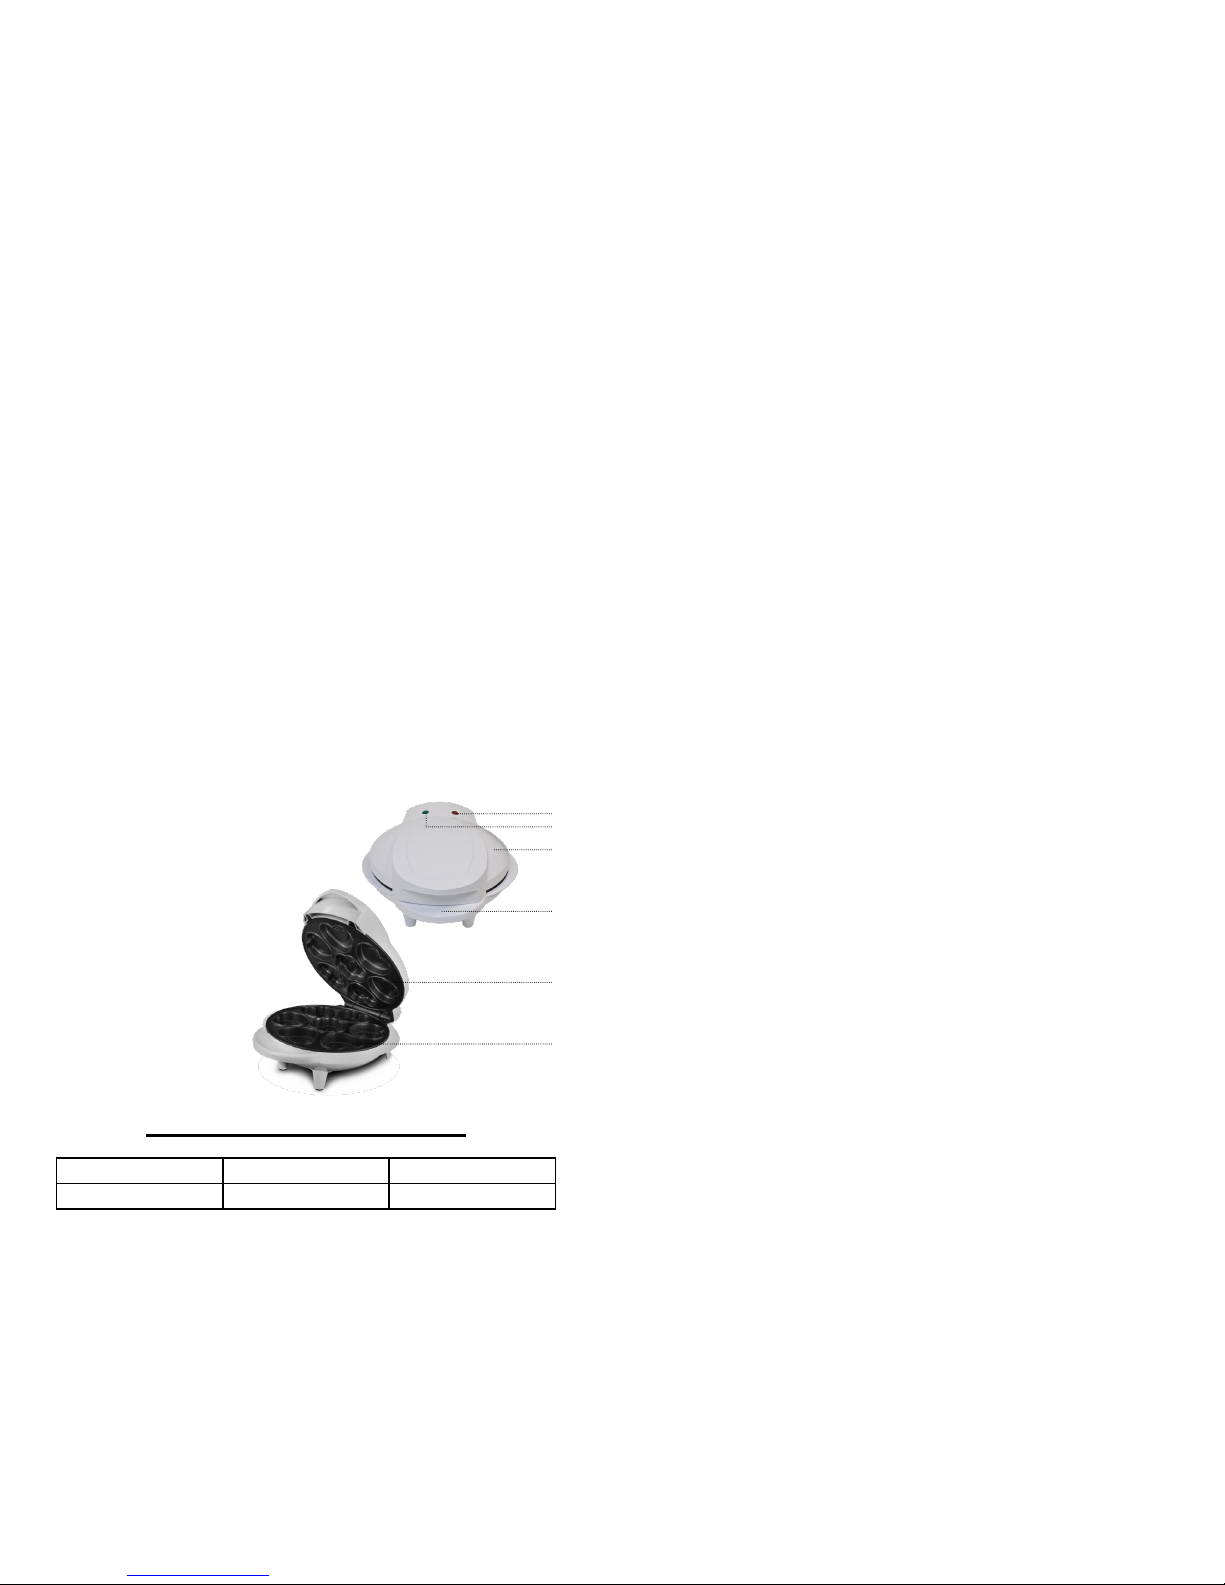
2. Open the unit by lifting the front handle.
3. Clean the appliance with warm soapy water using a
damp cloth, then dry it. DO NOT immerse the whole unit in
water at anytime.

5 6
OPERATINg INSTRUCTIONS
• Place the appliance on a at dry surface.
• Brush vegetable oil or cooking spray on cooking surfaces.
• Close the Sweet Heart Cup Cake maker.
• Plug cord in 120 volt electrical outlet.
• Keep unit closed and preheat until hot or ready light
turns on.
• The power light will illuminate as the heating
surface heats.
• The appliance must be pre-heated before using.
• As soon as the appliance is ready, the green ready light
will turn on.
• You can now begin baking.
• Open the appliance using the front handle only.
• Add enough batter so each well is lled just below the
top of the surface level as the cupcake will rise when
baking. Usually that will be 2/3 full though some prefer
slightly more batter.
• CAUTION: if too much batter is used, the appliance
will become difficult to close. To remedy this, remove
some of the filling. Never force this appliance to close
when it is over filled.
• During baking process the temperature regulating
thermostat switches off and on again depending on
heating levels.
CLEANINg & CARE
• Always clean your appliance after each use to prevent a
build up of batter.
• Always disconnect the power plug from the wall outlet
before cleaning.
• Clean the unit only when it has completely cooled down.
• Clean the housing surface and the outer surfaces of the
unit with a soft, damp cloth. If left over batter is difcult to
remove, brush surface with a little oil. Allow to stand for ve
minutes then wipe with a damp cloth. Do not use abrasives
or metal scourers as they will scratch the non-stick surface
of the cooking plates.
• CAUTION: To avoid electric shock, DO NOT immerse the
appliance in water or other liquids.
• Do not place the unit in the dishwasher.
4. Before using the appliance, make sure it is at least 4-6”
away from any obstacles.
5. There may be a slight smell and a small amount of
smoke the rst time the appliance is used. This is normal
and temporary. Make sure there is sufcient ventilation.
DO NOT put the Sweetheart Cupcake Maker into
the dishwasher. This will permanently damage the
product and will void the warranty.

7 8
• After completion of the baking process (approx. 5 to 8
minutes), carefully open the unit and remove the baked
items with the help of a at wooden, silicone or plastic
spatula.
Never use a sharp or metal object (e.g. knives, metal
spatulas, etc.) as this will damage the non-stick coating.
• The cupcakes are done when they are golden brown on
the bottom and light tan on the top.
• If cupcakes do not lift out easily, close the cover and bake
a few minutes longer.
• To Bake more cupcakes, re-brush the cooking surface
with oil or cooking spray, close the appliance again and wait
until the heating surfaces have reheated sufciently.
• When the ready light illuminates again, the baking
process can be repeated as described above.
• When done using the unit, disconnect the electric
plug immediately. Keep the appliance open allowing
it to cool down.
• Caution: The heating surfaces as well as the sides and
top of this appliance may get very hot. Avoid contact with
these hot areas by only using the handles and an oven mitt.
• The appliance must always be positioned horizontally on
a at surface during use.
hELPfUL hINTS
1. There may be a slight smell and a small amount of
smoke the first time the appliance is used. This is normal
and temporary. Make sure there is sufficient ventilation.
2. Should the top of your cupcakes or muffins be
light and not brown, try adding a little more batter to
each cavity.
3. If the sweetheart cupcakes are too brown,
insufficient batter is used or the cooking time is too
long. Ensure cooking plate is full or reduce cooking
time before checking.
4. Make sure that the plates are cleaned and lightly oiled
before each use to prevent the sweetheart cupcake from
sticking and ensure easy removal.
5. Use only wooden, plastic,or rubber utensils. DO
NOT use sharp-edged cooking tools such as knives,
forks, spoons etc. as the scratching will affect the
non-stick performance.
6. The Sweetheart Cupcake Maker allows you to use
any store bought cake mix. Follow package directions to
prepare the batter, but please note that the Sweetheart
Cupcake Maker cooks faster than a traditional oven and
therefore the cooking times will need to be adjusted.

9 10
Recipes
Red VelVet CupCakes
1 cup all-purpose our
1 tablespoon unsweetened cocoa
1/4 teaspoon baking powder
1/4 teaspoon baking soda
Dash salt
1/4 cup butter, softened
2/3 cup sugar
2 eggs
1/2 cup sour cream
1 1/2 teaspoons red food coloring
1 teaspoon vanilla
1. Preheat The Sweetheart Cupcake Maker until ready light turns on.
2. Brush vegetable oil or cooking spray on cooking surfaces.
3. Combine our, cocoa, soda, baking powder, baking soda and salt;
set aside.
4. Beat together butter and sugar until creamy.
5. Beat in eggs until well blended. Beat in sour cream. Blend in dry
ingredients.
6. Blend in red food coloring and vanilla.
7. Spoon about 2 tablespoons of batter evenly into each cupcake
well. Bake for 5-8 minutes or until toothpick inserted in center comes
out clean.
8. Remove cupcakes and allow to cool.
9. Once the cupcakes are completely cooled, frost with your favorite
frosting and decorate as you desire.
The easiest way to make cupcakes is to use a favorite packaged cake
mix. Read the labels as some work better than others for cupcakes.
Fill each cup with about 2 tablespoons of batter. Bake in the cupcake
maker, about 5 to 8 minutes or until toothpick inserted in center comes
out clean.
**If your cupcakes do not rise reduce the amount of water or liquid in
the recipe so that the batter has the thickness of toothpaste.
Here are some fun recipes to enjoy.
** Cream Cheese Frosting tastes and looks great on
Red Velvet Cupcakes.

11 12
RaspbeRRy
CheeseCake CupCakes
1 package cream cheese, softened (8 ounces)
1/4 cup sugar
1 egg
1/2 teaspoon vanilla
16 vanilla wafers (optional)
3 tablespoons seedless strawberry preserves
8 fresh strawberries, stemmed and halved
1 cup of your favorite frosting (optional)
1. Preheat The Sweetheart Cupcake Maker until ready light turns on.
2. Brush vegetable oil or cooking spray on cooking surfaces.
3. Beat cream cheese until smooth.
4. Add sugar, egg and vanilla and beat until smooth.
5. Crumble the vanilla wafers and place the crumbs at the bottom of the
cupcake wells.
6. Spoon about 2 tablespoons of cream cheese mixture into each
cupcake well. Bake 5-8 minutes or until softly set.
7. Carefully remove each cheesecake and place on a rack to cool.
8. Cover and refrigerate baked cheesecakes overnight or several hours
until well chilled.
9. Top with your favorite frosting (optional).
10. Heats the raspberry preserves and drizzle over the top of each
cupcake as a glaze. Garnish with mint and or raspberries.
bluebeRRy Muffins
3 tablespoons butter, softened
6 tablespoons sugar
1 egg
3 tablespoons milk
2/3 cup all-purpose our
1/2 teaspoon baking powder
Dash of salt
1/2 teaspoon cinnamon, optional
1/3 cup small blueberries
1. Preheat The Sweetheart Cupcake Maker until ready light turns on.
2. Brush vegetable oil or cooking spray on cooking surfaces.
3. Beat together butter and sugar until creamy.
4. Beat in egg and stir in milk.
5. Add dry ingredients and blend until the batter is smooth.
6. Stir in blueberries.
7. Spoon about 2 tablespoons of batter evenly into each cupcake
well. Bake for 5-8 minutes or until toothpick inserted in center
comes out clean.
8. Remove cupcakes and allow to cool.

13 14
key liMe CupCakes
1 box lemon cake mix
1 box (4-serving size) lime-avored gelatin
3/4 cup water
1/3 cup Key lime juice
1/3 cup vegetable oil
3 eggs
2 or 3 drops green food color, if desired
Glaze & Frosting
1 cup powdered sugar
2 to 2 1/2 tablespoons Key lime juice
1 package (8 oz) cream cheese, softened
1/4 cup butter or margarine, softened
1 teaspoon vanilla
3 1/2 cups powdered sugar
Grated lime peel, lime wedge, and or butterscotch crunch for garnish
1. Preheat The Sweetheart Cupcake Maker until ready light turns on.
2. Brush vegetable oil or cooking spray on cooking surfaces.
3. In large bowl, beat cupcake ingredients together.
4. Spoon about 2 tablespoons of batter evenly into each cupcake
well. Bake for 5-8 minutes or until toothpick inserted in center comes
out clean.
5. Remove cupcakes and allow to cool.
6. In large bowl, beat cream cheese and butter until light and uffy.
Beat in vanilla and 3 1/2 cups powdered sugar until mixed; beat until
uffy. Frost cupcakes, mounding and swirling frosting in center.
7. In small bowl, mix 1 cup powdered sugar and enough of the 2 to
2 1/2 tablespoons lime juice until glaze is smooth and thin enough to
drizzle. Drizzle and spread glaze over cupcakes.
8. Garnish with lime peel, wedge, and/or butterscotch crunch. Store
covered in refrigerator.
CaRaMel MaCChiato
2 1/2 (313g) cups all-purpose our
2 tsp baking powder
1/2 tsp salt
3/4 (180ml) cup strongly brewed coffee, cooled to warm
1/4 (60ml) cup milk
1 tbsp Kahlua
12 tbsp (170g) unsalted butter, softened
1 cup (200g) sugar
3 eggs
1 rounded tsp instant espresso
Espresso beans, for garnish.
Whipped Cream Topping
200g (around 1 cup) whipping cream
3 tbsp (40g) sugar
1tsp vanilla extract
1-2 tsp Kahlua (Optional. Don’t put too much, or the cream will be
too soft for piping)
Caramel Sauce
(this makes more than needed, use remaining as an ice-cream topper
or a mix-in for coffee)
1/2 cup (100g) sugar
3 tbsp (43g) unsalted butter, cut into pieces
4 tbsp (60g) heavy cream
1. Preheat The Sweetheart Cupcake Maker until ready light turns on.
2. Brush vegetable oil or cooking spray on cooking surfaces.
3. Stir together our, baking powder, and salt in a small bowl and set
aside. Combine coffee, milk, and Kahlua in a cup and set aside.
4. Cream butter and sugar until light and fluffy. Beat eggs in one
at a time.

15 16
6. Beat in another third of our mixture, then the rest of the liquid,
then the remaining our mixture. Mix in the instant espresso.
7. Spoon about 2 tablespoons of batter evenly into each cupcake
well. Bake for 5-8 minutes or until toothpick inserted in center comes
out clean.
8. Remove cupcakes and allow to cool.
Make Caramel Sauce
1. Warm the cream up in a small microwaveable bowl in the micro-
wave. Set aside.
2. Spread sugar evenly across the bottom of a heavy bottomed
saucepan and put over medium-high ame. Try not to touch the
sugar but watch carefully as it melts.
3. As soon as it is browning, you can start to stir. When it looks like
all of it has browned lightly, remove the pot from heat and stir in but-
ter. Be careful because it will bubble up.
4. Bring it back to the ame and stir for a few seconds until smooth.
Remove from the heat again and add the warmed heavy cream, again
careful of violent bubbling. Stir rapidly until smooth. Set aside and
allow to cool to lukewarm.
Make Whipped Cream Topping and Assemble
(Do not make this until the cupcakes are thoroughly cooled).
1. Whip the cream and sugar until soft peaks form. Add in vanilla and
Kahlua and whip until medium peaks form.
2. Transfer to a piping bag with a star tip and pipe on top of
each cupcake.
3. Drizzle the cool caramel sauce over the cupcakes with a spoon,
garnish with an espresso bean.
MeyeR leMon CupCakes
2 cups all purpose our
1 ½ teaspoon baking powder
¼ teaspoon salt
1 ½ cups sugar
2 egg whites lightly beaten
½ cup part-skim ricotta
1/3 cup butter, melted
1 cup buttermilk
1 teaspoon lemon extract
1 Meyer lemon, zested and juiced
Meringue Frosting
4 large egg whites
2/3 cup sugar
1 teaspoon lemon juice
1 teaspoon nely grated lemon zest
Pinch cream of tartar
Pinch ne salt
1. Preheat The Sweetheart Cupcake Maker until ready light turns on.
2. Brush vegetable oil or cooking spray on cooking surfaces.
3. In a mixing bowl, sift together the our, baking powder and salt.
Set aside.
4. Beat together the sugar and egg until light and uffy, about 3 minutes.
5. Add the ricotta, melted butter and buttermilk to the sugar mixture.
6. Begin adding the our mixture to the sugar mixture in thirds, scraping
the bowl down after each addition until fully incorporated.
7. Gently fold in the lemon extract, zest and juice. Stir.

17 18
8. Spoon about 2 tablespoons of batter evenly into each cupcake well.
Bake for 5-8 minutes or until toothpick inserted in center comes out
clean. Remove cupcakes and allow to cool.
For Meringue: Bring a few inches of water to a boil in a saucepan that
can hold a mixer’s bowl above the water. Whisk the egg whites, sugar,
lemon juice and zest, cream of tarter and salt in the bowl by hand. Set
the bowl above the boiling water and continue whisking until the mixture
is hot to the touch and the sugar dissolves, about 1 to 2 minutes. Trans-
fer the mixture to a standing mixer tted with the whisk attachment and
beat at medium-high speed until meringue is cool and holds a soft peak,
about 5 minutes. Add a few drops of desired food coloring and continue
beating until it holds stiff peaks.
To decorate: Using a spoon, offset spatula or piping bag, dollop,
spread or pipe meringue on top of each cupcake. Use the back of
a spoon to create peaks and valleys in the cupcake as desired. Add
lemon twist or zest for garnish.
double ChoColate
CupCakes
2 tablespoons butter, softened
3/4 cup sugar
1 egg
1 egg white
1/2 cup plus 2 tablespoons buttermilk
1/3 cup water
1 tablespoon white vinegar
1 teaspoon Spice Islands® pure vanilla extract
1-1/2 cups all-purpose our
1/4 cup baking cocoa
1 teaspoon baking soda
1/2 teaspoon salt
1/3 cup miniature semisweet chocolate chips
½ cup of chocolate swirls or shavings
1 cup of favorite frosting
1. Preheat The Sweetheart Cupcake Maker until ready light turns on.
2. Brush vegetable oil or cooking spray on cooking surfaces.
3. In a large bowl, cream butter and sugar until light and uffy. Add egg
and egg white, one at a time, beating well after each addition.
4. Beat until light and uffy. Stir in the buttermilk, water, vinegar and vanilla.
5. Combine the our, cocoa, baking soda and salt; add to batter just
until moistened. Stir in chocolate chips.
6. Spoon about 2 tablespoons of batter evenly into each cupcake
well. Bake for 5-8 minutes or until toothpick inserted in center comes
out clean.
7. Remove cupcakes and allow to cool.
8. Top with your favorite frosting and garnish with chocolate shavings.
Indice
Altri manuali Smartplanet Elettrodomestico da cucina

Smartplanet
Smartplanet PQM-1 Guida rapida

Smartplanet
Smartplanet MPM-1K Manuale utente

Smartplanet
Smartplanet MCM-1NQ Manuale utente

Smartplanet
Smartplanet MBM-1 Manuale utente

Smartplanet
Smartplanet PretzelDogsOn-A-Stick Make SPM-3 Manuale utente

Smartplanet
Smartplanet Keebler PPM-1K Manuale utente

Smartplanet
Smartplanet CDM-1 Manuale utente

Smartplanet
Smartplanet Nestle Nesquik NCF-1 Manuale utente

Smartplanet
Smartplanet CDM-2 Specifiche tecniche

Smartplanet
Smartplanet SGCM-2 Manuale utente


