
Caple WI6127 Manuale utente

Instruction manual for slot-in wine cabinet
Model code: Wi6127
Contact Caple on 0844 800 3830 or for spare parts www.4caple.co.uk


Contents
Important safety instructions 3
Installationinstructions 4
Before using your wine cabinet 4
Operating you wine cabinet and setting the temperature 5
Usingtheshelves 6
How to change the door opening 7
Installing the decorative grill 8
Fitting a kitchen plinth 8
Installation dimensions 9
Care and maintenance 10
Troubleshooting guide 11
Caple Service contact details 11
Defrosting/condensation 12
Thehumiditysystem 12
Recommended storage temperatures 12
Recommended drinking temperatures 12

Warnings
zTo prevent damaging the door gasket, make sure the door is fully opened when pulling
shelves out of the rail compartment.
zThe appliance must be positioned so that the plug is accessible. Release the electric cord and
move your cabinet to its final location. Do not move your cabinet while loaded with wine as
you may distort the body.
zThe wine cabinet should be installed in a suitable place in order to avoid touching the
compressor with the hand.
zIf the supply cord is damaged, it must be replaced by a Caple service agent or a similarly
qualified person in order to avoid a hazard.
PLEASE DO NOT TRY TO EXTEND THE ELECTRICAL CABLE IN ANY WAY.
Important Safety Instructions
aWARNINGa
To reduce the risk of fire, electrical shock, or injury when using your appliance, follow these basic
precautions:
zRead all instructions before using the wine cabinet.
zDANGER or WARNING:Risk of child entrapment.
zChild entrapment and suffocation are not problems of the past. Junked or abandoned
appliances are still dangerous . . . even if they will “just sit in the garage a few days”.
zBefore you dispose of your old wine cabinet: Take off the door, leaving the shelves in place so
that children cannot easily climb inside.
zThis product cannot be disposed of with general household waste. It should be taken to a
collection point for the recycling of electrical and electronic goods. For further information
please contact your local council or retailer.
zNever allow children to operate, play with, or crawl inside the appliance.
zNever clean appliance parts with flammable fluids. The fumes can create a fire hazard or
explosion.
zDo not store or use gasoline or any other flammable vapours and liquids in the vicinity of this
or any other appliance. The fumes can create a fire hazard or explosion.
zThe refrigerant of this appliance is R600a, flammable and explosive articles should not be put
in or near the cabinet, to avoid the risk of fire or explosion.
Please keep this instruction manual for future reference
3

Installation instructions
Before using your wine cabinet
•Remove the exterior and interior packing.
•Before connecting the wine cabinet to the power source, let it stand upright for approximately
12 hours. This will reduce the possibility of a malfunction in the cooling system from handling
during transportation.
•Clean the interior surface with lukewarm water using a soft cloth.
•When disposing your appliance, please choose an authorised disposal site.
Installation of your wine cabinet
•Place your wine cabinet on a floor that is strong enough to support it when it is fully loaded.
To level your wine cabinet, adjust the front levelling legs at the bottom of the wine cabinet.
•Locate the wine cabinet away from direct sunlight and sources of heat (stove, heater, radiator,
etc.). Direct sunlight may affect the acrylic coating and heat sources may increase electrical
consumption. Extreme cold ambient temperatures may also cause the unit not to perform
correctly.
•Avoid locating the unit in moist areas.
•Plug the wine cabinet into an exclusive, properly installed-grounded wall outlet. Do not under
any circumstances cut or remove the third (ground) prong from the power cord. Any questions
concerning power and/or grounding should be directed toward a certified electrician or an
authorised Caple Service centre.
Attention
•Store wine in sealed bottles;
•Do not overload the cabinet;
•Do not open the door unless necessary;
•Do not cover shelves with aluminium foil or any other shelf material which may prevent air
circulation;
•Should the wine cabinet be stored without use for long periods it is suggested, after a careful
cleaning, to leave the door ajar to allow air to circulate inside the cabinet in order to avoid
possible formations of condensation, mould or odours.
4

Operating your wine cabinet and setting the temperature
Please use the cabinet within a ambient temperature of 5-32°C, if the ambient temperature is
higher or lower than this, it will cause a temperature fluctuation in the cabinet and may
prevent it reaching 5-18 °C.
Control Panel
z“Light” Button
Switches the interior light ON/OFF
•“Run”
The indicator light illuminates to signify the cooling mode is currently in operation.
z“Power” Button
Turns this appliance turn on/off. (press and hold this buttons for approximately 3 seconds).
z“Set Upper” Button
To set the temperature in the upper compartment: The temperature setting can be adjusted from
5°C to 10°C. When pressing this button, the system will enter the set up mode for the upper
compartment automatically. The LED will flashing and display the set temperature.
Press the button once and the temperature will decrease by 1 degree. When exceeding the
minimum value that can be established, it will jump to the highest adjustable temperature value
automatically. After 5 seconds the LED figure will stop flashing.
z“Set Lower” Button
Used to set the temperature in lower compartment: The temperature setting can be adjusted
from 10C to 18C When pressing this button, the system will enter the set up mode for the upper
compartment automatically. Setting details are the same as above.
z“Upper” Window
Displays the temperature in the upper compartment.
z“Lower” Window
Displays the temperature in the lower compartment.
zAfter the unit is unplugged, the system will return to the factory set temperature. The
temperatures are shown below:
Upper compartment: 6°C
Lower compartment: 12°C
•To view the actual temperature at anytime press and hold the temperature adjustment button (Set
Upper or Set Lower) for approximately 5 seconds, the actual temperature will temporarily flash in
the LED display for 5 Seconds. After this it will revert back to the set temperature.
Flashing LED = Cabinet Temperature
Steady LED = Set Temperature
5
Note
•If the unit is unplugged, power lost, or turned off, you must wait 3 to 5 minutes before restarting
the unit. If you attempt to restart before this time delay, the wine cabinet will not start.
•When you use the wine cabinet for the first time or restart the wine cabinet after having been shut
off for a long time, there could be a few degrees variance between the temperature you select
and the one indicated on the LED readout. This is normal and it is due to the length of the
activation time. Once the Wine cabinet is running for a few hours everything will be back to
normal.
Using the shelves
•To prevent damaging the door gasket, make sure you have the door fully open when pulling
shelves out of the rail compartment.
•For easy access to the storage content, you must pull the shelves approximately 1/3 out of the rail
compartment, however this unit was designed with a notch on each sides of the shelf tracks to
prevent bottles from falling.
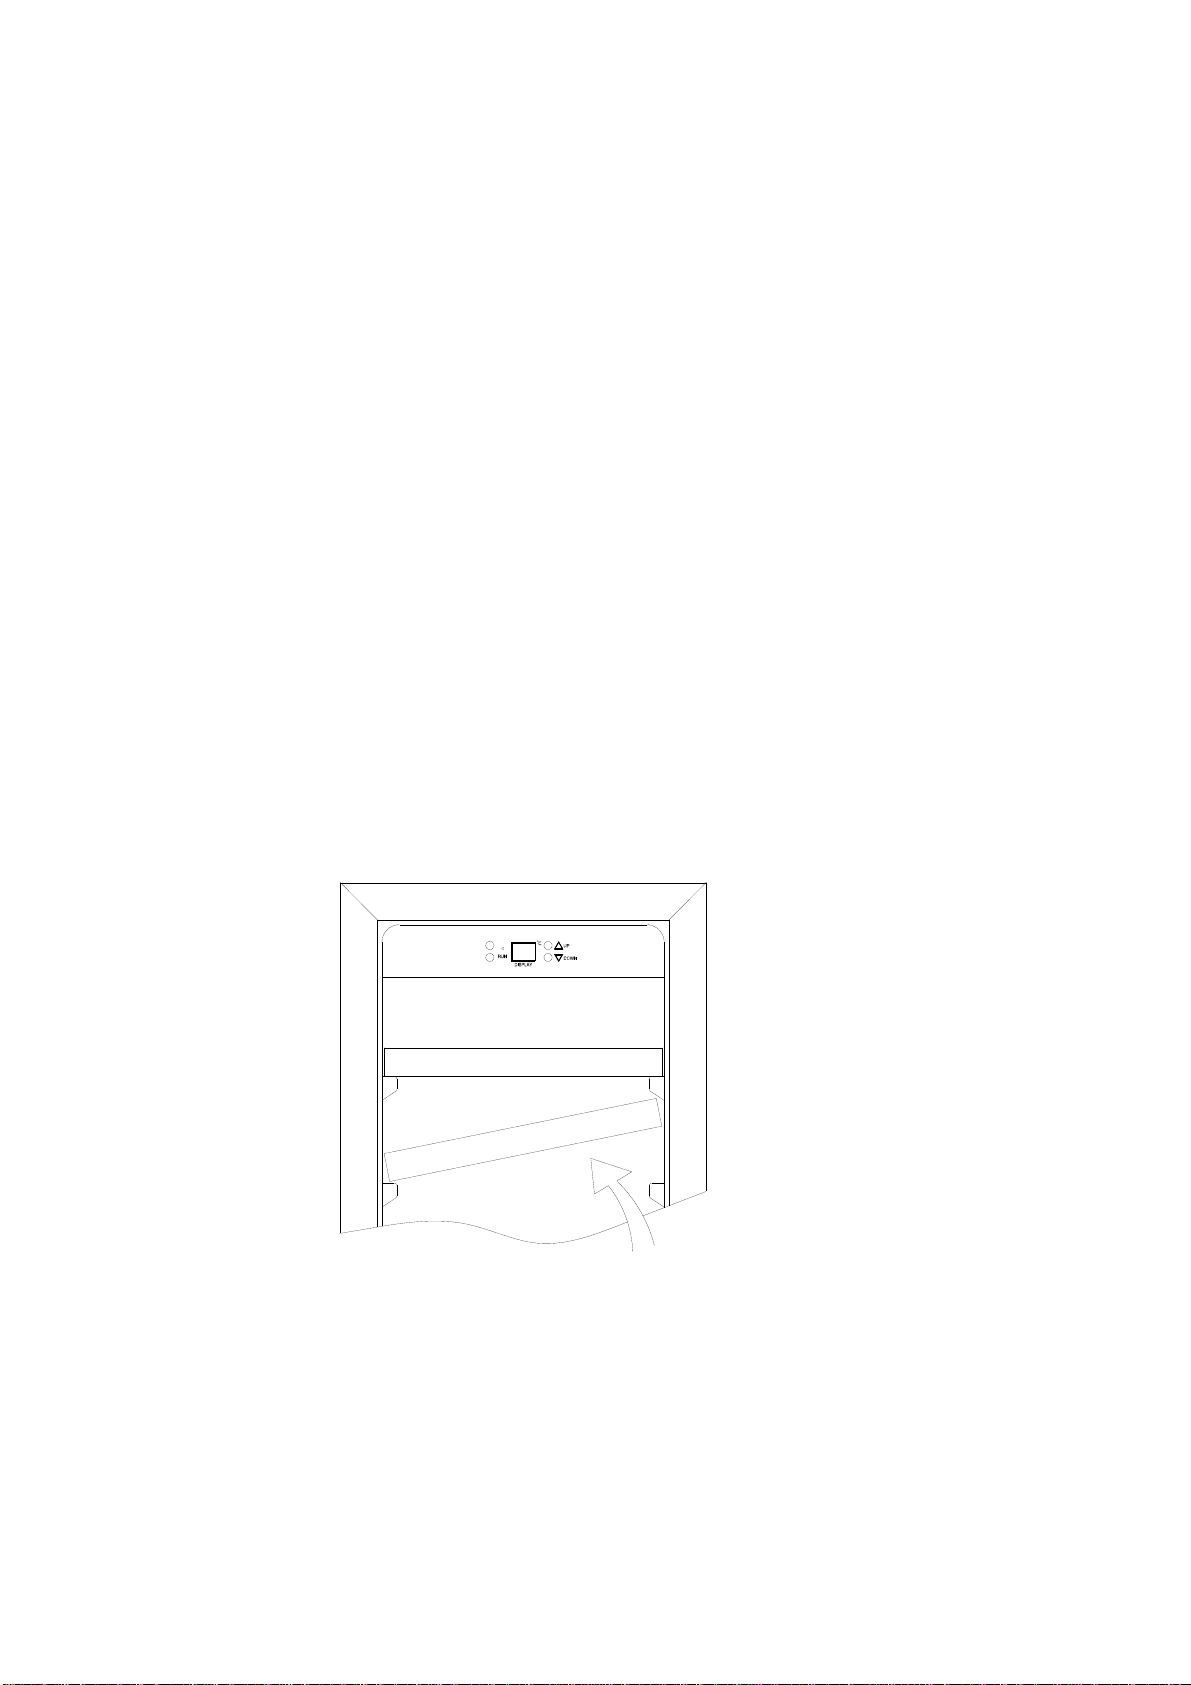
Removing or installing shelves
•When removing any of these shelves from the rail compartment, tilt the shelf as per the diagram
and simply pull out or to reinstall the shelf push it in until it sits on the support brackets securely.
6

How to change the door opening
This appliance has reversible doors but is delivered with a right hinged door. The left hand hinge
kit comes with the unit (in the box), should you wish to reverse the hinge on your unit.
1. Lower hinge (Right) 2.Screws 3 .Door axis
4. Door 5.Top hinge (Right) 6. Hinge Screws
7. Top hinge (Left) 8.Decorative nail 9. Lower hinge (Left)
10. Door limit device 11.Screw 12. Plug
1. Open the door 90 degrees and take out the 2 screws (2) from lower door axis (3), remove the door
(4), then pull out the door and door axis (Fig. A).
2. Store the door (4) safely and take out the plug (12) from top of door frame, unscrew 1 screw (11)
at bottom and remove the Door limit device (10), then install the Door limit device (10) at top of
door frame, please use spare plug (12) to block the hole at top of door frame. (Fig. A/B)
3. Take out the 3 hinge screws (6) from the top hinge (right) (5) and remove it. (Fig. C)
4. Remove the decorative nails (8) from the top left of the cabinet and install the spare top hinge
(Left) (7) at the top left of the cabinet with 3 screws. (Fig. D)
5. Following the above procedure, install the spare lower hinge (left) (9). (Fig. E)
6. Turn the door 180 degrees, install the door the same way it was removed and fix the door once
correctly aligned.
7. Block the hole at top right of the cabinet with the spare decorative nails (8).
7

Installing the decorative grill
Take out the decorative frame and the brackets from the accessories box. Fix the brackets to the
cabinet with the screws provided and fix both sides of the decorative frame to the brackets with the 2
supplied screws as shown in below diagram.
Screw
Screw
Decorative
fram e
The decorative
fram e bracket
Fitting a kitchen plinth
This model is also recessed to fit a kitchen plinth if the above method is not preferred. A H55mm vent
slot is required in the plinth to ensure air is able to ventilate correctly.
See diagram below.
Failure to
include this vent slot will invalidate the guarantee. Alternatively the Caple GRILL/SENSE600 stainless
steel grill can be installed in the plinth.
8

Installation dimensions
9
Altri manuali per WI6127
1
Indice
Altri manuali Caple Elettrodomestico da cucina

Caple
Caple WI3119 Manuale utente

Caple
Caple Wi6228 Manuale utente

Caple
Caple Wi6130 Manuale utente

Caple
Caple WI3118 Manuale utente

Caple
Caple WI6117 Manuale utente

Caple
Caple WI3117 Manuale utente

Caple
Caple WI156 Manuale utente

Caple
Caple C995 Manuale utente

Caple
Caple WI3123GM Manuale utente

Caple
Caple WI3118 Manuale utente

Caple
Caple WI6227 Manuale utente

Caple
Caple VERSE Guida rapida

Caple
Caple WI6118 Manuale utente

Caple
Caple WI3122 Manuale utente

Caple
Caple WC6217 Manuale utente

Caple
Caple W16135 Manuale utente

Caple
Caple WC1800 Manuale utente

Caple
Caple WI6225 Manuale utente

Caple
Caple WC6400 Manuale utente

Caple
Caple WI3124 Manuale utente


