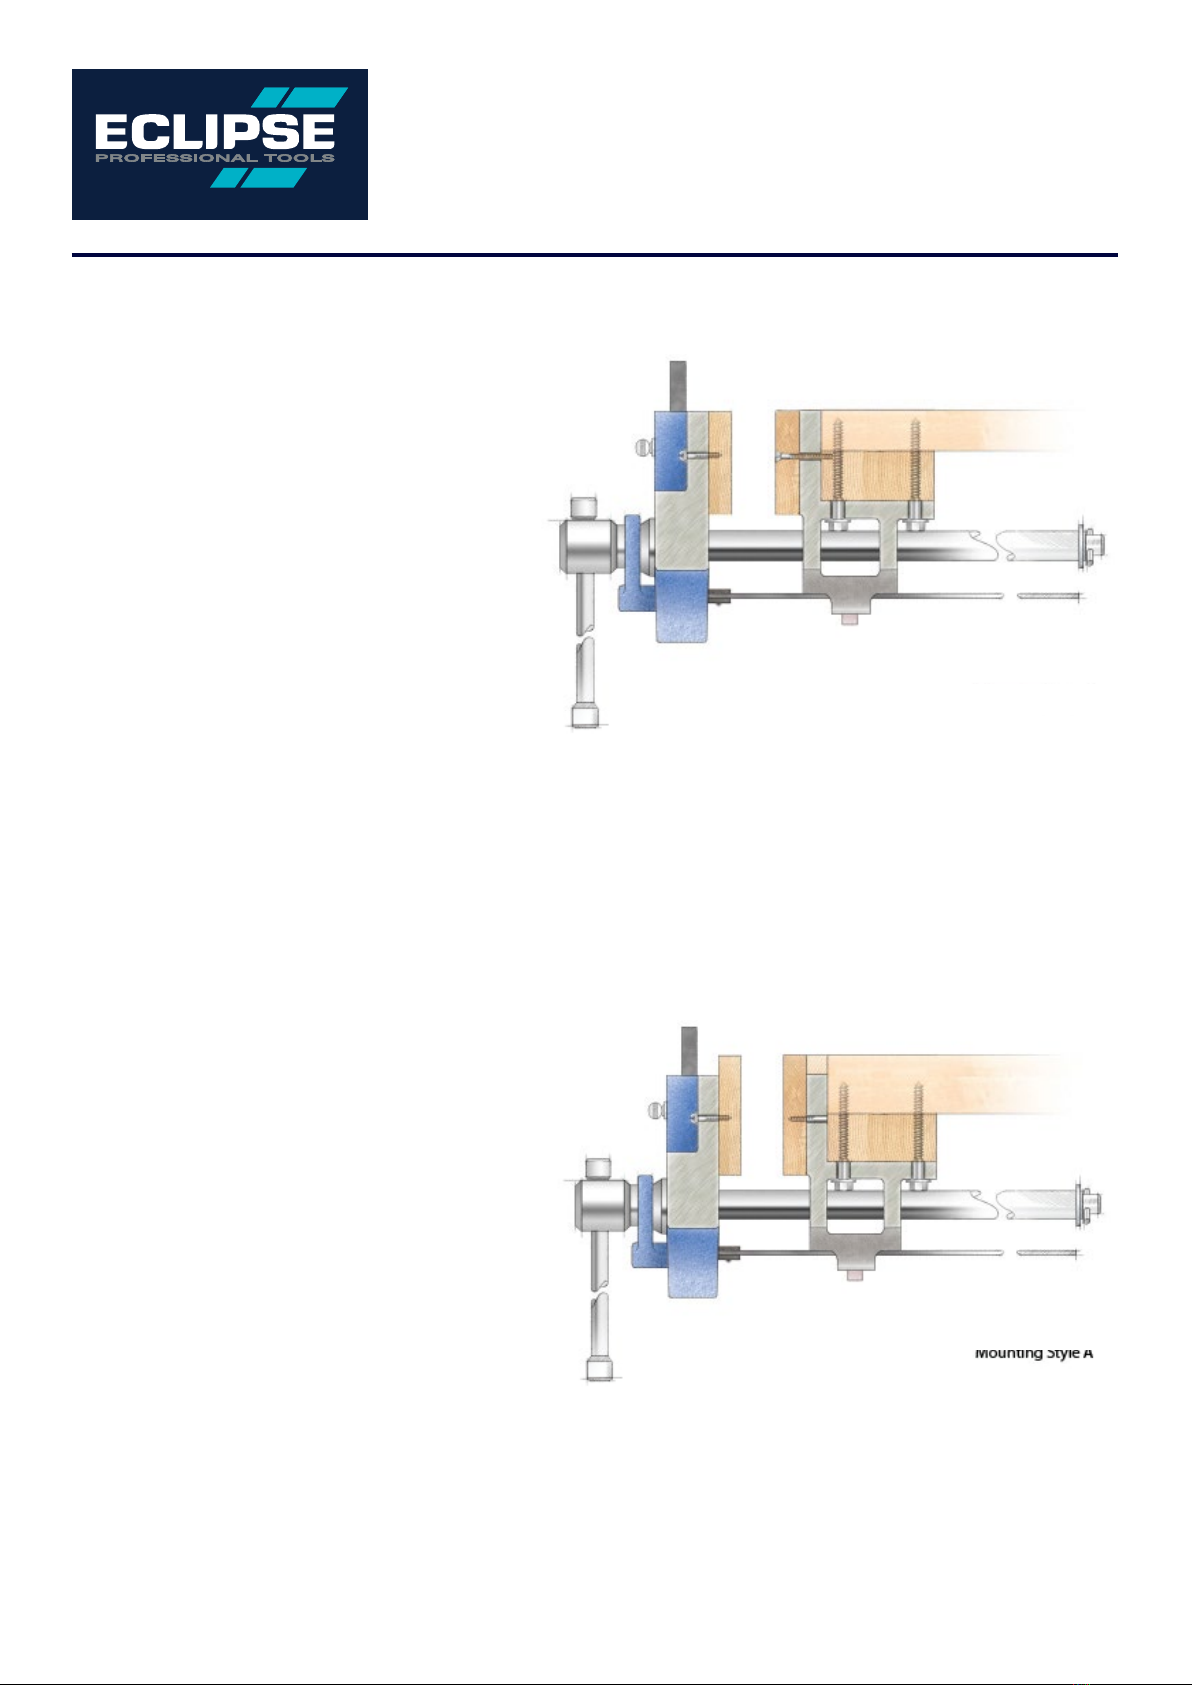
Eclipse EC-EWWQR Manuale utente

EC-EWWQR
Mounting
www.spearandjackson.com.au 1
Woodworking Vice Manual
THE TOOLS TO TRUST

EC-EWWQR
Warnings
2
Thank you for purchasing a Eclipse Quick Released Woodworking Vice!
Below is important information about your vice.
1. ALWAYS make sure bench tops are properly
secured.
2. ALWAYS use proper nuts, bolts and lock washers in
all mounting holes, to hold bench vice down.
3. ALWAYS use vice of proper size and capacity to hold
work object.
4. ALWAYS wear eye, face, and ear protection when
striking or using power tools with a vice.
5. ALWAYS wear restrictive hair covering and anti-slip
footwear while operating vice.
6. ALWAYS inspect vice for stress fatigue or damage to
the vice before using.
7. ALWAYS maintain the vice – grease main screw
regularly.
8. NEVER use a hammer, extension pipe, or cheater bar
on spindle handle of vice.
9. NEVER weld base of vice to any metal object.
10. NEVER use a vice to press an object into or out of
another object.
11. NEVER use and extension pipe to tighten handles of
lockdowns.
12. NEVER place pressurized containers or combustible
materials in vice.
13. NEVER apply extreme heat or prolong heat to the
vice as it may alter structural properties.
!
WARNING

www.spearandjackson.com.au 3
EC-EWWQR
Operating & Mounting
Mounting Style A
1. With the help of another person, hold the vice up
against the workbench in the desired location.
Mark the mounting holes with a pencil.
2. If the workbench is less than 2-3/8” thick,
use a shim, as shown in figure 2, to adjust the
workbench to 2-3/8” thick
3. Use a ¼” drill bit for drilling pilot holes in the work
bench for the Lag Screws
There are several methods for mounting your vice to the work bench.
Figure 1 - Mounting vice to workbench without a Shim Figure 2 - Mounting vice to workbench with a Shim
4. Reinforce the vice to the workbench with the 4 lag screws (5/16” x 1-3/4” Lag screw and 5/16” washer)
5. If you are using a shim make sure that the lag screws go completely through the shim and into the workbench.
6. For extra support, you can use screws to secure the front of the vice to the workbench. The front holes are not
counter-sunk, so you will need to attach a woodfacing so that the screws do not damage your work-piece.
Operating Instructions:
1. To open turn the vice handle counter clockwise. This will move the front jaw away from the stationary jaw.
2. To close turn the vice handle clockwise. This will move the front jaw closer to the stationary jaw
3. To use the quick release feature of this vice, move the lever toward the vice handle. This will disengage the nut
and allow you to quickly open or close the vice.
4. The bench dog can be moved in position by loosening the finger bolt on the front of the vice.

4
EC-EWWQR
Mounting Cont...
Mounting Style B
1. With the help of another person, hold the vice up
against the workbench in the desired location.
Mark the mountings holes with a pencil.
2. If the workbench is less than 2-3/8” thick,
use a shim, as shown in figure 2, to adjust the
workbench to 2-3/8” thick
3. Use a ¼” drill bit for drilling pilot holes in the
work bench for the Lag Screws
4. Mount the vice to the workbench with the 4 lag
screws (5/16” x 1-3/4” Lag screw and 5/16”
Washer)
5. If you are using a shim make sure that the lag screws go completely through the shim and into the workbench.
6. Attach wood jaw facings. For the stationary jaw, wooded jaw facings should be pre-drilled using a 1/8” drill bit.
Counter-sink the drilled hole to allow the woodscrews to fit into the jaw. You want to make sure that the screws
do not stick out past the wooden jaw facing, as this will damage your work piece when clamping with the vice.
Mounting Style C
1. With the help of another person, hold the vice up
against the workbench in the desired location.
Mark the mountings holes with a pencil.
2. If the workbench is less than 2-3/8” thick,
use a shim, as shown in figure 2, to adjust the
workbench to 2-3/8” thick
3. Use a ¼” drill bit for drilling pilot holes in the
work bench for the Lag Screws
4. Mount the wooden jaw to the stationary jaw of
the vice. Shown in the figure to the, the wooden
jaws for this purpose are taller than the vice.
This is for extra clamping capacity.
5. Reinforce the vice to the workbench with the 4 lag screws (5/16” x 1-3/4” Lag screw and 5/16” Washer)
6. If you are using a shim make sure that the lag screws go completely through the shim and into the workbench.

www.spearandjackson.com.au 5
EC-EWWQR
Maintenance
Maintaining your Vice
1. Apply dry graphite or silicon based lubricant to the main screw to keep it operating smoothly and prevents any
sawdust from building up in the threads.
2. If saw dust does build up on the vice threads, use a blade or bit cleaner to remove the built up dust.
1. Flat Coil Spring
2. Nut
3. Back Jaw
4. Front Jaw
5. Guide Rod (2)
6. Main Screw
7. Torsion Bar
8. Back Stop
9. Main Handle
10. Balled End (2)
11. Retaining Rod
12. Pin
13. Finger Bolt
14. Vice Dog
15. Lever
16. Washer
17. Cotter Pin
18. Washer -Wavy
19. Hex Bolt (2)
20. Washer (2)
21. Half Nut
22. Nut Housing
Parts List

EC-EWWQR
Warnings
6
EC-EWWQR MANUAL & SERVICE GUIDE
FIND OUT MORE AT www.spearandjackson.com.au
Follow us on:
CUSTOMER SERVICE CENTRE
Spear & Jackson Australia PTY LTD
PO BOX 4400
Dandenong South, Victoria
Australia 3175
Tel: 1300 731 818
Email: [email protected]
Spear & Jackson New Zealand PTY LTD
18 Barrhead Place
Avondale, Auckland NZ
Tel: 09 828 5049
Fax: 09 828 8729
Email: sales@spear-and-jackson.co.nz
These products are guaranteed against defects in
manufacturing, subject to wear and tear and the
provision of reasonable care and maintenance.
This does not affect your statutory rights.
Indice
Altri manuali Eclipse Utensili


