Mima xari Guida

1
®
user manual & warranty
instrucvo y garana
mode d’emploi et garane
ES
FR
2
Dear parents, grandparents, and friends:
Thank you for choosing xari and making it part of your
family!
Our products are designed and developed with great care
for your own comfort and safety of your child. We hope
you enjoy xari.
Please follow these instrucons carefully before using the
pushchair for the rst me, this will guarantee safe usage
of the product and enable you to nd out about all its
handy features.
mima
INDEX
WHAT YOU GET ........................................................3
PLEASE NOTE ............................................................4
GETTING STARTED ....................................................7
FIRST SETUP
WHEELS
HANDLEBAR HEIGHT
FOLDING AND UNFOLDING
PARKING BRAKE
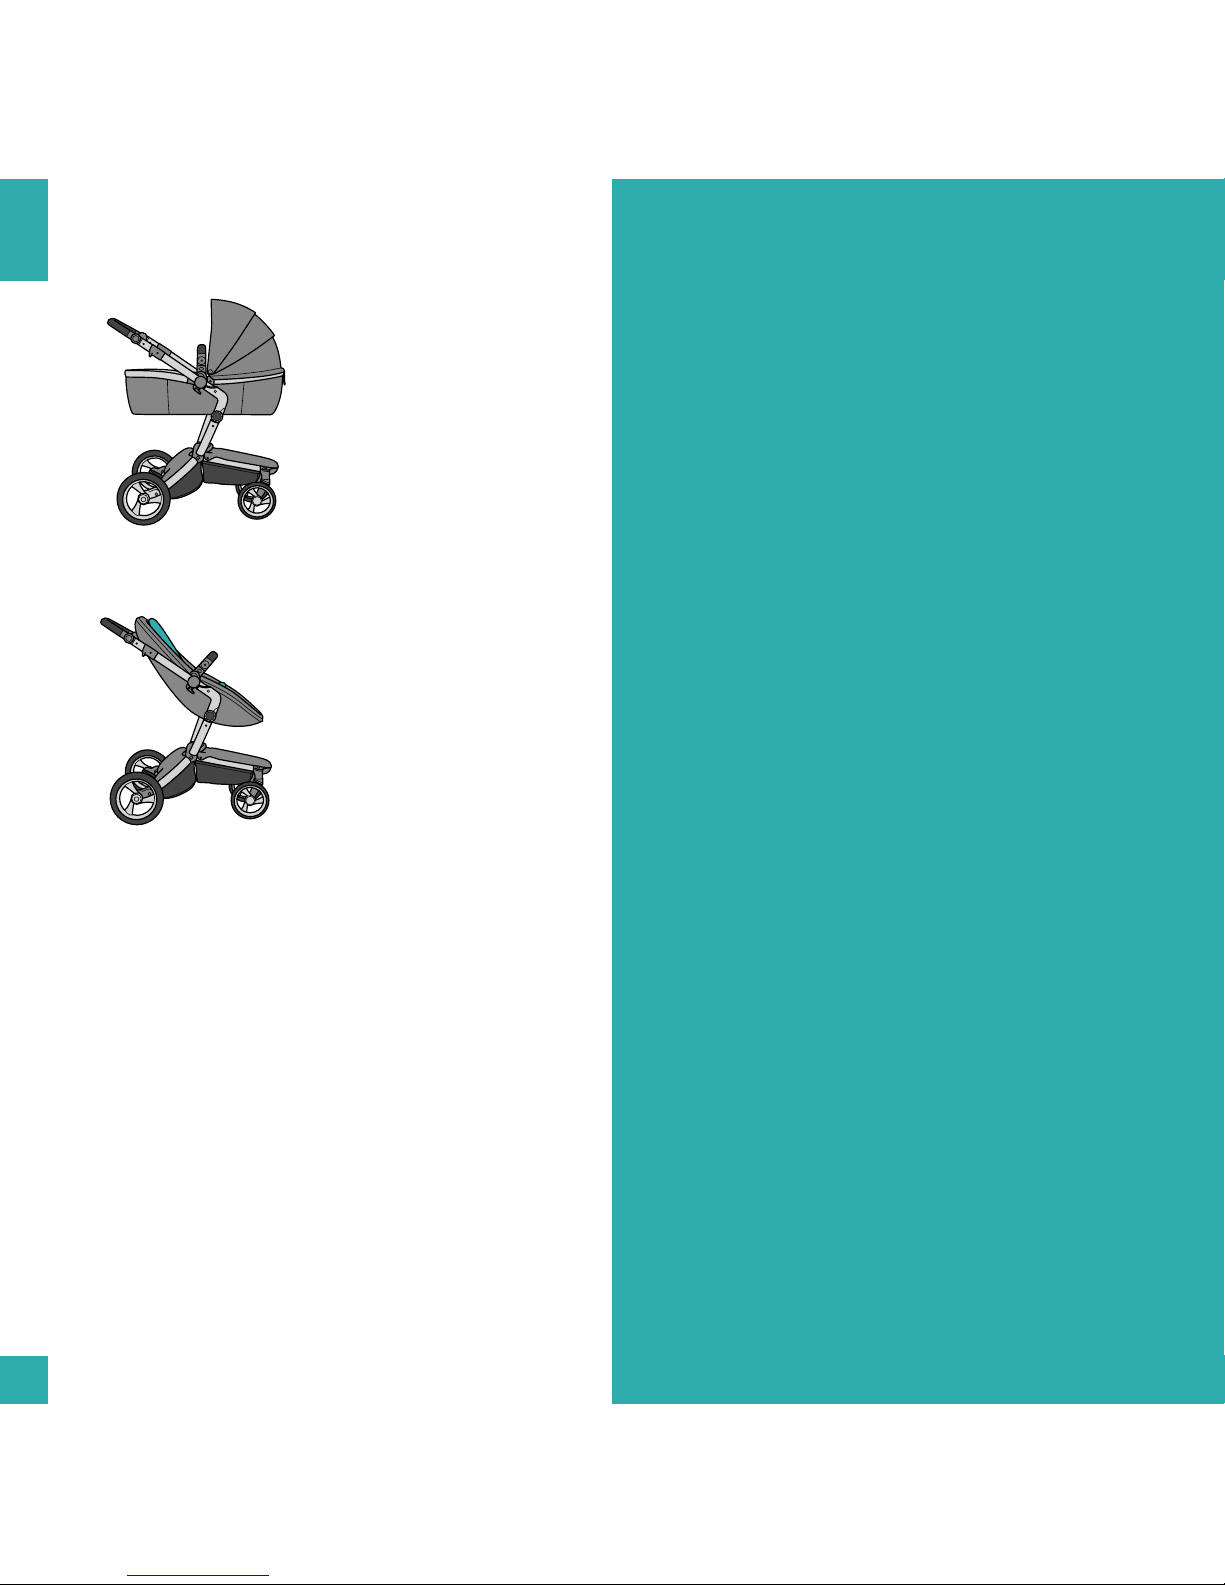
STAGE 1: BABY ..........................................................9
CARRYCOT
STAGE 2: TODDLER .................................................10
SAFETY HARNESS
SEAT
ACCESSORIES ..........................................................12
SAFETY BAR
CANOPY
APRON
RAIN COVER
OTHER ACCESSORIES
CARE AND MAINTENANCE ....................................14
WARRANTY ............................................................15
EN
3
WHAT YOU GET
Please make sure that you have received all the parts that are listed below. If anything is missing, please contact your
retailer.
1 chassis
2 front wheels
2 rear wheels
1 rain cover
Front and rear basket mesh
1 apron ap
1 seat pad with safety harness
1 carrycot maress
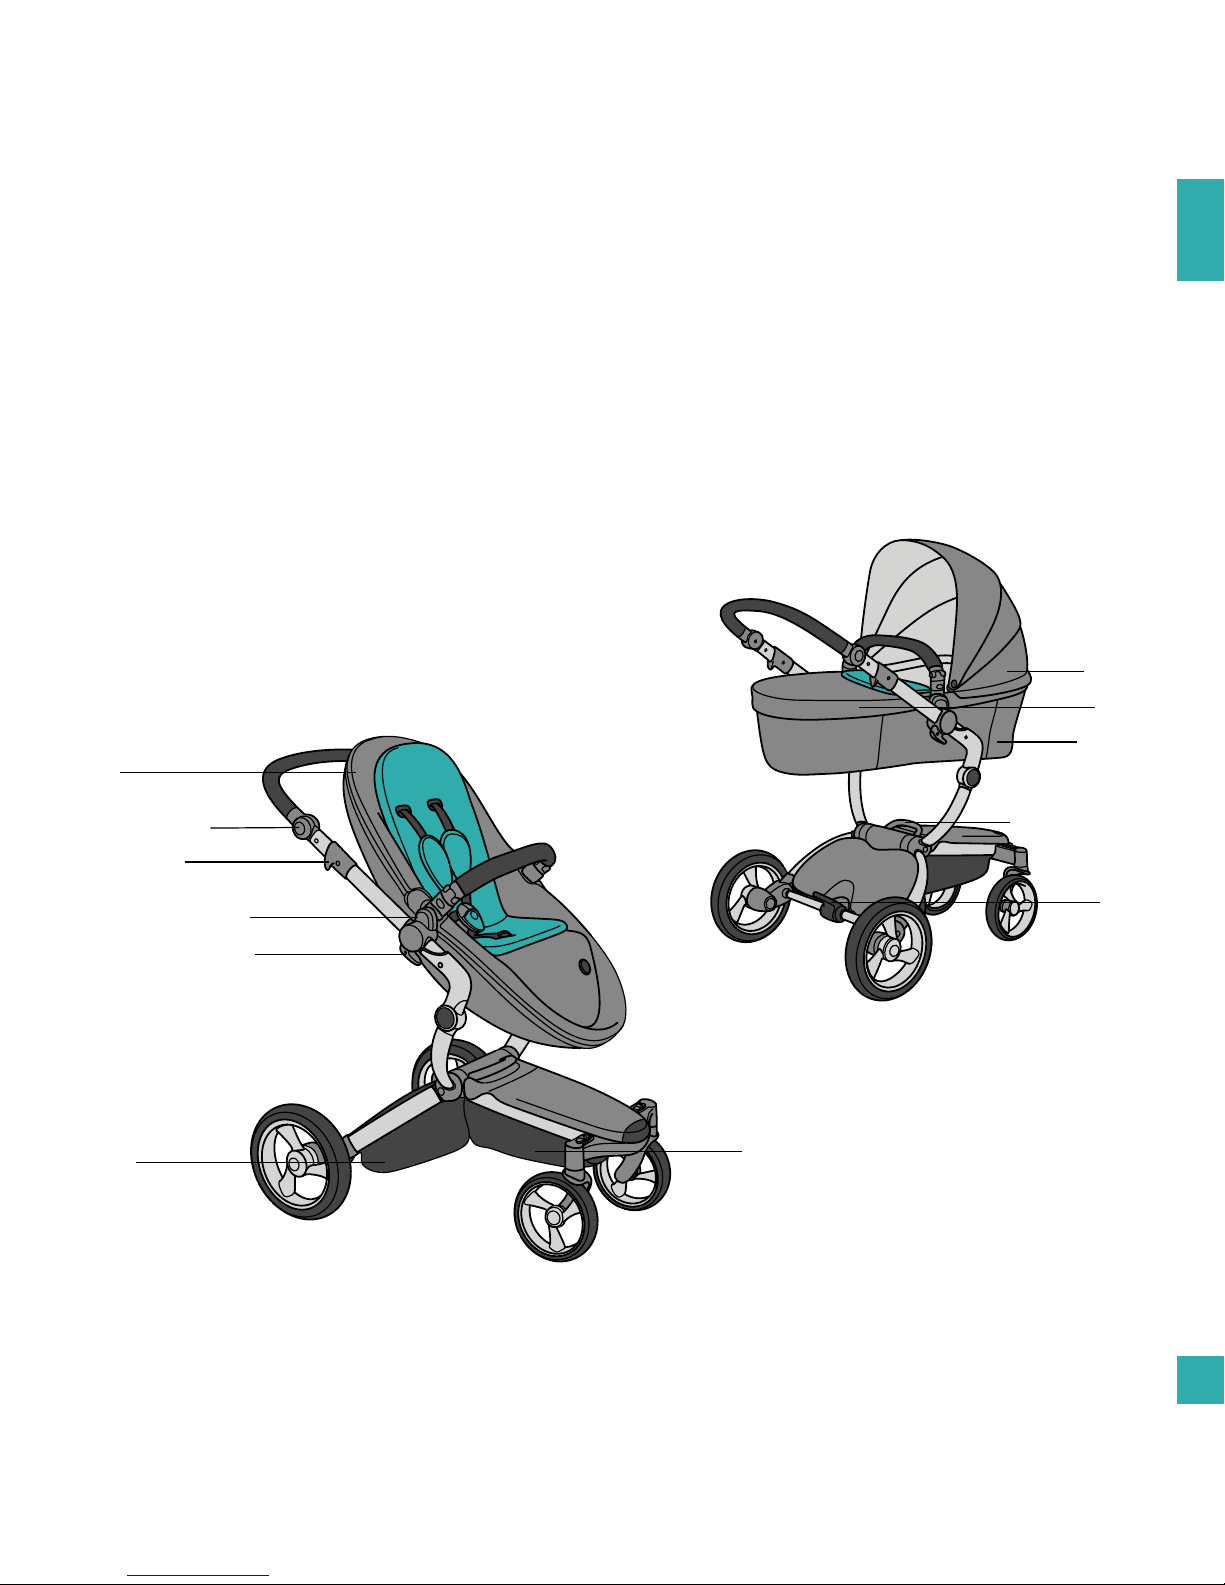
basket
canopy
carrycot
apron
parking
brake
seat release buon
handlebar
height adjuster
folding lock
seat height adjuster
basket
carrying handle
seat
EN
1 seat with carrycot inside
1 canopy
1 carrycot apron
Front and rear basket covers
Handlebar sleeve
1 safety bar

4
PLEASE NOTE
iIMPORTANT!
TO AVOID INJURY OR DEATH:
• Always apply the brakes whenever
the stroller is staonary.
• Retain this manual for future
reference.
• Read all instrucons carefully before
assembly and rst use of this stroller.
Always follow the instrucons. The
correct use and maintenance of this
product is essenal. Failure to follow
these instrucons might void your
product warranty and put your child’s
safety at risk.
• The seat is not suitable for children
under 6 months.
• This stroller is intended for children
from birth and up to 17 kg (37 lbs)
and height 90 cm. When used for
children under the age of 6 months
we recommend to use the supplied
carrycot unl the child can sit
unaided.
• The maximum weight of the child
using this product is not to exceed
17kg (37 lbs) for the stroller or 9kg
(20 lbs) for the carrycot. Excessive
weight may cause a hazardous
unstable condion.
• The maximum weight allowed in each
of the two baskets is 3 kg (6.5 lbs).
•
• iWARNINGS!
• Your child’s safety is your
responsibility.
• It is dangerous to leave your child
unaended in the stroller.
• Ensure that all the locking devices are
engaged before use.
• Do not add an addional maress in
the carrycot, only use the maress
provided by mima.
• As soon as your child can sit in the
seat unaided make sure to always
use the safety harness. Ensure the
harness is ed correctly to prevent
the risk of your child sliding or falling
out.
• Any load aached to the handle
aects the stability of xari and
overloading may increase the risk of it
pping over accidentally.
EN

5
• Always use the crotch strap in
combinaon with the waist belt.
• Never leave the harness buckled
when not ed to a child in the
stroller because the harness can form
loops which may pose a strangulaon
hazard.
• This product is not suitable for
running or skang.
• Do not stand on the crossbars
between the wheels. This is unsafe
and may damage the stroller.
• Check that the carrycot and/or seat
are installed correctly and securely
locked in place before usage.
• Always apply the brake when standing
sll even for only a few moments!
• Always use the wrist tether strap to
prevent the stroller from rolling away.
(For Australia & New Zealand only)
• Check that all safety locks are
engaged before placing a child in the
stroller.
• Make sure children are clear of
any moving parts before making
adjustments or folding/unfolding the
stroller to avoid injury. Ensure that
ngers are kept away from the folding
mechanism when folding the stroller
to avoid injury.
• Do not use the stroller if any parts are
damaged or missing. It may be unsafe
to use replacement parts that or not
supplied by mima, and this may void
your warranty.
• Do not let children play with this
product.
• The carrycot is suitable for a child
who cannot sit up by himself, roll over
and cannot push himself up on its
hands and knees. Maximum weight of
the child: 9 kg (20 lb).
• The upright posions are not suitable
for use with children less than six
months old. When using the stroller
for children under the age of six
months we recommend to use the
supplied carrycot unl the child can
sit unaided.
• Do not carry extra children or
excessive bags on this stroller.
• Never let go of the stroller when
parked on an incline because it may
slide or p over. Always park on a at
surface.
EN

6
• Always remove the child from the
stroller before going up or down stairs
or escalators. Use an elevator when
possible.
• Do not li the stroller by the safety
bar because it may disengage.
• Do not allow children to stand on the
seat.
• Do not hang bags or goods from the
handle as this could cause the stroller
to p over.
• To prevent the risk of the stroller
catching re, do not park it near
an exposed heat source such as a
radiator or an open re.
• Always lock swivel wheels when
on rough surfaces as this will help
eliminate wheel wobble.
• It is unsafe to use accessories other
than those tested and approved by
mima. To ensure safe use, only use
accessories designed for this stroller.
• The stroller is designed for use on at
or gently sloping surfaces and may
be unstable on steeper slopes and
uneven surfaces; and users should be
aware of the possibility of the stroller
pping over in these condions.
• For warnings on accessories - refer to
their individual instrucon manual.
The maximum weight varies for each
accessory.
• When a child is in the carrycot or
seat, the canopy must be aached at
all mes.
• This product will become unstable if a
parcel bag or rack is used when there
is no provision for one.
• Be careful when folding and unfolding
the product to prevent nger
entrapment.
SAFETY WARNING
• The sun is very strong. DO NOT LEAVE
YOUR CHILD EXPOSED TO THE SUN.
The canopy or hood on this product
will not give your child adequate
protecon from the harmful rays of
the sun.
EN
7
GETTING STARTED
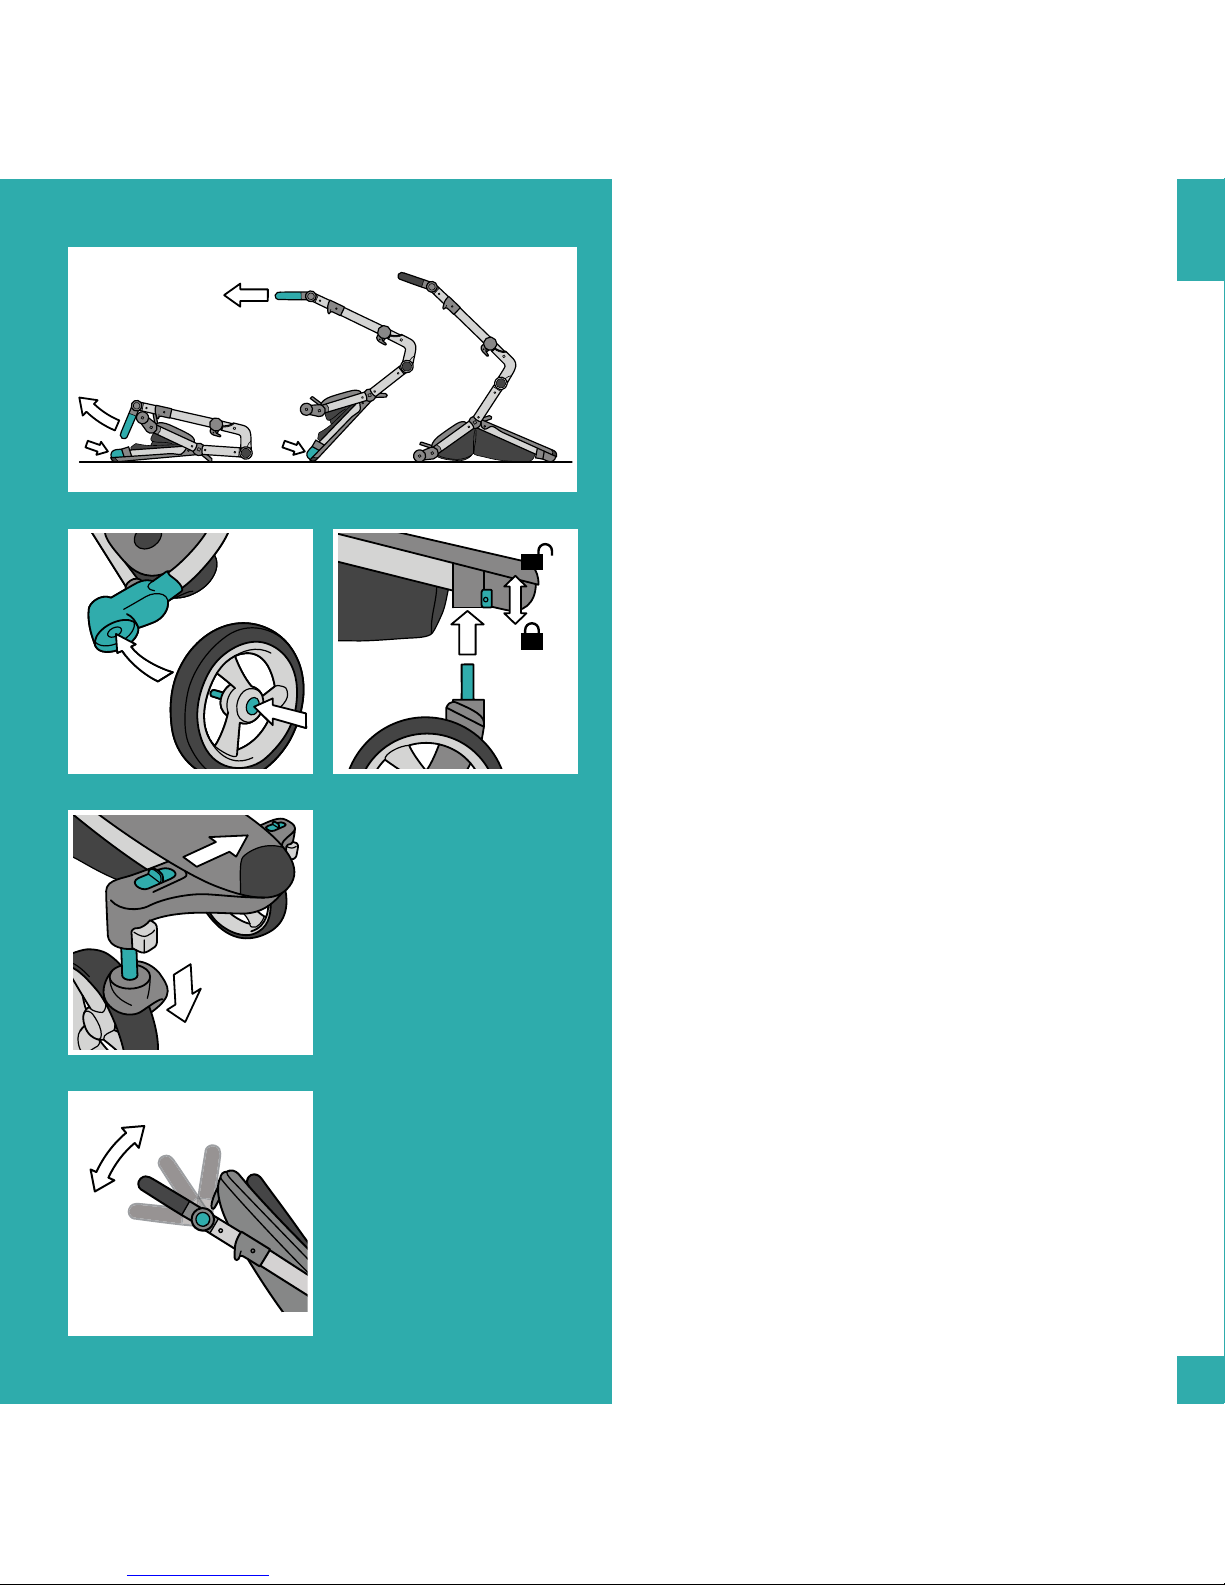
FIRST SETUP
1. Unfold chassis
Pull up the handlebar while holding down the p of the
chassis with your foot. Connue to pull the handlebar
towards you unl the chassis completely unfolds and
stands by itself.
WHEELS
• Please note the L/R indicaon on the chassis and on
each wheel.
2. Aach rear wheels
Press in the wheel axle hub and insert the axle into the
wheel ng. Check if the wheels are properly aached by
aempng to pull them out again.
3. Remove rear wheels
Press in the wheel axle hub and pull the wheel o.
4. Aach front wheels
Insert the wheel rod into the wheel ng and push it in
unl it clicks.
5. Front wheel swivel lock
Use the front wheel swivel lock when you are using xari
on rough terrain.
Push the swivel lock buon down to acvate. Pull it up
again to deacvate it.
6. Remove front wheels
Slide the unlock buon sideways and pull out the front
wheel.
HANDLEBAR HEIGHT
7. Adjust handlebar height
Press and hold both buons located on the outside of
the handlebar and rotate the handlebar to the desired
posion.
R
R
2 + 3 4 + 5
6
1
EN
1
2
3
4
7

8
HANDLEBAR SLEEVE
8. Aach the handlebar sleeve by zipping it over the
handlebar.
FOLDING AND UNFOLDING
• WARNING: A child should not be near to the stroller
when folding or unfolding!
9. Unfolding the chassis
Pull the handlebar upwards unl it clicks into place. The
chassis will subsequently completely unfold and stand by
itself. Rotate the handlebar into the desired posion.
10. Folding the chassis (with seat aached)
• xari can be folded with a seat aached (in its upright
posion and forward facing only)
• xari cannot be folded with the carrycot aached.
Rotate the handlebar into posion 4 (see g. 7)
Push the safety buon down, then pull the 2 folding locks
upwards, then lower the handle bar secon down.
Grab the chassis at the two hinge parts and pull it
upwards so that the front secon fork folds down.
Let the chassis stand and rest onto the front wheels.
To transport the chassis use the carrying handle.
Make sure the storage baskets are empty before folding
the chassis.
PARKING BRAKE
• WARNING: Always apply the brake even when
standing sll for only a few moments!
11. Apply and release parking brake
Press the brake pedal down to park.
Press it down again to release. Do not aempt to push up
the brake pedal with your foot.
9
11
10

9
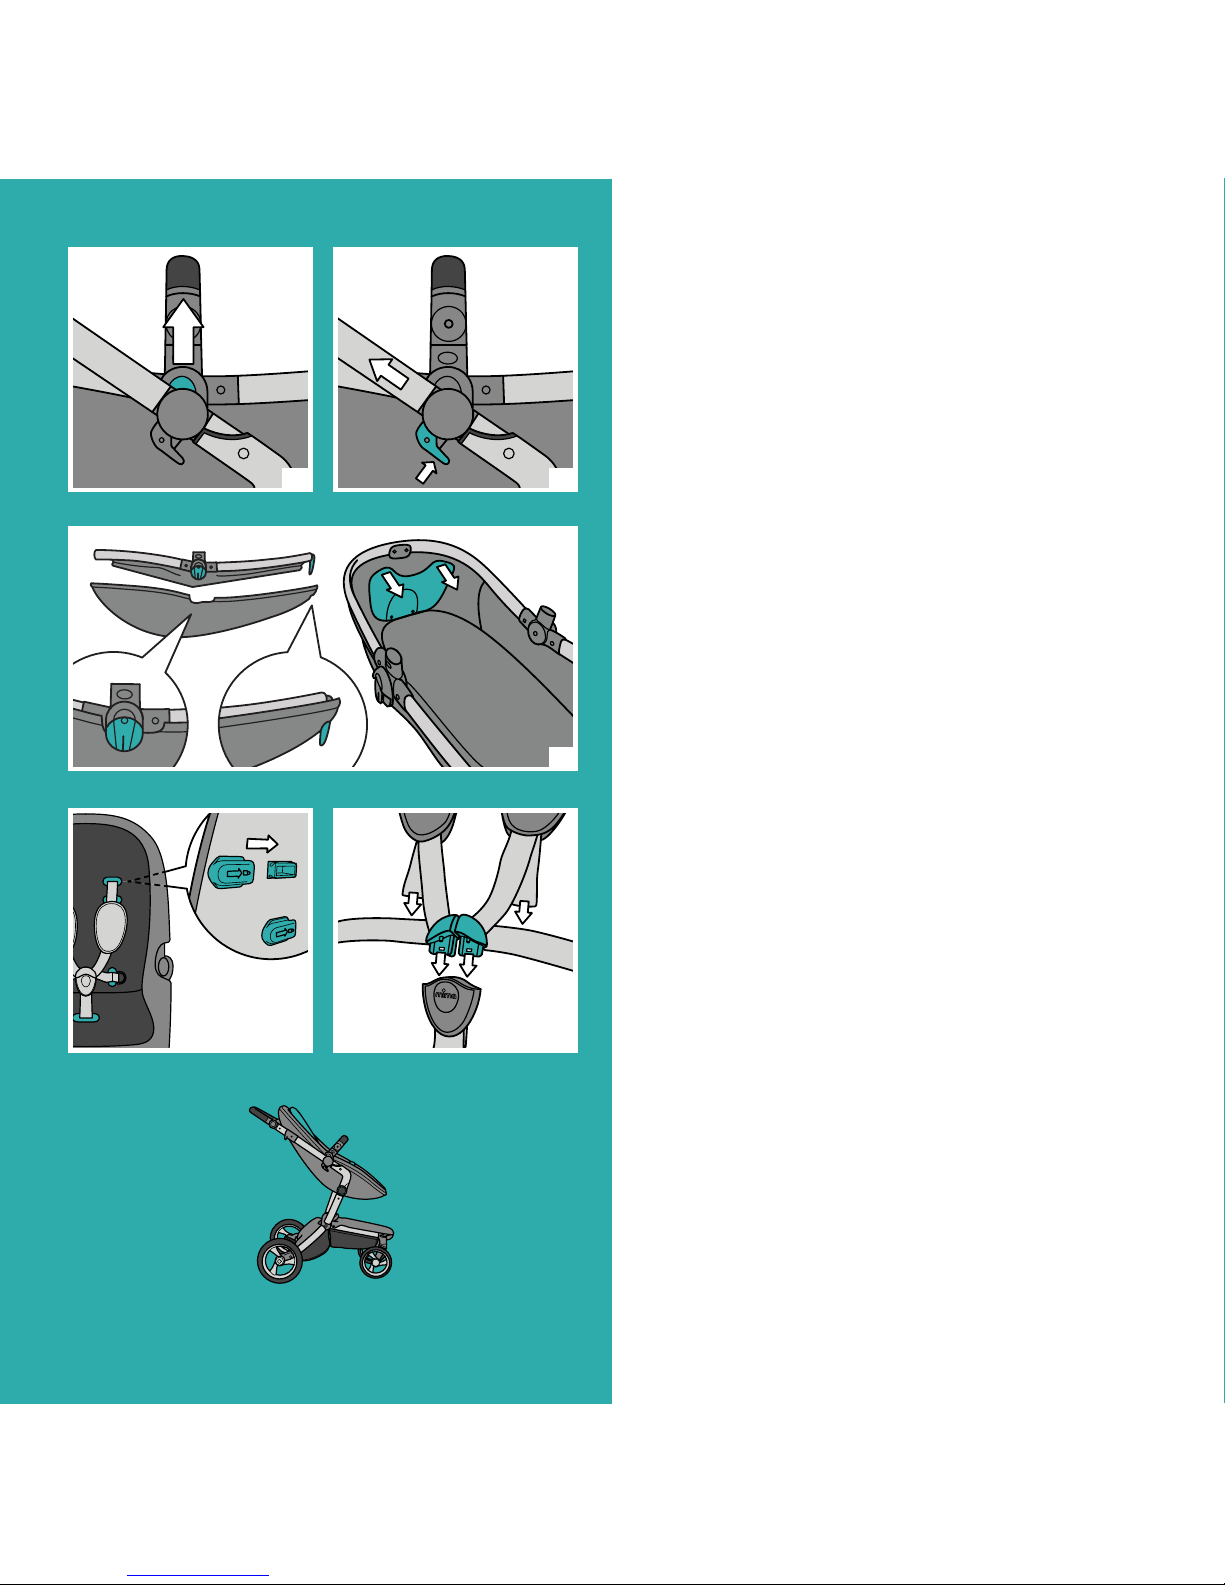
BASKET COVERS
12. Aach front basket cover to chassis
Click the snap buons on both sides of the front basket
cover onto the studs of the chassis.
13. Aach rear basket cover to chassis
Zip the rear basket cover onto the rear basket.
Fix the elasc band on the inside of the rear basket cover
to the basket by using the snap buon.
STAGE 1: BABY
CARRYCOT
• IMPORTANT: Carrycot must only be used in POSITION
III, horizontal posion. The canopy must be ed at all
mes.
• When using xari for children under the age of 6
months, we recommend using the supplied carrycot
unl the child can sit unaided.
14. Set up carrycot
Zip open the seat and take out the carrycot. Push the two
aps underneath the carrycot tube. Place the maress
inside the carrycot and aach the safety bar (see g 27).
15. Adjust carrycot angle
It is easier to t the carrycot onto the chassis if the
aachment brackets are in posion III, poinng straight
downwards. To do this, pull the angle adjustment lever
and rotate the brackets. The carrycot angle can also be
adjusted when ed to the chassis.
16. Aach carrycot
Posion the carrycot so that the angle adjustment lever
is at the front end of the stroller. Lower the carrycot onto
the chassis unl it clicks in place.
8
14
EN
12 13
15 1615
10
17. Remove carrycot
Press the two buons on both sides of the carrycot and
li it o.
18. Adjust height of carrycot
• There are two height posions for the carrycot.
Press the height adjustment buons on both sides of the
chassis and move the carrycot up or down.
19. Collapse carrycot
Remove the maress and the safety bar. Release the
sideaps from the carrycot frame. Open the seat and
posion the collapsed carrycot inside the seat. Align the
angle adjustment lever with the hole in the rear shell of
the seat. Make sure the seat brackets are clear of the
seat.
STAGE 2: TODDLER
SAFETY HARNESS
• Whenever a child is placed in the seat, ensure that the
safety harness is correctly ed.
• The shoulder straps can be set at two dierent height
posions. Choose the posion closest to the top of the
child´s shoulders.
20. Set up harness
Take each harness aachment and slide o the boom
secon. Push the harness aachment through its
corresponding hole in the seatpad and the seat. Zip the
seat open and slide the boom part onto the harness
aachment from the inside of the seat unl it clicks into
place.
21. Buckle up
Push the shoulder strap buckles into the buckle slot unl
it clicks. Pull the loose ends on the shoulder straps to t
the harness snugly around the child.
20 21
19
17 18
Altri manuali per xari
7
Indice
Lingue:
Altri manuali Mima Passeggino


