Minipa MLM-1011 Manuale utente
INSTRUCTIONS MANUAL
ManualdeInstrucciones
ManualdeInstruções
*Onlyillustrativeimage./Imagenmeramenteilustrativa./Imagemmeramenteilustrativa.
DIGITAL LUX METER
Luxímetro Digital
Luxímetro Digital
MLM-1011

1
TABLE OF CONTENTS
1. INTRODUCTION ................................................... 02
2. SAFETYINFORMATION ...................................... 02
3. SPECIFICATIONS................................................. 03
3.1 General Specifications ................................... 03
3.2 Electrical Specifications.................................. 03
4. FRONT PANELDESCRIPTION ............................. 04
5. OPERATION .......................................................... 05
5.1 Control Keys ................................................... 05
5.2 Operation Mode .............................................. 05
6. SPECIALCONSIDERATIONS .............................. 06
6.1 Spectral Sensitivity Characteristics ............... 06
6.2RecommendedIlluminationforSome .............
Environments .................................................. 06
7. ACCESSORIES ..................................................... 07
8. MAINTENANCE .................................................... 08
8.1 Battery Replacement ...................................... 08
8.2Cleaning .......................................................... 08
9. WARRANTY .......................................................... 09
9.1 Warranty Certificate Registration
Procedure ........................................................ 10

2
1.INTRODUCTION
This instrument is a portable digital luxmeter, compact, of
3 ½ digits, easy to use, of high accuracy and fast
response. It provides measurements in lux unit. The
instrument cover the range of 1lux to 100000lux , and
have the functions Data Hold and Automatic Zero.
2. SAFETY INFORMATION
Its is recommended that the user reads the safety
information and operation before using the instrument.
WARNING
••
••
•To prevent electric shock, it does not operate this
instrument when it is humid or wet.
••
••
•To prevent wounds or flames, do not use this product
in explosive atmospheres.
••
••
•Never make measurements with the instrument in the
following cases: if the luxmeter or the sensor present
defects; after storage or preservation of the instrument
in abnormal conditions; or with the instrument opened.
••
••
•Do not dive it in liquids, clean the sensor only using
soft cloth.
••
••
•Cover the sensor when it will not be in use to extend
the life of the silicon photodiode sensor.
The symbol in the instrument indicates that the user
must refer to explanation in the instruction manual.

3
3. SPECIFICATIONS
3.1 General Specifications
••
••
•Display:LCD3 ½ digits with maximum reading of 1999,
indication x10 and x100.
••
••
•Overload:Digit “1” is displayedwhen in 2000 and20000
ranges. OVER is displayed at 100000 range.
••
••
•Low Battery Indication: Symbol is displayed when
the voltage of the battery drop below the operation
level.
••
••
•Data Hold Function: “H” is displayed.
••
••
•Measurement Rate: 2.0 times per second (nominal).
••
••
•Operation Environment: -10°C to 40°C (32°F to 104°F)
with relative humidity < 70%.
••
••
•Storage Environment: -10°C to 50°C (14°F to 140°F)
with relative humidity < 80% (battery removed).
••
••
•Power Supply: One 9V standard battery (NEDA 1604,
IEC6F22).
••
••
•Battery Life: Approx. 200 hours.
••
••
•Dimensions: Instrument: 230(L) x 72(W) x 30(H)mm.
Sensor: 106(L) x 57(W) x 26(H)mm.
Cable Length: Approx. 1.5 m.
••
••
•Weight: 200g including battery.
3.2 Electrical Specifications
••
••
•Ranges: 2000, 20000 (reading x10), 100000 lux
(reading x100).
••
••
•Resolution: 1 lux, 10 lux, 100 lux.
4
••
••
•Accuracy: ± (4%Read.+0.5%f.s.); above 10000 lux
accuracy of ± (5%Read.+10Digits).
Calibrated with standard incandescent lamp of 2856K
color.
••
••
•Repeatability: ± 2.0%.
••
••
•Temperature Coefficient: 0.1% / °C.
••
••
•Photosensor: Silicon Photodiode.
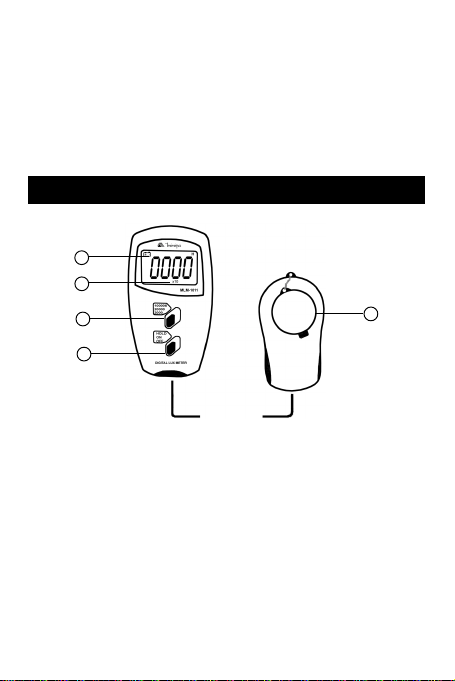
4.FRONT PANELDESCRIPTION
Fig. 1
1. Liquid Crystal Display
2.ON/OFF/HOLD Key
3. RANGE Key: Range Selector
4. Selected Range Indicator
5. Luminosity Sensor with Protective Cover
5
3
2
1
4

5
5.OPERATION
5.1 Control Keys
••
••
•HOLD Function
Set the ON/OFF/HOLD key to HOLD position to enter in
the Data Hold mode. In the Data Hold mode, the indicator
is displayed and the last reading is hold on the display.
5.2 Operation Mode
1. Set the ON/OFF/HOLD key to the ON position to turn
on the instrument.
2. Set the RANGE key to the desired range.
3. Remove the protective cover of photosensor and
place it in horizontal position.
4. Keep a safe distance of the sensor to prevent
shadows over the sensor. The sensor is connected
to the instrument by 1.5m cable that allows the
separation between the user and the place of the
measurement.
5. Read the measured value in the display.Ifthe display
indicate "1" means that the measurement exceeded
the range, and it is necessary to change for a higher
range. In 100000lux range, OVER is indicated as
over range.
6. When finishing the measurements cover the
photosensor to protect it and turn off the instrument
setting the ON/OFF/HOLD key to OFF position.

6
6. SPECIAL CONSIDERATIONS
6.1 Spectral Sensitivity Characteristics
6.2 Recommended Illumination for Some
Environments
••
••
•Office
Room of conferences, writing (200 to 750 Lux)
Work table (700 to 1500 Lux)
Section of typewriting (1000 to 2000 Lux)
••
••
•Manufacturing Plant
Section of packing, entrance (150 to 300 Lux)
Visual work in the production line (400 to 1500 Lux)
Work of inspection (750 to 1500 Lux)
Assembly line of electronic parts (1500 to 3000 Lux)
••
••
•Hotel
Public room, dressing room (100 to 200 Lux)
Reception, cashier (220 to 1000 Lux)

7
••
••
•CommercialStore
Internal corridor/stairs (150 to 200 Lux)
Shop window, packing table (750 to 1500 Lux)
Front of the shop window (1500 to 3000 Lux)
••
••
•Hospital
Sickroom, warehouse (100 to 200 Lux)
Medical examination room (300 to 750 Lux)
Operationroom and emergency treatment (750to1500
Lux)
••
••
•School
Auditorium, indoor gymnasium (100 to 300 Lux)
Classroom (200 to 750 Lux)
Library and laboratory (500 to 1500 Lux)
7.ACCESSORIES
Check the following items carefully to see any missing
or damaged part:
••
••
•Instructions Manual
••
••
•9V Battery (installed)
••
••
•Transport Bag

8
8. MAINTENANCE
8.1 Battery Replacement
This instrument is supplied with 9V (NEDA 1604, IEC
6F22). The symbol appears in LCD display when
replacement is necessary. To change it, remove the two
screws of the back side of the instrument and remove
the cover of the battery compartment. Remove the bat-
tery of the contacts and replace it with a new one.
8.2 Cleaning
Periodically wipe the housing with a damp soft cloth and
mild detergent, do not use abrasives or solvents.

9
9.WARRANTY
This instrument was carefully calibrated and inspected. If any
failure occurs under normal use, this product will be repaired
according to warranty conditions and limitations.
WARRANTY
SERIAL Nº MODEL MLM-1011
1- The warranty period is 12 (twelve) months and begins on
the date of purchase.
2- It will be repaired free of charge in the following cases:
A) Manufacturingdefectsordamagesoccurredundernormal
use of instrument within the warranty period.
B)The services to correct the failure will be done only in
authorizedservicecenter or personal willbe allowed to fixthis
product.
C)IfproductispurchasedthroughaMinipa’sauthorizeddealer.
3- Warranty will be void in case:
A) It has been misused, altered, neglected or damaged by
accident or abnormal conditions of operation or handling.
B)Theinstrumentshowsviolationsbyanonauthorizedrepair
center.
4- This warranty does not apply to fuses, dry cells, batteries and
accessories as test leads, carrying case, thermo couple,
etc.
5- For instrument with software, Minipa assumes responsibility
that the software will operate in accordance with its functional
specifications for 90 days. Minipa will not guarantee that the
software will be error free or operate without interruption.
6- Minipaassumesnoriskfordamageintransitortransportation
costs.
7- Warranty will be valid only after the registration of this
certificate.
Name:
Address: City:
State: Phone:
Sales Voucher N°: Date:
Serial N°:
Sales Agent Name:
Indice
Lingue:
Altri manuali Minipa Strumento di misura

Minipa
Minipa MFA-840 Manuale utente

Minipa
Minipa MDT-2238A Manuale utente

Minipa
Minipa MDT-2245B Manuale utente

Minipa
Minipa MC-153 Manuale utente

Minipa
Minipa MX-1050 Manuale utente

Minipa
Minipa MWD-14A Manuale utente

Minipa
Minipa ET-3702 Manuale utente

Minipa
Minipa MC-154 Manuale utente

Minipa
Minipa MTR-1522 Manuale utente


