
Minipa MWD-14A Manuale utente
INSTRUCTIONS MANUAL
Manual de Instrucciones
Manual de Instruções
*Onlyillustrativeimage./Imagenmeramenteilustrativa./
Imagemmeramenteilustrativa.
WOOD MOISTURE METER
Medidor de Humedad de Madera
Medidor de Umidade de Madeira
MWD-14A

1
CONTENT
1. INTRODUCTION......................................................... 02
2. SAFETY INFORMATION ........................................... 02
3. SPECIFICATIONS ...................................................... 04
3.1 General Specifications ......................................04
4. FRONT PANEL DESCIPTION.................................... 05
5. OPERATION .............................................................. 06
5.1 Making Measurement .....................................06
6. MAINTENANCE ......................................................... 07
6.1 Cleaning ............................................................. 07
7. ACCESSORIES......................................................... 07
8. WARRANTY ............................................................... 08
8.1 Warranty Certificate Registration Procedures ..09

2
1.INTRODUCTION
Thank you for purchasing our Wood Humidity Meter
MWD-14A. Please, read this manual to familiarize with
the instrument and use it well, also to maintain it in
perfect operation conditions.
It is a robust instrument, with large digital display, of
easy visualization, with data hold and low battery
indication. The instrument can be used for the
measurement of humidity in wood, bamboo, cotton,
tobacco, and many others.
2. SAFETY INFORMATION
This instruction manual contains warnings and safety
rules that must be observed by the user to ensure safe
operation of the instrument and maintain it in safe
condition. Therefore, read these operating instructions
thoroughly and completely before using the instrument.
WARNING
1. Never make measurements in objects that may be
powered. The instrument can not work properly, and
be damaged, exposing the user to shock risks.

3
2. The instrument must be used by trained and qualified
personal according to the instructions of this manual.
Minipa does not make responsible for damages
caused by operation error or no conformity with the
safety instructions and procedures. It is essential to
read and understand the safety rules and the
instructions of this instruction manual, and they must
be observed when using the instrument.
CAUTION
1. Never open the instrument when making
measurements.
2. If the instrument is in the following conditions, do not
attempt to make measurements and send the
instrument to be checked or repaired:
•The instrument is apparently broken in visual check.
•Sensors are damaged.
•The instrument can not be operated for intended
measurements.
•The instrument has been stored for a long period of
time under improper conditions.
•The instrument receives stress by severe
transportation.

4
3. SPECIFICATIONS
3.1 General Specifications
•Display: LCD.
•Low Battery Indicator: .
•Operation Range: 5% ~ 40%.
•Resolution: 1%.
•Accuracy: ±1%.
•Data Hold.
•Operation Environment: 0°C ~ 40°C (32°F ~ 104°F);
RH < 70%.
•Power: 1x 9V battery.
•Dimensions: 129(H) x 63(W) x 32(D) mm.
•Weight: Approx. 116g (including battery).
5
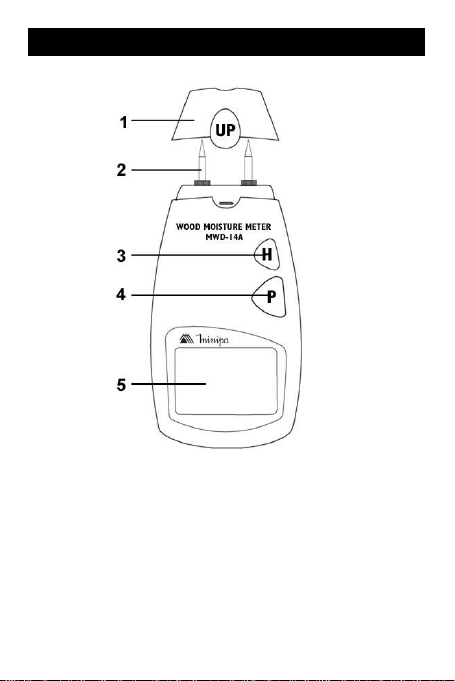
4.FRONT PANELDESCRIPTION
Front Panel View
1Sensor Protective Cover.
2Humidity Sensor.
3Data Hold Button.
4On / Off Button.
5LCD display.

6
5.OPERATION
5.1 Making Measurement
Before making any measurement, read the “SAFETY
INFORMATION” section with attention and remember
of all warnings. Always check the instrument regarding
damages, contamination (excessive dust, grease, ...)
and defects. In the case of any abnormal condition is
detected, do not take any type of measurement.
1. Press POWER button to turn on power, then display
will show 1% or 2%.
2. Remove the protective cover of sensor and press the
pins of two sides with fingers. The instrument is work
normally and can measure objects if the display value
is approx. 30%.
3. Insert the pins into the object approx. 5mm.
4. Press HOLD button to hold current reading. The His
displayed. Press HOLD again to cancel hold function.
5. After measuring, press POWER button to turn off the
instrument, and cover the sensor pins.
NOTES:
1. The pins are very sharp. Don’t let children play with
instrument.

7
2. Don’t point pins to others persons when using it.
3. The instrument has high resistance and well
insulated. Keep it dry and clean when store and using
it, so as to insure the accuracy of measurement.
4. As the battery power is not sufficient, LCD will display
. The replacement with one new battery is
required.
5. Remove the battery if you don’t use it for a long time.
6. Don’t apply excessive force when pressing the sensor
against the paper to avoid damaging the instrument.
6. MAINTENANCE
6.1 Cleaning
Periodically wipe the external case with a damp cloth
and mild detergent. Do not use abrasives or solvents.
7.ACCESSORIES
After receive your instrument, please, check the
presence of the following accessories:
•Instruction Manual
•Humidity Meter with Sensor Protective Cover
•Soft Carrying Pouch

8
8.WARRANTY
This instrument was carefully calibrated and inspected. If any
failure occurs under normal use, this product will be repaired
according to warranty conditions and limitations.
WARRANTY
SERIAL Nº MODEL MWD-14A
1-The warranty period is 12 (twelve) months and begins on the date
of purchase.
2-It will be repaired free of charge in following cases:
A) Manufacturingdefectsordamagesoccurredundernormaluseof
instrument within the warranty period.
BTheservicestocorrectthefailurewillbedoneonlyinauthorized
service center or personal will be allowed to fix this product.
C)If product is purchased through a Minipa’s authorized dealer.
3-Warranty will be void in case:
A) Ithasbeenmisused,altered,neglectedordamagedbyaccident
orabnormalconditionsofoperationor handling.
B)Theinstrumentshowsviolationsbyanonauthorizedrepaircenter.
4-This warranty does not apply to fuses, dry cells, batteries and
accessories as test leads, carrying case, thermo couple, etc.
5-Forinstrumentwithsoftware,Minipaassumesresponsibilitythatthe
softwarewilloperateinaccordancewithitsfunctionalspecifications
for 90 days.Minipa will not guarantee that the software will be error
free or operate without interruption.
6-Minipaassumesnoriskfordamageintransitortransportationcosts.
7-Warranty will be valid only after the registration of this
certificate.
Name:
Address: City:
State: Phone:
Sales Voucher N°: Date:
SerialN°:
SalesAgentName:

9
8.1 Warranty Certificate Registration Procedures
The registration can be made by following ways:
- Mail: Send a copy of warranty certificate correctly filled to
the following address.
Minipa Indústria e Comércio Ltda.
Att: Serviço de Atendimento ao Cliente
Alameda dos Tupinás, 33 - Planalto Paulista
CEP: 04069-000 - São Paulo - SP
- Fax: Send a copy of warranty certificate correctly filled by
fax number 0xx11-5071-2679.
-e-mail: Scanning this formand attach to your e-mail. Please
sendto [email protected].
- Site: Register the warranty certificate by http://
www.minipa.com.br/sac.
IMPORTANT
Thewarrantyconditions and limitations will bevalidonly to the
certificates correctly registered. In case the purchaser did
not register, a sales receipt showing the date of purchase will
berequired.
Manual specifications subject to change without notice.
Revision: 00
Date of Issue: 10/03/2009
Indice
Lingue:
Altri manuali Minipa Strumento di misura

Minipa
Minipa MC-153 Manuale utente

Minipa
Minipa MDT-2238A Manuale utente

Minipa
Minipa MFA-840 Manuale utente

Minipa
Minipa MX-1050 Manuale utente

Minipa
Minipa ET-3702 Manuale utente

Minipa
Minipa MC-154 Manuale utente

Minipa
Minipa MTR-1522 Manuale utente

Minipa
Minipa MLM-1011 Manuale utente

Minipa
Minipa MDT-2245B Manuale utente


